The Window menu is where you can access any of the main MotionBuilder windows.
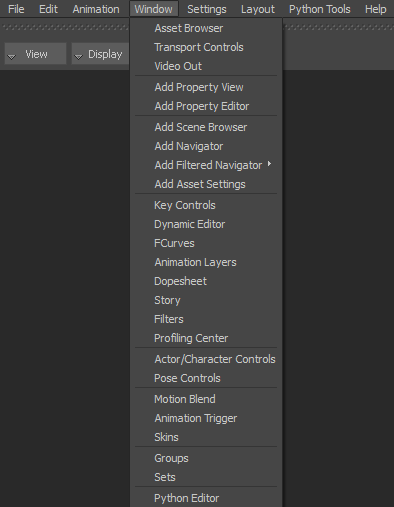
Window menu options
Displays the Asset browser that lets you drag assets into your MotionBuilder scene. See Asset browser.
Displays the Transport Controls window that lets you jog, shuttle, and play the current take. The Transport Controls window also lets you manipulate keyframes, take length, and adjust timing options. See Transport Controls.
Displays the Video Out window that enables you to invoke a non-interactive copy of the Video Out window.
Displays a Properties window that lets you change the values of the settings and properties of a selected asset. You can also animate the properties of an asset using the Properties window.
You can have multiple Properties windows open simultaneously. By adding multiple Properties windows, you can view and lock more than one property of an asset at the same time. See Properties window.
Displays the Property Editor window that lets you choose the properties you want to have in a (custom) keying group. You can also access this window by clicking Customize in the Asset browser > Properties window.
With the Property Editor you can choose the objects whose properties you want to copy to a keying group, edit the property values, add new properties, and change the relationship between the selected object(s) or effector(s) properties.
Adds a Scene browser. By default, the Scene browser is an integral part of the Navigator window. However, MotionBuilder lets you add additional Scene browsers for specific uses.
For example, if you have a large scene with many assets, constantly scrolling through the assets in your scene can be tedious. Select Add Scene Browser to add a second Scene browser window to your scene and showing another part of the hierarchy of a scene. See Scene browser.
Adds a Navigator window that lets you select and view the settings of all assets in your MotionBuilder scene.
Each Navigator window consists of a Scene browser and Asset Settings pane, which shows the settings and properties of a selected asset. See Navigator window.
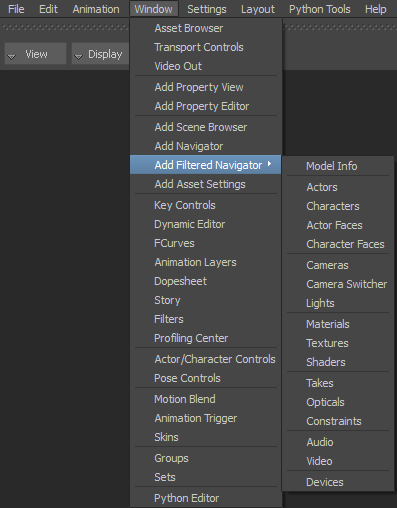
Adds a Navigator window showing all assets matching the filtered asset selected from the additional submenu.
For example, if you select Add Filtered Navigator > Characters, a Navigator window is added that shows only the Character assets in your scene. As with all Navigator windows, the filtered Navigator window consists of a Scene browser and Asset Settings pane.
Adds an Asset Settings window that lets you view the settings of the selected assets in your MotionBuilder scene. See Asset Settings.
Displays the Key Controls window that lets you create, edit, and step through keyframes associated with the selected object, asset, or property. See Setting keyframes.
Displays the Dynamic Editor that lets you modify the interpolation of animation for a selected object, a character effector, properties, and so on. You can modify the interpolation of multiple keyframes at the same time, keyframes at the current time, or an entire keyframe region. See Dynamic Editor.
Displays the FCurves window that lets you modify your animation by adjusting its individual keyframes and their interpolation, extrapolation, and tangents. You can also animate using timewarp curves. See Function curves.
Displays the Animation Layer editor that lets you create, blend, and organize multiple layers of animation. See Animating on Layers.
Displays the Dopesheet window that lets you review and edit your animation. See Dopesheet window.
Displays the Story window that lets you build animation and storyboards using various types of clips. See Animating with the Story window.
Displays the Filters window, letting you filter animation data. In order to filter animation data, you must first select a range of keyframes to filter. See Filtering.
Displays the Profiling Center window that lets you to monitor scene performance. See Profiling Center window.
Displays the Actor Controls window or Character Controls window. The window that opens depends on whether an Actor, Character, or a Control rig is selected. See Character Controls.
Displays the Pose Controls window that works in conjunction with the Control rig and object poses of a character. Use the Pose Controls to create a library of character poses, configurations and object poses. You can retarget configurations onto any character or object. You can choose to paste selected objects, body parts (such as finger positions) or entire character positions and complex object poses. See Pose Controls window.
Displays the Motion Blending window, letting you blend takes to create takes. See Motion Blend window.
Displays the Animation Trigger window that lets you set up motion clips and trigger them using your keyboard and joysticks. See Animation Trigger window.
Displays the Skins window that lets you adjust the weight of vertices relative to one or several bones. See Skins window.
Displays the Groups window, letting you organize a selection of assets into a group. You can create Groups that include models, elements, sensors, lights, materials, shaders, markers, nodes, textures, constraints, and even other groups.
Groups are used for the selection and organization of items in a scene. See Groups.
Displays the Sets window, letting you organize a selection of assets into a set. Sets are similar to groups as they both can include models, elements, sensors, lights, materials, shaders, markers, nodes, textures, constraints, and so on.
The main difference is that unlike groups, sets are exclusive. This means that while the same asset can appear in many groups, it can only occur once in a set. You cannot copy an asset or object from a set, you can only move it from one set to another.
In addition, the visibility of sets can be animated, and the animation stored in sets can be cached. See Sets.
The Python Editor window lets you execute individual lines of script, global scripts, and configure MotionBuilder to receive scripts remotely. See Python Editor.
 Except where otherwise noted, this work is licensed under a Creative Commons Attribution-NonCommercial-ShareAlike 3.0 Unported License


