The ToolClips.xml file is stored in the following locations:
ToolClips can contain two levels of data. This topic breaks the file down into the following parts:
The main body of the XML file is defined by a single <toolclips> element.
The following table describes the attributes of the <toolclips> element.
| Attribute | Description |
|---|---|
| <ui> |
Specifies the location of the QML description. This file describes the layout of the default ToolClip window. By default, the ToolClipUI.qml file is located in the builtin.toolclips\ui directory. |
| <simple> |
Specifies the location of the simplified QML UI description. This file describes the way ToolClips appear when Display tool name and shortcut only is enabled in the Help preferences. By default, the SimpleTooltip.qml file is located in the builtin.toolclips\ui directory. |
| <locale> |
Specifies the language locale of ToolClips included in the ToolClips.xml file. The default attribute value is en_US (English). |
xml version="1.0" encoding="utf-8"
<toolclips ui="ui/ToolClipUI.qml" simple="ui/SimpleTooltip.qml" locale="en_US”>
... </toolclips>
All ToolClips contain a level 1 window.
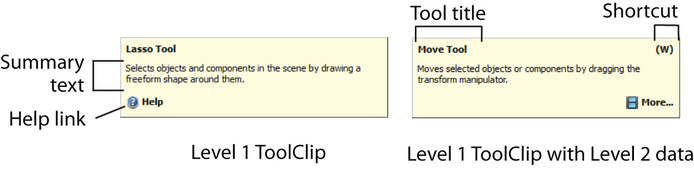
The following table describes attributes that define parts of a level 1 ToolClip.
| Attribute | Description |
|---|---|
| <toolclip> |
Encloses all level 1 and level 2 ToolClip elements. |
| <key> |
The key name used to request the ToolClip. See Create a ToolClip. |
| <help> |
(Optional) Specifies the location of the help link that is included in the ToolClip window when a level 2 ToolClip does not exist. The location can be a URL or an internal help string (as shown in the example code below). If a location is not specified, the help link defaults to the Help home page. |
| <title> |
The tool title that displays in the ToolClip window. |
| <shortcut> |
(Optional) The default keyboard shortcut. Keyboard shortcuts are assigned automatically in Maya, but you can use this attribute to override what is displayed in the ToolClip window. |
| <text> |
The summary text that displays in the ToolClip window. |
<toolclip key="moveTool" help="files/MoveTool.htm" title="Move Tool" shortcut="W">
     <text>Move selected objects or components by dragging the transform manipulator.</text>
...</toolclip>
Level 2 ToolClips are optional and are used when additional learning content exists. When a level 2 ToolClip exists, the More button appears in the level 1 ToolClip window.
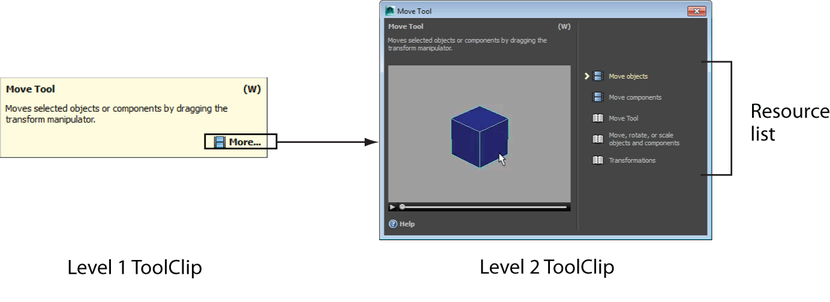
The following table describes the attributes that define parts of a level 2 ToolClip.
    <expanded>
       <default-resource index=”1”/>
        <resourcelist>
            <video location="MoveTool.webm">Move Objects</video>
            <image location=”MoveTool.jpg”>Show Objects</image>
            <link location="files/MoveTool.htm">Using the Move Tool</link>
        </resourcelist>
    </expanded>
 Except where otherwise noted, this work is licensed under a Creative Commons Attribution-NonCommercial-ShareAlike 3.0 Unported License


