


The Create Render Node window provides access to materials, textures, lights, and utility nodes you can create and customize in Hypershade. Icons representing the nodes are displayed under each tab.
To open the Create Render Node window, from the Hypershade, select Create > Create Render Node.
When on, Maya automatically creates a shading group when you create a material node. See About shading networks for more information about the Shading Group.
To display the shading group icon in Hypershade, click the Graph > Input and Output Connections button.
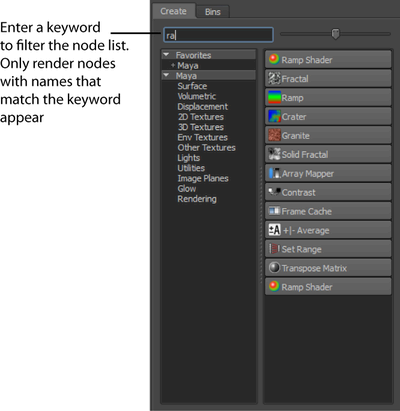
Enter the keyword for the render node that you want to create. As you enter a keyword, the right panel of the Create bar updates in real time and only render nodes with names that match what you entered are displayed.
You can also use the search area to clear your selection. When you select one or more sections, only the nodes in the selected
sections are displayed in the right panel. To clear your selection, press  in the search area.
You can create a Favorites list so you can easily access your most commonly used shaders.
To add a shader to your Favorites list,  drag the shader to Favorites. Alternatively, you can
  the shader and select Add to favorites. The Create Render Node window sorts your favorites in categories to enable you to locate your shaders easily.
For more information regarding favorites, see Creating and using favorites.
Describe the physical appearance of surfaces. See About surface materials for more information.
Describe the physical appearance of phenomena which occupy a volume of space (for example, fog or particles). See About volumetric materials for more information.
Change the surface of geometry. When viewed in silhouette, you can see the displacement of the surface. See About displacement material for more information.
2D patterns that simulate various types of surface materials by using either an image file (File texture) or a computer graphic procedure. See 2D and 3D textures.
3D patterns that simulate solid materials (for example, wood or marble) using a computer graphic procedure. When you map a 3D texture to a surface, the surface appears to be carved out of the material. See 2D and 3D textures.
Simulate 3D spaces using a series of image files (Env Ball, Env Cube, and Env Sphere textures) or using a computer graphic procedure (Env Chrome and Env Sky textures). See Environment textures.
The Layered Texture provides a quick way to layer attributes. You can create a texture consisting of two or more of the textures already existing in the scene and control how they are composited. See Layered textures.
Surfaces are illuminated by light rays directly emitted from these light sources. Using the attributes and properties associated with lights, you can simulate many different types of real-world light sources and special effects.
For more information about light sources and their attributes, see Sources of direct light.
Choose among utilities that enhance and blend various attributes and textures, or color correct and enhance texture colors. See About Utilities.
Control the appearance and placement of an image plane. You can assign a texture or image file to an image plane to create a background for the scene.
For more information, see Create, edit, or position an image plane.
Glows, halos, or lens flares optical effects are produced when a light shines directly into the camera. You can add an optical FX to any light.
For more information, see Glows, halos, and lens flares.
 Except where otherwise noted, this work is licensed under a Creative Commons Attribution-NonCommercial-ShareAlike 3.0 Unported License