Paint particle goal weights on soft bodies
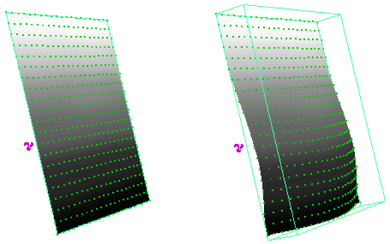
Using the Paint Soft Body Weights Tool, you can set goal weights on a soft body on a per particle basis by painting on the soft body surface. The tool provides color feedback so you know which parts of the soft body have particles with different goal weights. Weights display as a range of grayscale values, with a weight of 1 displaying as white and 0 as black.
To paint goal weights on a soft body
 ).
).
The Paint Soft Body Weights Tool automatically detects the soft body and goalPP attributes and selects the soft body for painting.
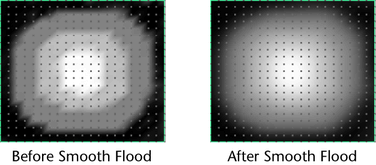
Flooding soft body goal weights
Flooding soft body goal weights is like taking a huge brush and applying its settings to all the particles on the soft body. When you flood a soft body, Maya changes the goal weight of each particle on the soft body according to the value and operation set for the Paint Soft Body Weights Tool.
To flood a soft body, follow the steps under Color Feedback setting; Select Cluster Mode hotkey;To paint goal weights on a soft body, but instead of painting in step 5, click the Flood button or use the hotkey Alt + f (Windows and Linux) or Option+f (Mac OS X).
Using the Paint Soft Body Weights Tool you can map particle attribute values onto a surface. The tool applies the mapped values to the soft body particle goal weights. For details on mapping, see Map attributes in the Artisan guide.
Paint soft body goal weight values on restricted areas
When you paint goal weights over selected vertices on a soft body, your strokes are applied only to the goal weights for the particles corresponding with the selected vertices. In effect, the unselected vertices act as a mask, where only selected vertices are affected by any weight painting or flooding you do.
Before defining the restricted area you must first create the soft body. For details on restricting the paint area surfaces, see Restrict an area for painting in the Artisan guide.
Paint Soft Body Weights Tool settings
See Soft/Rigid Bodies > Paint Soft Body Weights Tool. For details on Brush, Stroke, Stylus Pressure, Attribute Maps, and Display settings, see Artisan Tool Settings in the Artisan guide.
You can define hotkey combinations to change most of the settings without opening the Tool Settings editor. For details on setting hotkey combinations, see Use Artisan hotkeys in the Artisan guide.