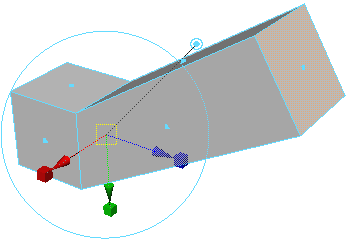
Extrude a polygon face, edge, or vertex


You can add polygons to an existing mesh using the Extrude feature (Edit Mesh > Extrude). You can extrude polygon faces, edges, or vertices using the feature. For example, when you extrude a face on a polygon mesh the existing face telescopes inwards or outwards as it creates new connecting faces on the sides of the extrusion.
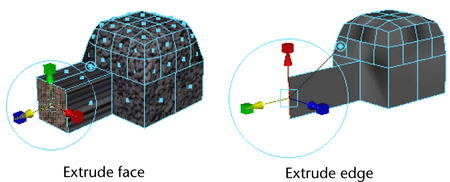
Note

The Extrude options window is context sensitive. That is, when you display the Extrude options window, only the options for the currently selected components (faces, edges, or vertices) are displayed in the window.

To extrude polygon faces or edges

  1. Select the faces or edges you want to extrude.
  2. Select Edit Mesh > Extrude

    The action creates an extrude node and switches to the Show Manipulator Tool.
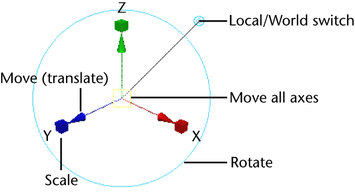
    NoteYou can also switch to the Show Manipulator Tool by selecting the entire poloygon mesh, then pressing + and choosing Extrude Face from the marking menu.
  3. Do any of the following:
    • Use the manipulator to control the direction and distance of the extrusion. Remember that you can also change the pivot by pressing Insert or Home. Click the circle handle attached to the manipulator to switch between local and world axes.
      Note

      The Show Manipulator Tool only appears when Construction History is on.

    • Use the controls in the Attribute Editor or Channel Box to edit the extrusion. See Edit Mesh > Extrude.

      You can use the three sliders next to the Show Manipulator Tool to modify the thickness, offset and divisions (see: Edit Mesh > Extrude) of the selected face or edge. You can also insert numerical values that go beyond the range of the sliders by clicking the small circle next to each slider.

      NoteThe sliders only appear when the Show Manipulator Tool is on and there is a node selected.

      You can turn the sliders on or off by pressing + + and then selecting Show Attribute Sliders from the marking menu.

      NoteThe minumum value for the Divisions slider is 1. There is a "soft max" of 25, but values above this can be entered.
      Tip

      You can scale and rotate the extrusion along its length to create interesting forms.

      Note

      Extruding edges can make your mesh non-manifold. Use Mesh > Cleanup to fix non-manifold geometry.

To extrude edges or faces along a path curve
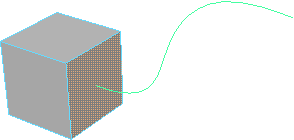
  1. Select the edges/or faces you want to extrude and the curve you want to extrude along.
  2. Select Edit Mesh > Extrude > .
  3. Turn on either the Selected or Generated options.
  4. Click Extrude.
  5. Use the controls in the Attribute Editor or Channel Box to edit the extrusion. See Edit Mesh > Extrude.

    For example, increase Divisions so the extruded polygons better match the shape of the curve.
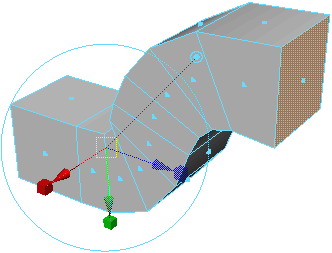
    Reduce Taper so the extruded polygons gradually become narrower along the curve. (You can also use the Taper Curve controls to create more complex tapers.)
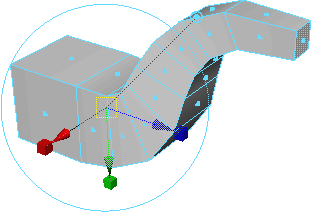
    Adjust Twist so the extruded polygons rotate along the curve.
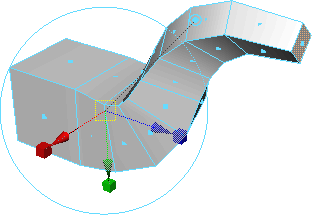
Vertices extrude along its vertex normal, creating additional faces for each face that shares the vertex.

To extrude a vertex

  1. Select the vertex you want to extrude.
  2. Select Edit Mesh > Extrude > .
  3. Set the Length setting to extrude the vertex and click Extrude.

Keeping faces together when extruding

The Keep Faces Together option (Edit Mesh > Keep Faces Together) controls how Extrude treats the edges of adjacent faces. When Keep Faces Together is on, the faces expand so their edges stay connected. When Keep Faces Together is off, Maya creates new polygons along the edges of the faces as they extrude.
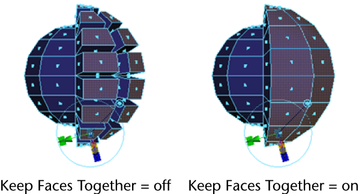
Note

When Keep Faces Together is off, each face becomes a separate mesh.