You can manually move, scale, or rotate UVs and UV shells in the UV Texture Editor. For example, you may wish to move individual UVs or entire UV shells to improve their layout, or scale UV shells to ensure they make optimal use of the 0 to +1 texture space.
| To... | Do this: |
|---|---|
| Move, rotate, or scale UV positions. |
Note: Scaling UVs of multiple polygonal objects together in the UV Texture Editor may produce unexpected results. Work on the UVs of one object at a time. |
| Move a UV shell and ensure that it does not overlap other shells. |
Note: To prevent the repositioned shell from overlapping other shells, turn on the Prevent overlap option. See Tool > Move UV Shell Tool. |
| Rotate UVs by an exact number. |
|
| Flip UVs to flip the texture placement on the mesh. |
|
| Scale UVs to fit within the 0 to +1 texture range. |
Use the Normalize UVs options.
|
| Move UVs to (0,0), (1,1), (1,0), or (0,1) in texture space. |
|
You can use Discrete rotate and Discrete scale to rotate or scale your UVs by fixed increments. You can modify these increments in the Step size field. This is useful to restrict the rotation or scale amount to a specific factor.
Discrete rotate or Discrete scale can be found in the Tool Settings Editor when the Rotate Tool or Scale Tool are selected respectively.
To use Discrete rotate or Discrete scale
You can use snapping in the UV Texture Editor to transform UVs with great precision the same way you can use it to transform components in the scene view.
Example 1: Snapping to projections
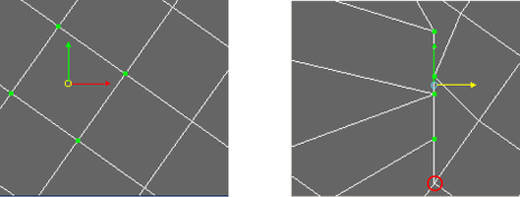
When Snap to Points is on, you can also snap to UV projections along the U or V axis. A UV projection is a straight line in either the U or V direction from a UV. This is useful if you don’t want to snap two UVs together, but want them to line up in the UV Texture Editor.
You can use this functionality on multiple UVs at once to obtain different results.
With the Retain Component Spacing option off, all the selected UVs snap to the nearest UV projection. Notice below that the selected UVs line up with the circled UV beneath them when translated right.
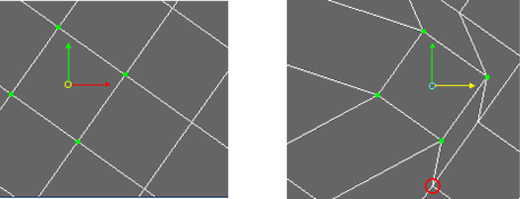
With the Retain Component Spacing option on, the center of the selected UVs snaps to the nearest UV projection. The relative spacing of the selected UVs is maintained. Notice below that the shape of the selected UVs is maintained and only the center of the selection (the manipulator) lines up with the circled UV beneath them when translated right.
The behavior of snapping to UVs and UV projections depends on the UV Snap Tolerance setting in Window > Settings/Preferences > Preferences in the Snapping section under Settings.
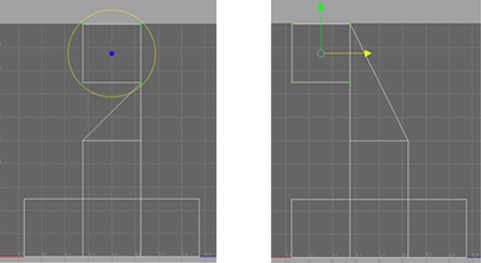
You can use snapping in the UV Texture Editor to position pivots for rotation or scaling. This helps to reduce the number of steps in some workflows and ensures that transformations along existing points are accurate.
For example, if you want to rotate the upper portion of a cube’s UV shell 90 degrees around its bottom left corner, you can rotate it first, then translate it left.
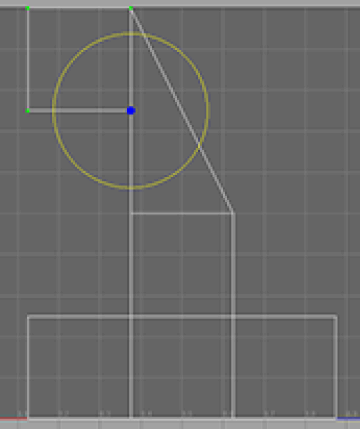
However, it’s easier and more precise to move the pivot point to the bottom left corner and rotate on that pivot.
 or
or  .
.
When you move the manipulator close to a UV, the pivot automatically snaps to it. You can then move the pivot from UV to UV.
or to return to the rotate manipulator
You can use a similar workflow to scale a set of UVs relative to a specific point.


 . (Or click the