The Offset Edge Loop Tool lets you insert two lines of parallel edges on either side of the edge(s) you select. The parallel edge lines traverse the extent of the edge selection. Offset Edge Loop is useful when you want to add localized detail to a polygonal mesh on either side of a single edge or line of edges.
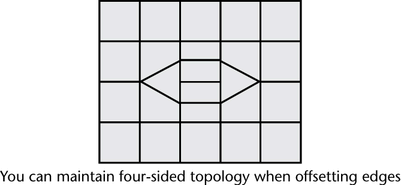
When editing a polygonal mesh, there is always the risk that splitting a polygon to add detail to the mesh will result in changing the integrity of the polygon topology from the usual ideal four-sided topology (quads) to triangles or some type of multisided (n-sided) polygon topology.
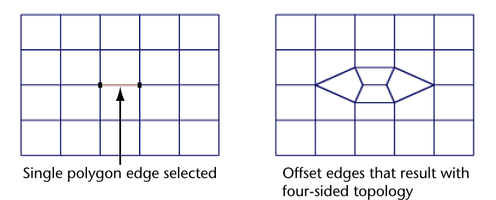
The Offset Edge Loop Tool lets you insert edges on either side of selected edges to add detail to a polygon mesh while ensuring that the integrity of the four-sided polygon topology is maintained. When an edge or multiple edges get offset on a mesh comprised of four-sided polygons (quads), the Offset Edge Loop Tool creates two new edges on either side of the selected edge and subdivides the affected faces to ensure that the four-sided polygon topology is maintained.
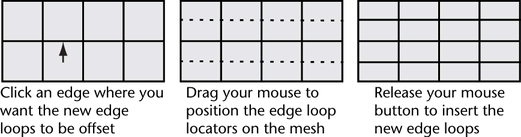
To offset an edge loop on a polygonal mesh
 .
.
A pair of green dotted edge loop preview locator lines appear on the mesh parallel to and on either side of the edge you clicked. The edge loop preview locator indicates where the new edge loops will be inserted across the mesh once you release the mouse button.
The new edge loops are inserted on the polygon faces associated with the edges you selected. The original edge loop remains selected so you can perform additional operations on it.
For example, selecting the Move Tool to move the selected edge loop, selecting Edit Mesh > Extrude to extrude the selected edge loop, or converting the edge loop selection to faces.
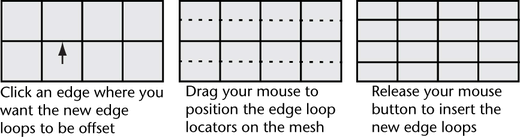
To offset a partial edge loop on a polygonal mesh
.
A pair of edge loop preview locator lines appear on either side of, and parallel to, the edge you clicked. The green dotted preview locators indicate where the edge loops will be inserted across the mesh once you release the mouse button.
The Offset Edge Loop Tool selects any edges between the first and last edge you select and updates the edge loop preview locator as you proceed.
 +
+  that edge and continue your selection. If you want to cancel the selection entirely, click anywhere in the scene view off
of the mesh.
that edge and continue your selection. If you want to cancel the selection entirely, click anywhere in the scene view off
of the mesh.
 or
or  and select Complete Tool from the marking menu.
The new edge loops are inserted on the polygon faces associated with the original edge loop you selected. The original partial edge loop remains selected so that you can perform additional operations on it.
For example, selecting the Move Tool to move the selected edge loop, selecting Edit Mesh > Extrude to extrude the selected edge loop, or converting the edge loop selection to faces.
If the Offset Edge Loop selections don’t select the edges as you expect, see Edge ring and edge loop selection tips for additional information.
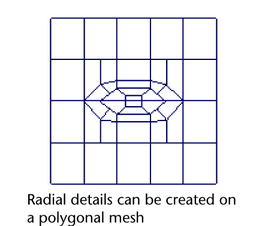
Depending on the extent of your edge selection, the Offset Edge Loop Tool inserts edges in a more radial fashion compared to the original mesh, based on how the Offset Edge Loop Tool maintains the four-sided topology when the Delete Edge option is turned on. This radial detail can be useful for creating features such as an eye, ear, or a mouth on a model of a character.
Additional options for duplicating edges are possible when the Offset Edge Loop Tool is set to work as an action. For a description of the options, see Edit Mesh > Offset Edge Loop Tool.
To change the Offset Edge Loop Tool so it works as an action
.
The additional options will be available the next time you select this feature.
You can turn the Auto Complete and Delete Edge options on or off while the tool is active using a marking menu. This assists your workflow by letting you continue your work without having to re-open the tool options window.
To change the tool options when the Offset Edge Loop Tool is active
+  + anywhere within the scene view away from the surface.
The Offset Edge Loop Tool options (Auto Complete and Delete Edge) appear on a marking menu.
You can continue to use the Offset Edge Loop Tool and the options you selected will be used.


