Synchronizing Animations


The possibilities of what you can animate in the Universal Channel Editor are extensive. All nodes and clips that you arrange in the Batch process tree are represented in the Universal Channel Editor—except the Keyer and Modular Keyer, and any node that does not use the Channel Editor. You can, therefore, link channel animations from one node to another to create complex animated effects with precision timing.

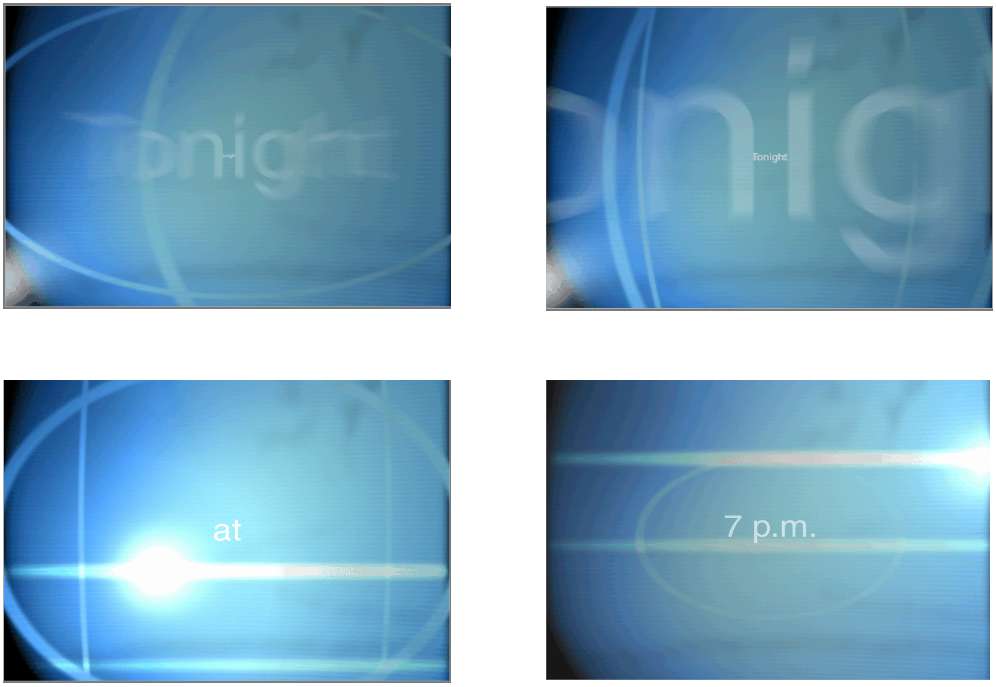
The following procedure illustrates how to adjust the timing of RGB gamma channels in a Colour Corrector node and the position of 3D text layers in Action so they are in sync. The idea is to create 3D text layers that fly toward the camera. As each 3D text layer leaves the scene, a colour correction animation creates a flare. The flares must be in sync with both the incoming and outgoing 3D text layers.

You can apply this technique in similar instances where you want dramatic changes in channel values to occur together.

To adjust the timing of RGB gamma channels with the position of 3D text layers:

  1. In Batch, set up the schematic with clips, a Colour Correct node, and a an Action node, as illustrated in the following example.

    The image feeding into the Colour Correct node should have high luma values.

    Show small imageShow large image

  2. Click the Action node.

    The Action menu appears.

  3. In Action, add three text layers containing the following words:
    • Tonight
    • at
    • 7 p.m.
  4. For each 3D text string, select a font, such as Discreet, and set the Size to 800.

    For full details on creating 3D text strings, see Changing 3D Text Properties.

  5. Set the Action setup to 90 frames.
  6. Go to frame 1, and set the scaling position to 0 to make the first text layer invisible at the first frame.
  7. Go to frame 30 and set scaling position to 100.
  8. Adjust the z position until the 3D text flies past the camera.
  9. Add three extra layers.
  10. Adjust the transparency and animate motion blur for those layers.
  11. Copy the Axis node from the first Geom Axis node and use it for the other two text layers.
  12. Rename the Axis nodes and Geom nodes for easy recognition in the Universal Channel Editor.

    An example of what the Action schematic might look like is illustrated as follows.

    Show small imageShow large image

  13. Set the Channel Editor to Tracks view.
  14. In Tracks view, offset the axis of each 3D text object as follows:
    • “at” starts at frame 30.
    • “7 p.m.” starts at frame 60.
    • “Tonight” stays where it is as it starts at frame 1.

    Show small imageShow large image

  15. Click Play to preview your result.

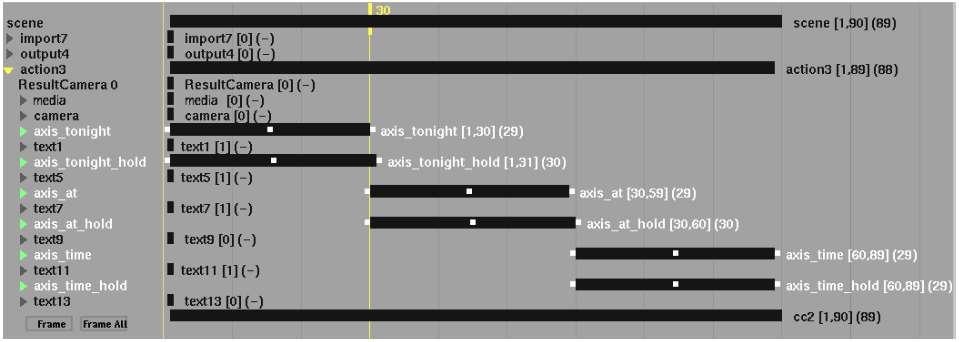
    At frame 1, “Tonight” is scaled at 0 so the text begins to appear at frame 4 or 5, where it flies into the scene and past the camera. At frame 30, the word “at” appears and flies into the scene and past the camera. At frame 60, the words “7 p.m” appears and flies past the camera.

    Show small imageShow large image

    You now have a setup that you can use for the colour correction animation. You want to time the colour correction as each text layer goes past the camera.

  16. In the Universal Channel Editor, open the cc folder and then select the red gamma channel.
  17. Set the red gamma channel with the following values at the frames indicated:
    • Frame 25 = 1
    • Frame 29 = 10
    • Frame 30 = 1
    • Frame 55 = 1
    • Frame 59 = 10
    • Frame 60 = 1
    • Frame 85 = 1
    • Frame 89 = 10
    • Frame 90 = 1

    The gamma changes occur at the same time (30, 60, 90) as the 3D text strings change in the scene.

  18. For the first and second gamma keyframes, set the interpolation to Constant prior to the start of the colour correction animation.
  19. Copy the red gamma channel data to the green and blue channels using Copy and Link. See the procedure for Linking Animation to Several Branches.
  20. Adjust the 3D text position keyframes in the Channel Editor so they are in sync with the gamma keyframes.

    The following example illustrates keyframes that are synced up with the gamma channel at frame 30.

    Show small imageShow large image

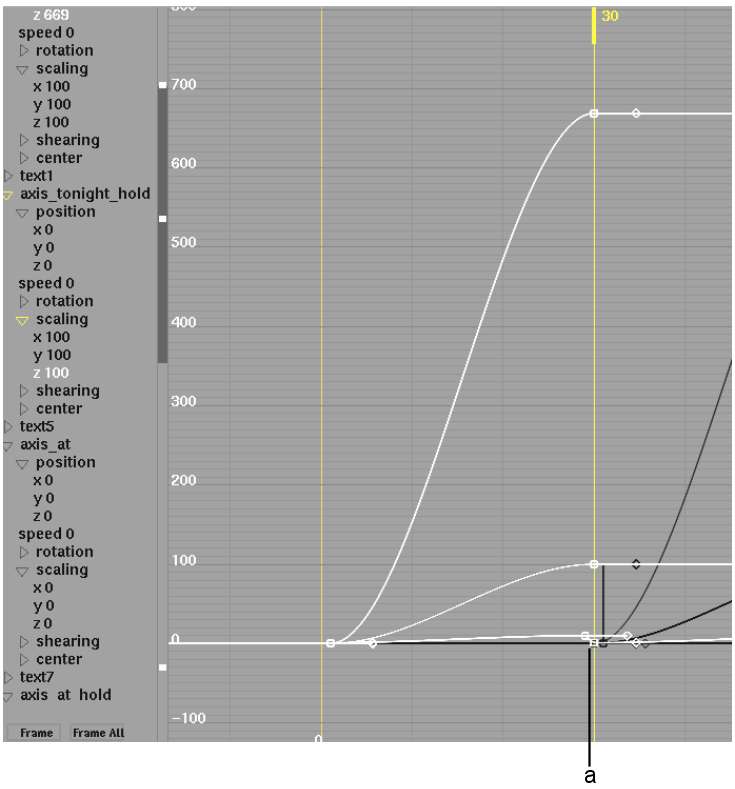
    (a) Red gamma channel  

    TipTo refine the view in the Channel Editor, you can use the Filter controls to display only the channels that are currently animated. See Showing and Hiding Channels.
  21. Play the result.

    Every time the text flies past the camera, the background should flare to almost white. This all depends on the luma of your background image.