When you add a 3D Text node to your scene, the default text string “Text” appears. You can easily change this text string.
The on-screen keyboard appears, representing the character set for the selected font. Enable Up ASCII to access the rest of the character set.


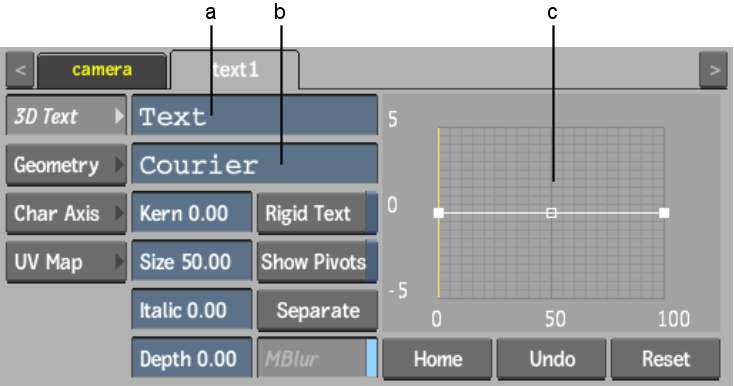
(a) Text field (b) Font field (c) Bevel curve
The 3D Text tab settings are described as follows.
Text fieldDisplays the characters that make up the text string.
Font fieldDisplays the current font. Click to open the font library, where you can select a different font for the text string.
You specify the default font using the TextDefaultFont token in the init.cfg configuration file. See the Autodesk Visual Effects and Finishing Configuration File Reference Guide. Also, you can install additional fonts for use with Inferno. See Installing Fonts.
Kern fieldDisplays the kerning for the characters in the text string.
Size fieldDisplays the font size for the characters in the text string.
Italic fieldDisplays the level of italicization of the characters in the text string.
Depth fieldDefines the level of depth (thus extruding the selection, making it three dimensional).
Rigid Text buttonEnable to gang the text string characters as a single geometry. Enabling this button is particularly noticeable when attaching the 3D Text node to a 3D path.
Show Pivots buttonEnable to display the pivot point for each individual text character in the 3D Text string. These pivot points are displayed in the image window in red. When disabled, only the master character pivot point is displayed (in green). This setting can also be found in the Character Axis tab.
Separate buttonSeparates text so that each letter has its own axis node. See Separating Text.
MBlur buttonEnable to use a motion blur effect for the selected text (can only be used if the global Motion Blur button is enabled in the Action Setup menu).
Bevel curveApplies a bevel to the depth of the text string when you manipulate the Bevel curve. You can move and add points to the curve, as well as adjust the tangent handles to produce different effects with the text string. See Creating Bevelled Text.
Home buttonResets the Bevel curve viewer to show the whole curve.


