You
can create particle streams using your own 3D objects or text. You
can also use the shape of any surface for each particle. For example,
create custom particles using a light source, 3D object, or surface
as a particle generator. See
Generating Particles.
To use a 3D object or text as a custom
particle:
- From the node bin, add a particle generator
to your scene.
- In the schematic, double-click the Particle
Generator node to access the Generator menu.
- From the Render Type box, select Node
as the particle type and change the Interactive Type box to Node
to view the 3D object or text as you make changes to your particle
stream.
- Import the 3D object or create the text.
See
Importing 3D Models or
Changing 3D Text Properties.
- In Schematic view, rename your 3D object
or text “ParticleDraw”. This name is case sensitive
so make sure it is typed exactly as shown.
- Parent the particle generator to the
3D object or text.
If you want to add transformations,
such as rotating all the particles, parent the particle generator
to the axis of the 3D object or text as shown in the next step.
- Hide the 3D object or text.
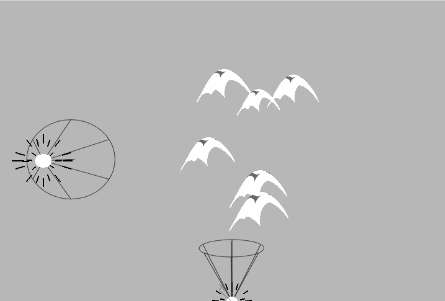
The particle generator
uses the 3D object or text named ParticleDraw. The following figure
shows the schematic and the result of using the letter A as a custom
particle and a light source as the particle generator.
To use a surface as a custom particle:
- Add a particle generator.
You can use a light source,
3D object, or surface as a particle generator. See
Generating Particles.
- Select Node as the particle type in the
Render Type box. To view the surface as you make changes to your
particle stream, change the Interactive Type box to Node as well.
See
Setting Particle Rendering Properties.
- Add a surface to the scene. It can be
an image, a bilinear, a bicubic, or an extended bicubic surface.
See
Adding Surfaces.
NoteYou do not have to
apply media to the surface because the particle generator only uses
the surface's shape and not its media. To have an image appear on
each particle, you have to apply a texture to the particle generator.
See
Applying Textures to Particles.
- Rename your surface “ParticleDraw”.
This name is case sensitive so make sure it is typed exactly as
shown.
- Parent the particle generator to the
surface.
If you want to add transformations,
such as rotating all the particles, parent the particle generator
to the axis of the surface as shown in the next step.
- Hide the surface.
The following figure
shows the schematic and the result of using a bicubic surface as
a custom particle and a light source as the particle generator.
The shape of the bicubic surface is animated and its axis is used
to rotate the particles.
NoteYou can animate the
shape of a bilinear, bicubic, or extended bicubic surface, and have
the particles reflect the animation.