The Colour Source tool
generates a virtual source that contains one or more identical frames
of a solid colour, a gradient of two or four colours, or SMPTE or
PAL colour bars at 75% or 100% luminance. When you use the Colour
Source tool to create a custom colour source, you can save that
colour in the colour palettes. You can also use this tool to create
frames composed of video noise. Noise clips are not virtual sources — each
frame in the clip is unique.
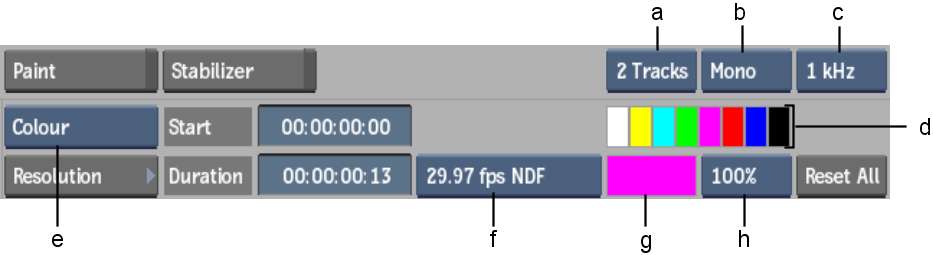
To create a colour source or noise clip:
- With Video selected from the A/V Tools
box, click Colour Source (or press F10).
The Colour Source controls
appear.
- From the Source Type box, select the
type of frame you want to generate.
| Select: |
To generate frames of: |
| Colour |
A solid colour. |
| Noise |
Monochrome video noise. |
| Colour Noise |
Colour video noise. |
| SMPTE Bars |
SMPTE standard colour bars. |
| PAL Bars |
PAL standard colour bars. |
| Gradient |
A two- or four-colour gradient. |
- From the Luminance box, select 75% or
100% luminance (not available for Gradient frames).
- From the Frame Code Mode box, select
the framerate and drop frame mode for your colour source clip.
- In the Start field, specify the start
time.
- In the Duration field, specify the duration
of the colour source that you want to generate.
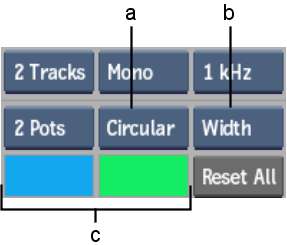
- To generate audio with the clip, select
the number of audio tracks from the Track Number box, select whether
the tracks are mono or stereo from the Audio Track Type box, and
then select a frequency from the Frequency box.
NoteSelecting Silence
in the Frequency box creates audio tracks with a flat waveform.
- If the Source Type is set to Colour,
select the colour for the frames using one of the following methods:
- Click one of the colour palettes to transfer
that colour into the current colour pot.
- Click the Source colour pot to access
the colour picker. Use the colour picker to create the current colour.
- If the Source Type is set to SMPTE or
PAL Bars, enter a value in the Softness field to display the softness
between the colour bars.
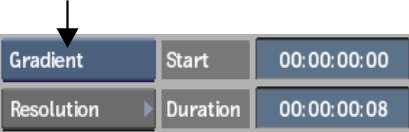
- If the Source Type is set to Gradient,
use the Gradient tools to create a two- or four-colour gradient.
See the following procedure.
- Optional: Change the resolution.
By default, the result
clip has the same resolution as the project default resolution.
To specify an alternative resolution, click Resolution, and use
the Resolution controls.
Click Resolution again
to exit the Resolution menu.
- Select the destination for the generated
clip.
The result clip appears
in the selected destination.
Once you create a colour
source, gradient, or colour bar clip, you can use it as a virtual
source. See
Virtual Sources.
NoteAudio settings and
colour pots are saved from session to session. If you want to reset
the options to the factory defaults, click Reset All in the Colour
Source controls.
To create a gradient clip:
- From the Source Type box, select Gradient.
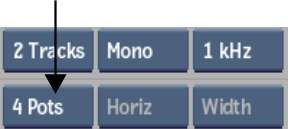
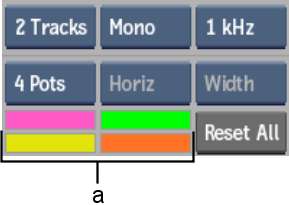
- From the Gradient Mode box, select whether
you want to create a two-colour or four-colour gradient.
- If you selected 4 Pots in the Gradient
Mode box, use the four colour pots to select the colours representing
the four corners of the image.
- If you selected 2 Pots in the Gradient
Mode box, use the two colour pots to select the gradient colours
and then set a pattern of Horizontal, Vertical, or Circular in the
Gradient Pattern box.
- If you selected Circular in the Gradient
Pattern box, you can set how the gradient is drawn in the Circular
Mode box. The gradient is drawn from the centre of the image using
the maximum width, height, or diagonal length, depending on your
choice.
- Select the destination for the generated
gradient clip.