Use these options to change resolution, aspect ratio, bit depth, and field dominance. See Resizing Clips on Import, Export, or in a Clip Library.
If Resize is disabled, you can force an aspect ratio for all the images selected for import, or use the Default Resolutions list to determine the aspect ratio for each individual image in the selection. See Setting Default Image Resolution Characteristics on Import.


(a) Fit Method box (b) Resize Filter box (c) Frame Width field (d) Resolution Presets box (e) Frame Height field (f) Aspect Ratio field (g) Scan Mode box (h) Colour Correction Type box (i) LUT Name field (j) Aspect Ratio Presets box (k) Frame Depth box
When importing QuickTime files, you can also change the gamma settings of images originating from Apple Macintosh computers.
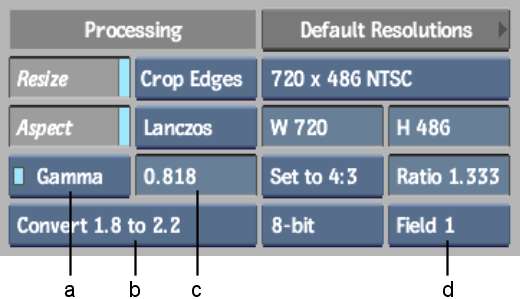
(a) Colour Correction Type box (b) Gamma Presets box (c) Gamma Correction field (d) Scan Mode box
Resize button When enabled, displays the Resize options that can affect one or more clips on import. If disabled, the Aspect Ratio Presets box and the Aspect Ratio field are still available. Resize options are not active when you soft-import media.
Aspect button When enabled, allows you to use non-square pixel formats. This button is active only when Fit Method is set to Crop Edges or Letterbox.
Fit Method box Select the fit method that is applied to the clips. Fit Method is active only when Resize is enabled.
Pan Start X field Enter the offset for horizontal position. Pan Start X is active only when Fit Method is set to Pan.
Pan Start Y field Enter the offset for vertical position. Pan Start Y is active only when Fit Method is set to Pan.
Resize Filter box Select the filter option to determine the quality of the interpolated resize result. Defining a filter method in the Resize menu will override the default setting specified in the Preferences menu. The Resize Filter box is active only if Fit Method is set to Crop Edges, Fill, or Letterbox.
| Select: | To get: |
|---|---|
| Impulse | Quick, low-quality results. |
| Triangle | Moderate results with little processing overhead. |
| Mitchell | Best results when resizing a clip to a higher resolution. |
| Bicubic | Very good results for resizing soft-looking images. Use to sharpen the image. |
| Quadratic | Good results for resizing simple images with straight edges. Similar to Gaussian but with more blurring. Use to soften the image. |
| Gaussian | Excellent results when resizing a clip with no patterns and a lot of straight edges to a lower resolution. Useful for softening some detail. |
| Shannon | Excellent results when resizing a clip to a lower resolution. Very similar to Lanczos, but results are a little softer. |
| Lanczos | Best results when resizing a clip containing a variety of patterns and elements to a lower resolution. It is the most complex with the longest processing time. |
Default Resolutions button Displays the Default Resolutions list. See Default Resolutions List.
Frame Width field Displays the frame width of the selected resolution preset. If Resolution Presets is set to Custom, then this field is active, allowing you to enter the frame width value that you want to use.
Resolution Presets box Select one of many standard resolutions, as well as a Custom option that you can use to specify non-standard resolutions.
Frame Height field Displays the frame height of the selected resolution preset. If Resolution Presets is set to Custom, then this field is active, allowing you to enter the frame height value that you want to use.
Create LUT button Create a custom LUT. See Applying a LUT on Import or Export. Create LUT is active only if Use LUT is enabled.
LUT Name field Displays the name of the currently used LUT file. When enabled, a browser appears containing the LUTs currently residing in the project ~/lut directory. These include the samples provided with Backdraft Conform, as well as any LUTs you may have saved or exported to this directory. LUT Name is active only when you enable the Use LUT button.
Aspect Ratio Presets box Select a standard frame aspect ratio. Select the Set to w:h option to set the clip to use square pixels. Select Custom to define a custom frame aspect ratio in the Aspect Ratio field.
Frame Depth box Select from one of five frame depth options: 8-bit, 10-bit, 12-bit, 12-bit u, or 16-bit fp. Frame Depth is active only when Resize is enabled.
Aspect Ratio field Displays the aspect ratio of the imported clip. When Aspect Ratio Presets is set to Custom, this field becomes active so that you can enter a custom frame aspect ratio.
Scan Mode box Select an option to set the order in which the fields of interlaced material is scanned.
| Select: | To: |
|---|---|
| Progressive | Scan a frame-based clip with no interlacing. |
| Field 1 | Scan Field 1 first, followed by Field 2. |
| Field 2 | Scan Field 2 first, followed by Field 1. |
| File Header | Read the field dominance from the file. |
Colour Correction Type box Select the type of colour correction to use. Selecting 1D LUT or 3D LUT activates Create LUT and LUT Name and uses a Lookup Table on import. Selecting Gamma activates the Gamma Presets box and the Gamma Correction field. Click the LED to switch between On (blue) and Off (gray).
Gamma Presets box Select a gamma correction preset.
Gamma Correction field Displays the gamma correction value to be applied. Editable.


