Loading Image Files into Video-Based Sources


When recapturing unlinked media, you can substitute files such as DPX images files for sources on a timeline that originated as video. This is useful when you want to conform an SD clip that was captured from video tapes to film scanned material. The requirements to accomplish this are as follows:

NoteThis procedure is not supported for audio files.

To load files into video-based sources:

  1. Display the clip library containing the unlinked clips for which you want to recapture media.
  2. Select the unlinked clips.
  3. Click I/O to display the I/O menu.
  4. Click Recapture.

    The Recapture screen appears.

    Show small imageShow large image

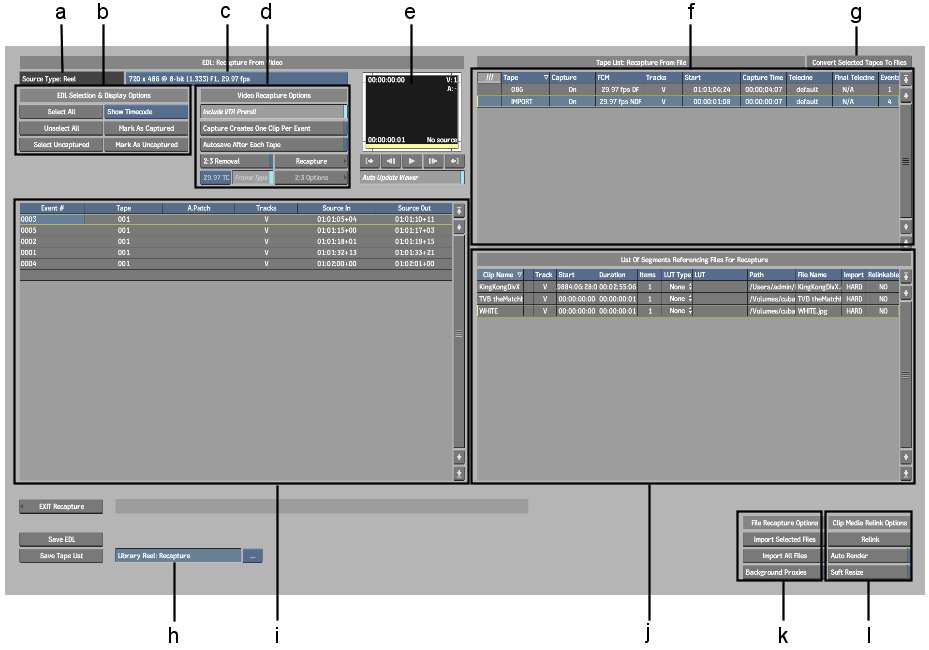
    (a) Source Type label  (b) EDL Selection & Display Options  (c) Source Resolution box  (d) Video Recapture Options  (e) Auto Update Viewer  (f) Tape list  (g) Convert Selected Tapes To Files (h) Library Reel box  (i) EDL list  (j) Imported Clips list  (k) File Recapture Options  (l) Clip Media Relink Options  

    The tapes corresponding to the video-based unlinked media are listed in the Tape list. The Source Type label indicates the origin of the media. This information is read from the clip metadata.

  5. By default, the captured clips will be placed in a reel called “Recapture”. You can change the library reel where you want to place the captured material by selecting one from the Library Reel box or create one by clicking the Library Reel Name field.
  6. Optional: From the Source Resolution box, select the resolution of the device from which you are capturing material.

    If your timeline clip uses sources of differing resolutions, the resolutions are listed in the Source Resolution box. This box acts as a filter on the Tape list and Event list. Only those tapes or events of the currently displayed resolution are listed.

    The tapes containing the material of the specified resolution are displayed.

  7. Select the tapes containing events for which you want to load equivalent files.
    NoteThe status of the Capture field does not affect the selection.
  8. Click the Convert Selected Tapes to Files button.

    The events belonging to the selected tapes appear in the File list. No path or filenames currently appear, but the reel name is placed in the path field temporarily, for reference. Next, you set the correct path and filename for the file corresponding to each video-based event.

  9. Specify the path for any entries as required by clicking the Path field of the entry.
  10. Optional: Select an alternative sequence of files in the File Name field of the entry.
  11. Optional: Associate a LUT with the selected video file. In the LUT Type field, select 1D LUT, 3D LUT, or Gamma correction. Select a LUT in the LUT field for the entry. See Applying a LUT on Import or Export.
  12. Optional: If you want to generate proxies of the media in the background, enable Background Proxies.
  13. Select the file entries that you want to reload from the File list. If you are reloading all the clips, you do not need to select any entries.
  14. Click Import Selected Files or Import All Files.

    The files are loaded.

  15. View the loaded files in the Recapture Viewer to make sure the files were loaded successfully.
  16. Enable Auto Render if you want to re-render all timeline soft effects.
  17. Optional: If the material needs to be soft-resized, enable Soft Resize.

    This is useful, for example, when importing a 720x486 clip into a 720x480 project. See Resize.

  18. Click Relink to relink the captured media with the unlinked clips.

    The loaded files are linked with the unlinked clips. If Auto Render was enabled, timeline soft effects are re-rendered.

  19. Click Exit Recapture to return to the clip library.

    The reel specified in the Library Reel box contains a clip with the unlinked media and the captured sources.