Chapter 17, Animation
| About Animation | Animating with Keyframes | ||
Chapter 17, Animation |
|||
Use the animation curves in the Channel Editor to create animations.
For control surface mappings, see Adding Keyframes for the Autodesk control surface, or Adding and Moving Keyframes for the Tangent CP100.
In the Main menu, click Animation, and then click Curves.
The Channel Editor appears.

 "Show full-size image")
|
|
|
The Channel Editor is made up of the following elements.
Animation controls--Use to switch between animation modes, select and view channels, and control interpolation.
Animation Curves window--Use to create and view animation curves, adjust interpolation, and add, edit, or delete keyframes.
Channel hierarchy--Use to select the directories and channels to animate. You can also refer to the Channel Hierarchy to quickly see what channels contain keyframes.
Track Editor--Use to adjust animation timing. This window appears in place of the Animation Curves window when you click Timeline.

 "Show full-size image")

You perform most animation operations in the Animation Curves window.

 "Show full-size image")
|
|
|
|
|
The Animation Curves window is made up of the following elements.
Current Frame positioner--A vertical yellow line represents the current frame position.
Start and end of current shot--Vertical thick grey lines represent the start and end of the current shot. If the shot is trimmed, the trimmed handles are greyed out.
Trimmed frames--If you trimmed frames from the current shot, these frames are greyed out before or after the shot.
Animation curves--Selected curves are white. Deselected curves are black.
Using the Animation Curves window, you can go directly to any frame for the current shot, or you can go directly to previous or next keyframes. The Current Frame positioner always moves to reflect your new frame position in the current shot.
Drag in the Shot timebar to scrub between frames in the current shot.
The Current Frame positioner moves in sync with the timebar positioners.
Hint: You can also use the playback controls to navigate through the Animation Curves window.
Do one of the following:
Click Next to move to the next keyframe.
Click Prev to move to the previous keyframe.

 "Show full-size image")
|
|
You can pan and zoom the Animation Curves window using the mouse. Do this when you need to see a part of the window that is not visible.
Middle-click and drag to pan the Animation Curves window view horizontally or vertically.
Do one of the following:
To zoom horizontally, hold down the right mouse button and drag to the right to increase the zoom factor and to the left to decrease it.
To zoom vertically, hold down the right mouse button and drag up to increase the zoom factor and down to decrease it.
Hint: Hold down Alt while dragging to centre the zoom at the point where you began dragging.
Use the Animation controls to switch between animation modes, select and view channels, and set keyframe interpolation type.

 "Show full-size image")
|
|
|
The Animation controls are made up of the following elements.
Range button--Displays the shot range horizontally (without the trimmed sections) and fits the selected curves into the Animation Curves window vertically.
AllCrv button--Fits all the existing animation curves into the Animation Curves window.
SelCrv button--Fits only the selected curves into the Animation Curves window.
SelPts button--Fits only the selected curve's selected keyframes into the Animation Curves window.
Animation modes--Allow you to manipulate keyframes in the Animation Curves window.
Interpolation buttons--Change the shape of the animation curve between keyframes.
Click Animation, and then click Curves.
In the Animation controls, click Range.
All keyframes are loaded into the Animation Curves window.
In the Animation controls, click AllCrv.
All animated channels appear in the Animation Curves window.
Select the animated channels.
Click SelCrv.
The selected curves are loaded into the Animation Curves window.
In the Animation Curves window, select the keyframes. See Selecting Keyframes.
Click SelPts.
The animation curves are scaled so that the selected keyframes fill the Animation Curves window.
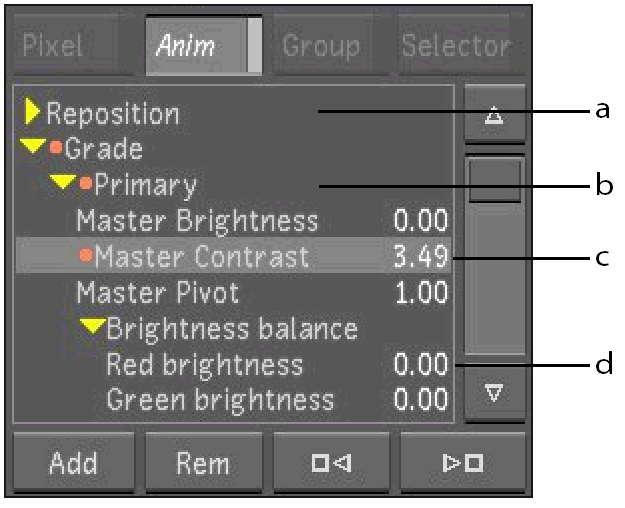
Use the Channel Hierarchy to select the channels to animate. In the following example, Master Contrast is selected. You can then set keyframes for this channel and create an animation.
In the Channel Hierarchy, channels are grouped together in directories. When you select a folder, all its channels are selected and all its curves appear in the Animation Curves window. You can also expand a folder and select a single channel.
 "Show full-size image")
|
|
|
|
