Chapter 3, Project Management
| Project Configuration Settings | User Configuration Settings | ||
Chapter 3, Project Management |
|||
 About User Defaults and Session Settings
In Lustre, using user configuration, you can:
Create a new user profile.
Create a new user from an existing user profile.
Create a new user from an existing user template.
Edit the settings of an existing user profile.

When configuring your project settings in Lustre, you can configure some parameters as project defaults and others as user defaults. The parameters that are configurable as user defaults become the default settings each time that user logs in.
While logged in, the user can override some of the user default settings. These overrides only last for the duration of the session. Restarting the application resets the settings to the values set at user creation.
When a user logs into a particular project in Lustre for the first time, Lustre creates the <user>context.config file, where <user> represents the user name associated with a user profile. The context file is found in the ...\project\<project name>\ folder in Windows and the .../project/<project name>/ directory in Linux. The context parameters include some attributes not defined in the Project or the User Management pages. They are saved and reloaded each time the context (same user and same project) applies. Contextual settings include:
Last scene
Last shot
Resolution
Crop value
Assemble frame rate / drop frame mode
State of the surface control
Audio file
Context parameters are stored in the <user>Context.config file. For information, see the Autodesk Lustre Software Installation Guide.
Note: It is recommended that you verify your user-level and project-level parameters in the User and Project configuration menus, prior to starting a project. See User Configuration and Project Configuration.
The new user settings menu allows you to customize your settings so they are used whenever you enter the Lustre application. The settings are broken down into three groups: Display & Interface, System & Menu, and Tools. When you create a new user you can set the settings within the three groups to your preference, or you can choose to keep the default settings.
Use templates to accelerate user creation. See Working with Templates.
Do one of the following:
From the Main menu, click Setup, then Settings, and then click New in the User group.
From the Lustre splash screen, click New in the User group.
 "Show full-size image")
Configure the new user. Use Reset to reset all settings, from every menu, to their defaults.
| Select: | To configure: |
| Display & Interface | The default display and interface settings for this user. See Display & Interface Settings. |
| System & Menu | The system, match grade, assemble, and playout settings for this user. See System & Menu Settings. |
| Tools | Keyframe interpolation, animation, and dust settings for this user. See Tools Settings. |
To save the settings for the user, click Save User.
Click Exit User.
Do one of the following:
From the Main menu, click Setup, and then Settings. Select the baseline user, and then click Edit in the User group.
From the Lustre splash screen, select the baseline user, and then click Edit in the User group.
 "Show full-size image")
In the Project Name field, enter a name for the new project, or you will overwrite the original project's settings with the new settings.
Configure the new user. Use Reset to reset all settings, from every menu, to their defaults.
| Select: | To configure: |
| Display & Interface | The default display and interface settings for this user. See Display & Interface Settings. |
| System & Menu | The system, match grade, assemble, and playout settings for this user. See System & Menu Settings. |
| Tools | Keyframe interpolation, animation, and dust settings for this user. See Tools Settings. |
To save the settings for the user, click Save User.
Click Exit User.
Do one of the following:
From the Main menu, click Setup, then Settings, and then click New in the User group.
From the Lustre splash screen, click New in the User group.

 "Show full-size image")
From the User Template list, select the template to use. See Creating a User Template.
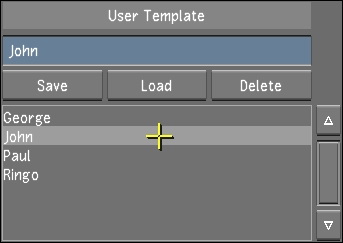
 "Show full-size image")
Click Load.
The template settings are now loaded.
Configure the new user. Use Reset to reset all settings, from every menu, to their defaults.

|
Warning: Rename the new user, or you will overwrite the template. |
| Select: | To configure: |
| Display & Interface | The default display and interface settings for this user. See Display & Interface Settings. |
| System & Menu | The system, match grade, assemble, and playout settings for this user. See System & Menu Settings. |
| Tools | Keyframe interpolation, animation, and dust settings for this user. See Tools Settings. |
To save the settings for the user, click Save User.
Click Exit User.
As you are working from project to project, one project may require different settings than the other. The editing feature allows you to change the settings of an existing user profile.
Do one of the following:
From the Main menu, click Setup, and then Settings. Select the user, and then click Edit in the User group.
From the Lustre splash screen, select the user, and then click Edit in the User group.

 "Show full-size image")
Edit the user settings. Use Reset to reset all settings, from every menu, to their defaults.
| Select: | To configure: |
| Display & Interface | The default display and interface settings for this user. See Display & Interface Settings. |
| System & Menu | The system, match grade, assemble, and playout settings for this user. See System & Menu Settings. |
| Tools | Keyframe interpolation, animation, and dust settings for this user. See Tools Settings. |
To save the edits, click Save User.
Click Exit User.