Chapter 17, Animation
| Editing Keyframes | The Track Editor | ||
Chapter 17, Animation |
|||
 About the Copy Keyframe Controls
Copy / Paste Keyframe Hot Keys
From any menu in Lustre, you can copy and paste keyframes for accessible channels in the Animation Channel Hierarchy. This includes, but is not restricted to, keyframes for grading, geometries, plugin effects, and point trackers. There are different ways to perform a copy and paste:
Using the user interface. See About the Copy Keyframe Controls.
Using hot keys. See Copy / Paste Keyframe Hot Keys.
Using the Autodesk Control Surface (ACS). See Autodesk Control Surface User Guide.

The Copy Keyframe controls are located in the Channel Hierarchy, which is visible in the user interface in all menus except the following menus:
Editing > Timeline
Colour > Timeline
If you are in one of these menus and need to make channel selections or access the Copy Keyframe controls, navigate back to another menu that displays them. Select the channels to copy, then return to the Timeline menu; the selected channels remain active. Use the copy / paste hot keys to copy the keyframes. See Copy / Paste Keyframe Hot Keys.
The Channel Hierarchy and Copy Keyframe controls are not displayed, but are still active, when you are in the following menus:
Editing > Timeline
Colour > Timeline
Editing > Capture
Editing > Playout
If you are in one of these menus and need to make channel selections or access the Copy Keyframe controls, navigate back to another menu that displays them. Any channel / folder selections or Copy Keyframe actions you perform will remain active even after you leave the Channel Hierarchy.
Note: Hot keys and the ACS controls are available regardless of which menu is displayed in Lustre.
 "Show full-size image")
|
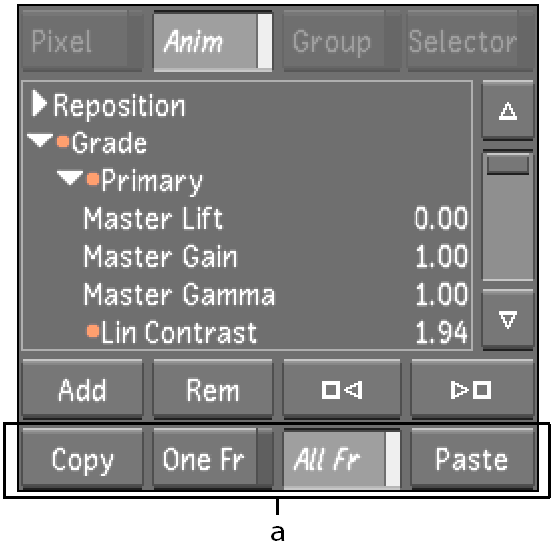
Copy--Click to copy one or more keyframes to memory. The Copy function is dependent on which channels are selected in the Channel Hierarchy or Animation Curve. See Copying Keyframes.
One Fr--When enabled, Lustre copies only the keyframes present at the current location of the Positioner for a selected channel or group of channels.
All Fr--When enabled, Lustre copies all the keyframes within a shot for a selected channel or group of channels.
Paste--Click to paste the copied keyframes. See Pasting Keyframes.
Note: If you are in the Animation > Curves menu and you select keyframes in the Animation Curves window, you do not need to use the One Fr and All Fr buttons. Lustre automatically copies and pastes the selected keyframes.
When copying keyframes, use the Channel Hierarchy to select channels you wish to copy keyframes from. You can choose either a single channel or all channels in a parent folder. Once the channels are selected, you can choose to copy:
Only those keyframes at the frame where the Positioner is located.
All keyframes in the shot.
A selection of keyframes.
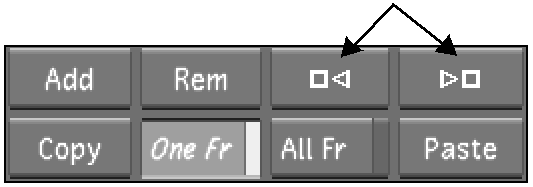
Make sure the Positioner is located directly over the keyframe.
To do this, navigate to the keyframe by clicking on the Forward and Backward buttons in the user interface or with the ACS.
 "Show full-size image")
Change the copy mode to One Fr by doing one of the following:
Click One Fr.
Press Alt+C.
Change the copy mode to One Fr using the ACS.
Copy the keyframes by doing one of the following:
Click Copy.
Press the left Ctrl+C.
Use the ACS.
Change the copy mode to All Fr by doing one of the following:
Click All Fr.
Press Alt+C.
Change the copy mode to All Fr using the ACS.
Copy the keyframes by doing one of the following:
Click Copy.
Press the left Ctrl+C.
Use the ACS.
Navigate to the Animation > Curves menu.
To display the full range of the selection of curves, click Range.
In the Animation Curves window, select the keyframes you wish to copy. See Selecting Keyframes.
Copy the keyframes by doing one of the following:
Click Copy.
Press the left Ctrl+C.
Use the ACS.
When pasting keyframes, use the Channel Hierarchy to select the target channels. You can select either a single channel or all channels in a parent folder.
When you copy all the channels in a sub-folder and paste into a parent folder, the keyframes are pasted into the first available sub-folder of the parent folder. For example, if you copy all the channels in the Tracker4 sub-folder and paste into the parent Trackers folder, the keyframe data are pasted into the Tracker1 sub-folder.
When you copy a keyframe sequence which spans more than one frame in a shot, you can paste the sequence at a location where it goes beyond the shot boundary. The part of the sequence that is cut off is still pasted after the shot boundary.
In the Animation Curves window, the cut off keyframes appear greyed out as in the following example.
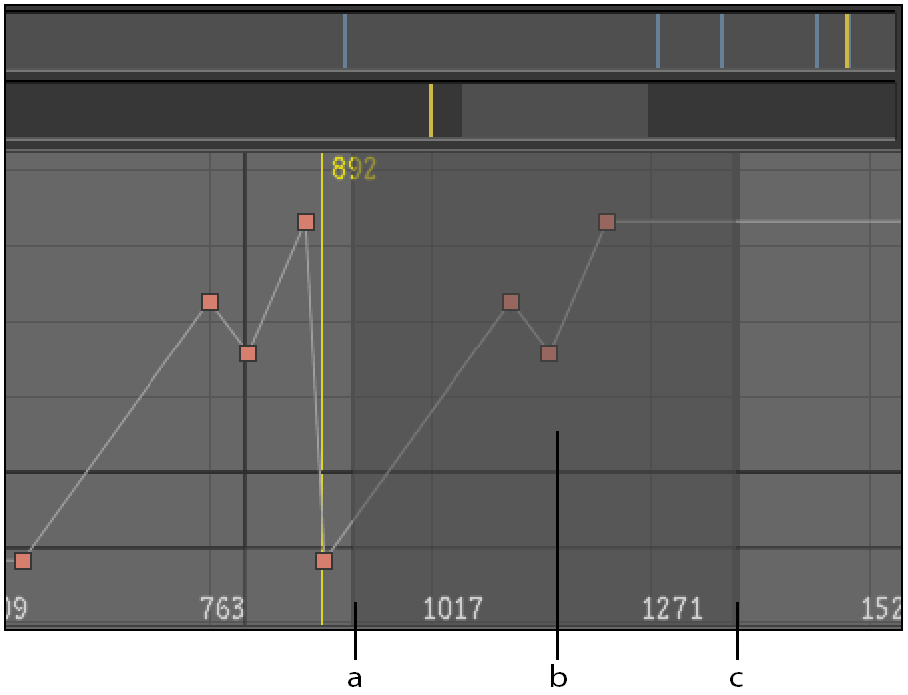
 "Show full-size image")
|
|
|
It is also possible to see the cut off keyframes in Animation > Timeline view.
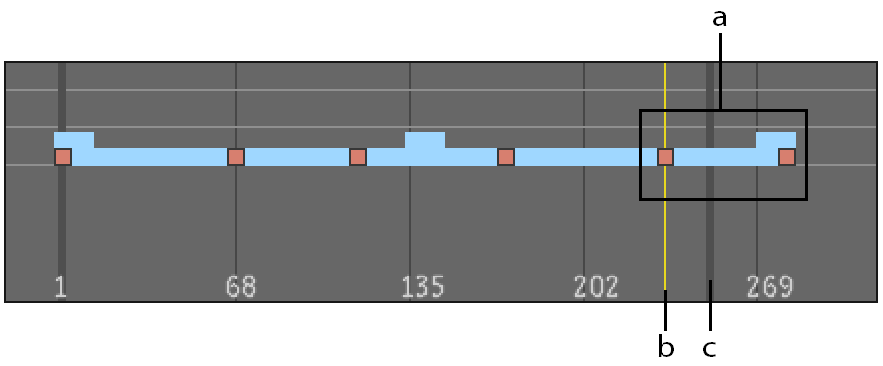
 "Show full-size image")
|
|
|
Once you have selected the target channels or parent folder, you can paste the copied keyframes:
Over a target selection of keyframes.
Starting at the current location of the Positioner.
If you paste keyframes and you have not selected target keyframes to paste over, the pasting operation will destroy any and all keyframe data that was originally present in a target span that starts at the location of the Positioner. This target span of the timeline is exactly the size of the span in the copy buffer.
In the Channel Hierarchy, select the target channel or parent folder.
The selected channel(s) are highlighted.
In the Animation Curves window, make sure no keyframes are selected.
Note: If keyframes remain selected the contents of the copy buffer will be pasted to this selection.
Do one of the following:
To paste the keyframes to a different shot in the same timeline, use the Scene Timebar to move the Positioner to the desired shot.
To paste the keyframes to a different timeline, load the required cut, then return to the Animation > Curves menu and move the Positioner to the target location. See Loading a Cut.
Note: Before loading a different cut, save the grade of the cut you are in. Failure to do so will result in a loss of any new grading information (including animations) for this cut.
Do one of the following:
Click Paste.
Press Ctrl+V.
Use the ACS to paste the keyframes.
The keyframe data in the copy buffer is pasted to the timeline starting at the location of the Positioner.
For rules regarding the paste behaviour of point trackers, plugins, and geometries, see Guidelines for Point Trackers, Plugins, and Geometries.
The following are behaviours specific to pasting to a keyframe selection:
When you paste keyframe data to a target keyframe selection, all keyframe data originally present in the span of the timeline occupied by the target keyframe selection is destroyed. This is true even if the copied keyframes occupy a timeline span that is smaller than the target span.
If the target span is discontinuous (that is, there are one or more unselected keyframes separating the selected keyframes of the span), the unselected keyframes are not destroyed when the copy buffer is pasted there. For more information about selecting a span of keyframes, see Selecting Keyframes.
If the span of the copied keyframes is larger than the span of the target selection of keyframes, the copied keyframes are pasted over the target selection as expected, but the portion of the copied keyframes that overshoots the target selection is discarded.
In the Channel Hierarchy, select the target channel or parent folder.
Navigate to the Animation > Curves menu.
Select the desired keyframes in the Animation Curves window. See Selecting Keyframes.
Do one of the following:
Click Paste.
Press Ctrl+V .
Use the ACS to paste the keyframes.
The keyframe data in the copy buffer is pasted to the target keyframe selection.
When copying and pasting keyframes for point trackers, plugins, and geometries, you need to be aware of the following:
You can only copy and paste the same channels (e.g., point tracker channel can be only be copied to another point tracker channel).
When pasting keyframe data to a channel folder, if there are more keyframes in the copy buffer than there are appropriate channels to paste them to, Lustre will match keyframes in the copied folder (in top-to-bottom order) to channels in the target folder and ignore the remaining keyframes.
You can only copy the keyframes for common parameters from one geometry to another.
Geometries are not saved with absolute values. Therefore it is not possible to copy one axis to another while keeping its original position. You may have to manually modify the channel(s) value of your geometry.
When in either the Editing > Timeline or Colour > Timeline menus, the only way to perform the copy and paste actions is by using hot keys or the ACS (see the Autodesk Control Surface User Guide). You can use the hot keys when you are in any of Lustre's menus.
| Hot key | Action |
| Left-Ctrl+C | Copy keyframe(s). |
| Left-Ctrl+V | Paste keyframe(s). |
| Ctrl+Z | Undo |
| Ctrl+Alt+Z | Redo |
| Alt+C | Toggle between One Fr and All Fr copy modes. |