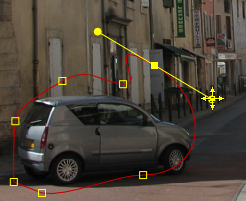
Once you create a mask, you can use different tools to modify it. As the portion of the image that you are masking changes
over time, you will need to adjust the points of the mask to exactly match the image. The mask editing options can be applied
to a single point, a group of points, a single shape, or a group of shapes by:
- Selecting a point or group of points in the Player.
- Selecting a shape or group of shapes from the mask list.
- Selecting a shape or group of shapes in the Player.
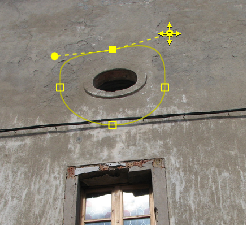
There are two mask editing tools in the Garbage Mask UI; the Point tool and the Transform tool.
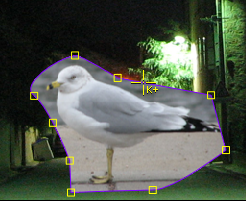
Use the Point tool to edit mask points. Depending on what hot key is pressed and on the location of the mouse cursor, the
mouse cursor updates and displays a visual cue for the current edit mode.
You can nudge the position of selected mask control points, selected shapes, and edge handles (in increments of one pixel)
by holding down the Shift key and pressing the arrow keys on the keyboard. To nudge the position of control points, selected shapes, and edge handles
in increments of 10 pixels, hold Ctrl + Shift and press the arrow keys on the keyboard.
The following mask point parameters (for each point) can be animated. They are accessible from the animation timeline and
expressions can be assigned to all of them:
- X
- Y
- Tangent In angle
- Tangent In Distance
- Tangent Out angle
- Tangent Out Distance
To insert a control point:
- Press and hold the Alt key and click on the curve dragging the point to move it.
To delete control points from a mask:
- Press and hold the Alt key and click on the control point you want to delete or, select points and press the Delete key.
To move control points:
- Do one of the following:
- Click and drag a control point. Hold Ctrl + Alt while moving the point to move in Auto Tangent mode.
- Click or drag a bounding box around a point to select the point. Type the position values into the X and Y value editor under
the Position label and press Enter.
- Click or drag a bounding box around a point to select the point. Click + drag inside the value editor.
To add or delete tangent handles:
- Press and hold the Ctrl key and click on the control points to go from a sharp curve to a smooth curve with tangent handles and drag to adjust the
tangents. Press and hold the Ctrl key and click on the control point a second time to delete them.
To adjust the length of a single unbroken tangent handle:
- Do one of the following:
- Click and drag the handle.
- Type the distance value into the In Dist or Out Dist value editor under the Tangent label and press Enter.
- Click + drag inside the value editor.
To adjust the length of both sides of an unbroken tangent handle:
- Hold the Alt key and drag the handle. When you press Alt and drag an unbroken tangent handle, both tangent handles are automatically given the same length.
To break a tangent handle:
- Press Ctrl then click and drag the handle. Press Ctrl then click and drag the handle again to make the handle continuous.
To move a curve between points:
- Hold Ctrl + Alt over the location on the curve you want to move then drag the curve. The curve and tangents adjust accordingly based on the
location of the cursor.
 Except where otherwise noted, this work is licensed under a Creative Commons Attribution-NonCommercial-ShareAlike 3.0 Unported License