Learning Resources > Tutorials > Getting Started with Maya Unlimited > nParticles > Creating a liquid simulation with nParticles >
Lesson 2: Adjusting Liquid Simulation attributes
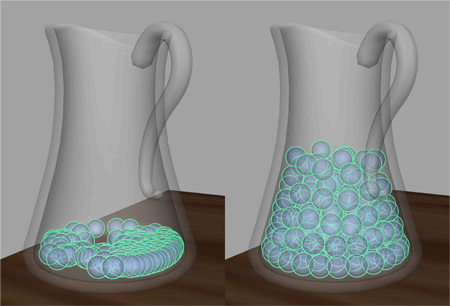
One of the main characteristics of water refers to its volume, or rather how it fills the area inside a given volume. In order to reproduce this with nParticles, there needs to be some space between each individual particle. However, having too much space between them can hinder the fluidity of water, which is another important characteristic. Therefore, we need to set the Liquid Radius Scale attribute to control the amount of space between each nParticle, which compresses and holds the individual nParticles together.
To ensure the lesson works as described, do these steps before beginning:
This file can be found in the GettingStarted directory that you set as your Maya project:
Getting Started/nParticles/Liquid_Simulation_2.mb
This scene includes textured models that have been created for you. The desk, ashtray, and cigarette provided are all polygon meshes.
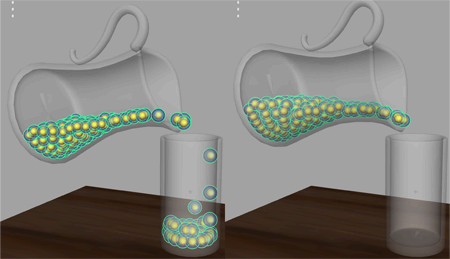
The nParticles are now stacked on top of each other, creating considerably more volume in the pitcher.
More about Liquid Radius Scale
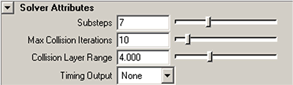
When creating liquid simulations, Liquid Radius Scale can be affected by other nParticle attributes, such as Radius and Collide Width Scale. For example, Liquid Radius Scale uses the nParticle object's Radius to determine how nParticles overlap, and any change in the nParticle Radius will affect how your nParticles overlap in the liquid simulation. Adjusting the Nucleus solver Substeps and Max Collision Iterations can also affect the amount of volume that is generated by the Liquid Radius Scale value. You can experiment with these settings by changing Substeps to 10 and Max Collision Iterations to 15 and observe how your liquid simulation is affected.
In the next section of this lesson, you adjust nParticle Collide Scale Width and Incompressibility attributes to add fluidity to your nParticles.
Adding fluidity to the nParticles
To make it easier to see how the nParticles are interacting with the pitcher and glass passive collision objects, turn on the Solver Display to see the nParticle collision volume. Collision volumes are a non-renderable surface offset from each nParticle radius that the nucleus solver uses when calculating the nParticle object's with each passive object collisions.
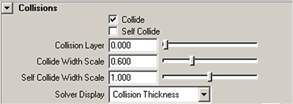
For typical liquid simulations, set Collide Width Scale to a value that is one-third the nParticle object Radius value.
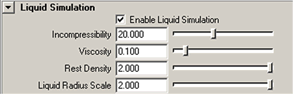
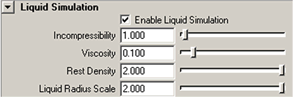
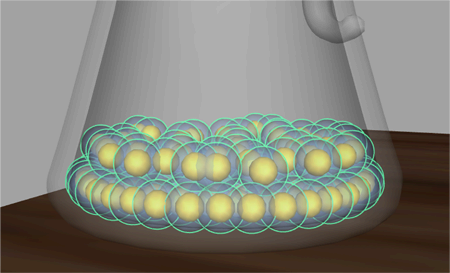
The water nParticles occupy the pitcher in two distinct layers, one on top of the other. In the bottom layer, the nParticles are evenly spaced and leveled, while in the upper layer, there are numerous gaps between each particles. Since the top layer of nParticles represent the surface of the liquid, the gaps between each particle creates a surface that is uneven, and therefore unlike the surface of a liquid.
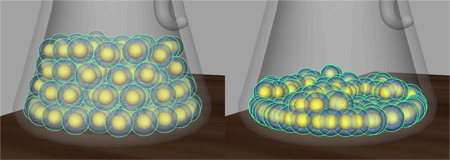
Increasing the nParticles’ Incompressibility decreases their tendency to be squeezed by neighboring particles. This forces the nParticles into a more uniform distribution throughout the volume, which creates a leveled surface for the liquid.
More about Liquid Simulation attributes
For this tutorial, you leave the following Liquid Simulation attributes at their default values:
You can experiment with Rest Density by setting it to 0.5 and then 4.0. Play back your simulation with each new setting to observe how the values affect your nParticles. Set Viscosity to 10,play back the simulation, and observe how long it takes in the animation for the nParticles to move from the pitcher to the glass. Ensure you set Viscosity and Rest Density to their default values before continuing the tutorial.
For more information about these attributes, see Viscosity and Rest Density.
In this lesson you learned how to Adjust Liquid Simulation attributes to set the volume and fluidity characteristics of your liquid nParticles.