In this section, you will create a shader for the Grip surface by duplicating an existing shader. Then, you will apply a bump map to the new shader to create the effect of a bumpy surface.

Watch Part 4 of the tutorial.
Creating a shader for the Grip surface

A new shader is created called Plastic#2. We are creating a shader instead of modifying the original plastic shader, because the original shader was also shared by the Decorations layer. We don’t want to change the shader on the decorations, just on the grip.


The grip becomes active.


 to deselect all objects.

You will change the characteristics of the material to be more like a hard sponge. The surface will still be somewhat shiny, but will not be very reflective.
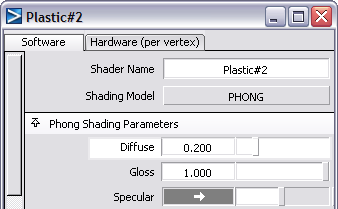


At the Shader Name cell, change the shader name to Grip.

Creating a bump map for the Grip shader
To create an effect of a bump on a surface, you use a technique called bump mapping. Any image can be used as a source for creating a bump on a surface. Typically, the image used in a bump map is gray scale. For example, to create a golf ball, you would use an image that was all white with gray circles darkening to black at their centers on it. The computer would push the surface inwards everywhere there was a dark circle on the image. The darker the color, the farther it gets pushed from the surface.
It is important to note that bump maps create the appearance of a bump on a surface, but do not affect the surface. The edge of a bumped object will retain its original smoothness. If you need to the edge or profile of an object to be bumpy as well, consider using a displacement map, which alters the surface when the image is rendered.
Now, you will create a bump map on the grip shader using a texture from within Alias.


The Texture Procedures window is opened.

The Bulge control window is opened.

The Surface Placement parameters control the number of times the image is repeated across the surface.
 (Windows) or
  (Mac). Click the Vrepeat field
and type 20, then press (Windows) or (Mac).
(Mac). Click the Vrepeat field
and type 20, then press (Windows) or (Mac).

Now, you will render the scene to see the bumpy grip texture.
The File Browser opens to the pix directory of the Lessons project.
The File Browser closes and the render begins.
The grip now has a bumpy surface.


