Part 5: Raytracing


So far, you have been rendering your scene using a type of renderer called a raycast renderer. A raycast rendering requires a lot of tricks to make it look real, because raycasted images do not produce true reflections or refractions.

There is a second type of renderer called a raytracer. This type of renderer is much more accurate and can produce accurate reflections and refractions. Raytracing is also a process that takes much longer to compute than a typical raycast render.

In this section, you will learn how to raytrace an image. First, you will delete the Chrome texture from the Metal shader. Then, you will raytrace the scene.

Watch Part 5 of the tutorial.

Deleting the chrome texture

In the previous tutorial, you applied a chrome texture to the teakettle surface. The chrome texture is assigned to the Metal shader. Now, you will delete this texture because it will not be needed when raytracing.

  1. Open the Multi-lister window, and display only the shaders (Render > Multi-lister > Shaders).

  2. Click the Chrome#2 swatch to make it active.

  3. In the Multi-lister, select the Delete Active command [Delete > Active].
  4. Click the OK button to confirm that you want the chrome to be deleted from the model.

  5. Close the Multi-lister.

Raytracing the scene

  1. Select the Render options command (Render > Render ) to open the Rendering Options window.

    The Rendering Options window is opened.

  2. In the Renderer Type section, click Raytracer.

  3. Click the Save button to save Raytracer as the Renderer Type.

    The Rendering Options window is closed.

  4. Select the Render command (Render > Render).

    The File Browser opens to the pix directory of the Lessons project.

  5. Type render6 in the Object name field (Windows) or Save As field (Mac), then click the Save button.

    The File Browser closes and the render begins.

    Rendering a raytraced image takes longer than rendering a raycasted image. This is because raycasting requires more time to compute reflections and refractions in a scene.

  6. Click the Show button on the Render Monitor to view the rendered image.

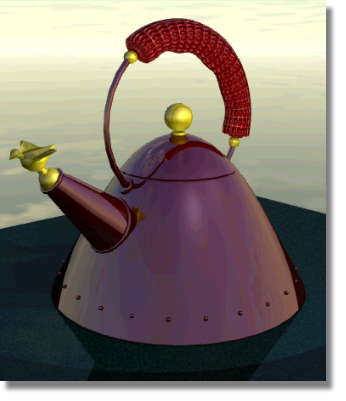
    The sky texture is reflected in the entire scene, including the teakettle and the tabletop. The reflection of the grip is visible in the top of the teakettle, and the reflection of the teakettle is visible in the tabletop.

  7. Close the rendered image and Render Monitor windows.

Adjusting the reflectivity of surfaces

In some cases, you may prefer to limit the amount of reflection that occurs on a surface. Next, you will change the reflectivity of the teakettle and the color on the teakettle.

  1. Open the Multi-lister.
  2. Double-click the Metal shader to open its Control Window.

  3. In the Metal Control Window, change the Reflectivity value from 0.5 to 1.0. This will make the teakettle very reflective, similar to a mirror.

  4. Click the Color field to open the Color Editor.

  5. In the Color Editor, change the color of the metal surface from grey to red. Then, move the cross hairs along the long edge of the color triangle to make the color darker.

  6. Close the Color Editor.

  7. Click the Tabletop shader to display its parameters in the control window.

  8. In the Reflectivity field change the setting from 0.5 to 0.2. This will reduce the amount of reflection on the tabletop.

  9. Close the Tabletop control window and the Multi-lister.

Raytracing the scene again

  1. Select the Render command (Render > Render).

    The File Browser opens to the pix directory of the Lessons project.

  2. Type render7 in the Object name field (Windows) or Save As field (Mac), then click the Save button.

    The File Browser closes and the render begins.

  3. Click the Show button on the Render Monitor to view the rendered image.

    The teakettle is red, as opposed to gray. The reflectivity of the teakettle in the new render is very high, like a perfect mirror. The tabletop is not as reflective as it was in the previous render.

Save your work

  1. Save your work in the wire file of the Lessons directory.
  2. Name your file myadv_rend5.wire.