Main Parameters Rollout (Garment Maker)


Command entry:Select a shape object (spline or NURBS curve). Modify panel Modifier List Object-Space Modifiers Garment Maker Main Parameters rollout

The Main Parameters rollout is the first rollout you see on the Modify panel once you apply the Garment Maker modifier.

This rollout comprises mostly controls to create and adjust the mesh. The remaining rollouts are available at the sub-object levels.

Interface

Density

Adjusts the relative density of the mesh (in other words, the number of triangles per unit area). Possible values range between 0.01 and 10.0. A value of 10.0 creates a very dense mesh, while 0.01 creates a comparatively low-resolution mesh.

For best results, use the lowest possible density to achieve the desired result. This speeds up simulation time and overall performance.

Left: Density=0.5

Right: Density=1.5

Auto mesh

When on, Garment Maker updates the mesh automatically if you change the density or add/remove seams.

This setting is active at all sub-object levels, so it's recommended you leave it on to see changes as you make them. The only time you might want to turn off Auto Mesh is while creating the seams at the Curves sub-object level. Re-meshing can take some time, so you might want to define a number of seams before re-meshing.

Preserve

When on along with Auto mesh, Garment Maker preserves the 3D shape of the object. When off, if you change the Density value, the panels are flat.

Relax

When on, relaxes the default mesh to produce a smoother result. Default=off.

(The default mesh is a standard Delaunay triangulation.)

Mesh It!

Applies a change in the Density value. If Auto mesh is off when you change the Density value, you must click the Mesh It! button to apply the change.

TipSometimes in an error condition Mesh It! will no longer respond. If this happens, go to the spline level in the modifier stack, and then return to the Garment Maker level.
Mesh It and Preserve

Applies a Density change and also preserves the 3D shape of the object. This lets you change the density of the cloth or the underlying spline shape after simulating without having to run the simulation again.

_____

The following setting, comprising three radio buttons, determines how the cloth panels are passed up the modifier stack to the Cloth modifier:

  • Arranged PanelsWith this option, the mesh passed up the stack will be have the panels arranged/bent around the figure as they were placed by the user in panels sub-object mode.
  • Preserved SurfaceWhen both Auto mesh and Preserve are on, or when you click Mesh It And Preserve, Garment Maker takes a snapshot of the mesh at the top of the stack (where Cloth is applied). This snapshot is passed up the stack when you choose Preserved Surface. This way, if you change the Density value, the mesh will retain its deformation. Once a snapshot has been taken, at the Panel sub-object level, the panels will have the Use Preserved check box on. This means you can move the panels around while maintaining their deformation. Also note that once a snapshot has been taken, Garment Maker automatically chooses the Preserved Surface option.
  • Flat PanelsDisplays all the panels as flat surfaces. This mode defines the texture coordinates of the garment vertices. With this output mode active, you can adjust texture coordinates at the Panel sub-object level by moving and rotating the panels.

_____

Stretch Map Coords

When on, the UV coordinates are based on the square bounding rectangle whose edge is the longer edge of the actual bounding box, and so have an aspect ratio of 1:1. When off, the UV coordinates do not maintain a 1:1 apect ratio but use the actual bounding box.

Left: Stretch Map Coords on

Right: Stretch Map Coords off

Figure group

Use these controls to specify locations for each panel on the figure to be clothed

[button]

Click this button, labeled “None” by default, and then click the object, or figure, to which the clothing is to be applied. Typically this is a character model. Thereafter, the name of the object appears on the button.

Mark Points on Figure

After specifying a figure using the “None” button (see preceding), use this control to specify locations on the figure for automatically positioning panels in the garment.

When you click Mark Points On Figure, this character outline appears in the corner of each viewport:

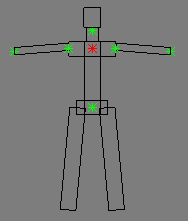
The character outline lets you mark points for positioning panels.

As each point highlights in red, click the corresponding location on your figure. When you do so, an axis tripod appears on the object surface and the next point on the outline highlights. During this process you can manipulate the viewport as usual, zooming, panning, and rotating freely. You can continue clicking points as long as you like; to stop, right-click in the viewport, or turn the button off.

NoteIf you return to marking points later, 3ds Max starts again where you left off earlier.

The points highlight in this order:

  1. Upper Chest
  2. Pelvis
  3. Neck
  4. Right shoulder
  5. Left shoulder
  6. Right hand
  7. Left hand

After setting the points, you can use the Panel Position and Level controls at the Panels sub-object level to place the panels automatically.