Sweep surfaces are constructed from curves. A 2-rail sweep surface uses at least three curves. Two curves, the "rails," define the two edges of the surface. The other curves define the surface's cross sections. A 2-rail sweep surface is similar to a 1-rail sweep. The additional rail gives you more control over the shape of the surface.

Sweep surface created with two rails
The cross-section curves should intersect the rail curves. If the cross sections don't intersect the rails, the resulting surface is unpredictable. In addition, the initial points of the rails and the endpoints of the first cross-section curve must be coincident. Use NURBS Snaps to accomplish this.
When you create a 2-rail sweep, you can select curves that are not already sub-objects of the active NURBS model. You can select another curve or spline object in the scene. When you select that curve, it attaches to the current object as if you had used the Attach button.
As you move the mouse over a curve that is not part of the active NURBS object, the cursor changes shape to indicate that you can pick the curve, but the curve is not highlighted in blue.
 (Create 2-Rail Sweep).
The sweep is interpolated smoothly between the cross sections, following the outlines defined by the two rails.
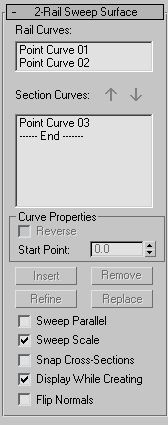
As you click curves, their names appear in the lists on the 2 Rail Sweep Surface creation rollout. The order in which you click the curves can affect the shape of the sweep surface.
Example: To create a 2-rail sweep with automatic attach:
 Create panel and create three independent CV or Point NURBS curves.
 Modify panel. In the NURBS toolbox, click to turn on (Create 2-Rail Sweep).
3ds Max creates the sweep. You don't need to collapse the curves to a NURBS surface or Attach them to an existing NURBS model.
As you move the mouse over a curve that is not part of the active NURBS object, the cursor changes shape to indicate that you can pick the curve, but the curve is not highlighted in blue.
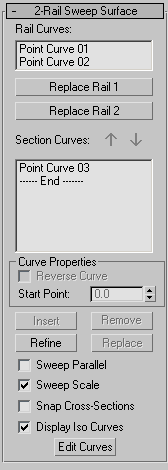
While a 2-rail sweep sub-object is selected, a rollout with the 2-rail sweep parameters appears. This rollout appears only and when one 2-rail sweep sub-object is selected. It isn’t possible to edit more than one 2-rail sweep at a time, so unlike some other NURBS sub-objects, the rollout doesn’t appear when multiple 2-rail sweep sub-objects are selected.
These controls affect individual curves you select in the Section Curves list, as opposed to properties of the sweep surface in general. They are enabled only when you have selected a curve in the Section Curves list.
Adjusts the position of the curve's start point. This can help eliminate unwanted twists or "buckles" in the surface.
This control is disabled if the curve is not a closed curve.
While you're adjusting start points, a dotted blue line is displayed between them, to show the alignment. The surface is not displayed, so it doesn't slow down adjustment. When you release the mouse button, the surface reappears.
When off, the rail curves define a ruled surface, and the cross sections describe lofting from this base ruled surface. When on, each cross section is associated with its best fitting plane. This plane moves along the rails and parallel to them. If the rails are curved, the plane can rotate. If the spacing between the rails changes, the section scales or stretches. In either case, the surface is blended from section to section along its entire length. Default=off.
When on, cross-section curves are translated and scaled so they intersect both rails. The first cross section is translated to the start of the rails, and the last to the end of the rails. The cross sections in the middle are translated to touch the rails at the closest point to the ends of the cross-section curves. Default=off.
When Snap Cross-Sections is on, the sweep follows the rail curves exactly. This makes it easier to construct 2-rail sweep surfaces.
These controls affect individual curves you select in the Section Curves list, as opposed to properties of the sweep surface in general. They are enabled only when you have selected a curve in the Section Curves list.
Adjusts the position of the curve's start point. This can help eliminate unwanted twists or "buckles" in the surface.
This control is disabled if the curve is not a closed curve.
While you're adjusting start points, a dotted blue line is displayed between them, to show the alignment. The surface is not displayed, so it doesn't slow down adjustment. When you release the mouse button, the surface reappears.
Refines the 2-rail sweep surface. Click to turn on Refine, then click an iso curve on the surface. (As you drag the mouse over the surface, the available section curves are highlighted.) The curve you click is converted to a CV curve and inserted into the sweep and the section list. As when you refine a point curve, refining a sweep can change the curvature of the surface slightly. Once you’ve refined the surface by adding a cross-section curve, you can use Edit Curves to change the curve.
When off, the rail curves define a ruled surface, and the cross sections describe lofting from this base ruled surface. When on, each cross section is associated with its best fitting plane. This plane moves along the rails and parallel to them. If the rails are curved, the plane can rotate. If the spacing between the rails changes, the section scales or stretches. In either case, the surface is blended from section to section along its entire length. Default=off.
When on, cross-section curves are translated and scaled so they intersect both rails. The first cross section is translated to the start of the rails, and the last to the end of the rails. The cross sections in the middle are translated to touch the rails at the closest point to the ends of the cross-section curves. Default=off.
When Snap Cross-Sections is on, the sweep follows the rail curves exactly. This makes it easier to construct 2-rail sweep surfaces.
Lets you edit the currently selected curve without switching to another sub-object level. Click to turn on Edit Curve. The points or CVs of the curve are displayed, as well as the control lattice if the curve is a CV curve. You can now transform or otherwise change the points or CVs as if you were at the Point or Curve CV sub-object level. To finish editing the curve, click to turn off Edit Curves.
The sweep surface can deviate from the curve if you edit a curve in a sweep by increasing the weight of the curve CVs. You can work around this by refining the curve at the point where the surface deviates.