Glossy reflections and refraction can be interpolated, which causes them to render faster and look smoother.
Interpolation works by precalculating glossy reflection in a grid across the image. The number of samples (rays) taken at
each point is govern by the Reflection  Glossy Samples or Refraction Glossy Samples parameters, as in the non-interpolated case.
Note that interpolation can cause artifacts. Because it is done on a low-resolution grid, it can lose details. And because it blends neighbors of this low-resolution grid, it can cause oversmoothing. For this reason, it is useful primarily with flat surfaces. Interpolation does not work well with wavy, highly detailed surfaces or surfaces that use bump maps.
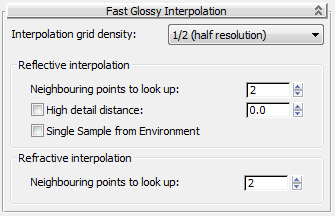
Reflective interpolation group
Defines how many stored grid points (in an N by N group around the currently rendered point) is looked up to smooth out reflective glossiness. The default is 2. Higher values will “smear” the glossiness more, but because of this they are prone to more oversmoothing artifacts.
In the following illustration, the reflection of the left cup in the floor does not use interpolation, and some grain is evident (here intentionally exaggerated). The floor tiles under the other two cups use a half-resolution interpolation with point lookup set to 2 (center) and 4 (right), respectively.
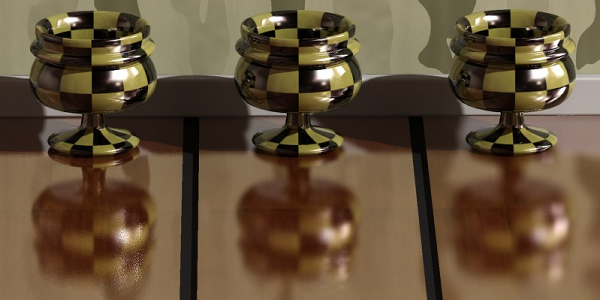
Left: No interpolation
Center: Looking up two points
Right: Looking up four points.
The preceding image also illustrates one of the consequences of using interpolation: The foot of the left cup, which is near the floor, is reflected quite sharply, and only the parts of the cup far from the floor are blurry. However, the interpolated reflections of the right cups have a base level of blurriness, due to the smoothing of interpolation, which makes even the closest parts somewhat blurry. In most scenes with weak glossy reflections this discrepancy will never be noticed, but in other cases this can make things like legs of tables and chairs feel “unconnected” with a glossy floor, if the reflectivity is high. To resolve this, you can use the High Detail Distance setting (see following).
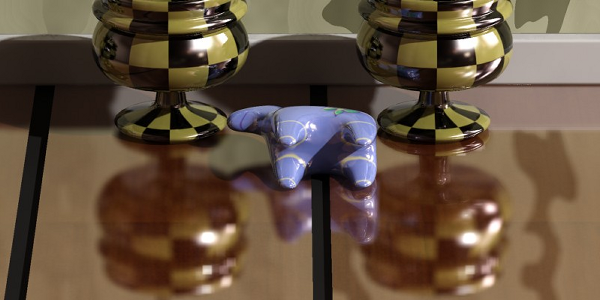
Allows tracing of a second set of detail rays to create a “clearer” version of objects within the specified radius.
In the following illustration, all three floor tiles use interpolation, but the two on the right use different distances for the detail distance.

Left: No detail distance
Center: 25mm detail distance
Right: 150mm detail distance
This also allows an interesting trick: Set Reflection Glossy Samples to 0, which renders reflections as if they were mirror-perfect, but also use interpolation to introduce blur
into this reflection, and perhaps use High Detail Distance to make nearby parts less blurry. This is a fast way to obtain
a glossy reflection.
The floor tiles in the following illustration are rendered with mirror reflections, and the blurriness comes solely from the interpolation. This renders as fast as or faster than pure mirror reflections, yet gives a satisfying illusion of true glossy reflections, especially when utilizing the High Detail Distance option, as on the right.
Left: No detail distance
Right: With detail distance
Creating realistically blurry glossy reflections normally requires taking multiple samples from the environment, which can
result in grainy, slow-rendering environment reflections. With this check box on, mental ray instead takes only one sample, thus preventing the grain. This also prevents blurring the environment, so it is best used together with a local,
“pre-blurred" environment map. You can do the pre-blurring in an image-processing program or with the Material Editor Coordinates rollout Blur and Blur Offset settings.


 Material Editor