Use the Reaction Manager dialog for setting up and modifying Reaction controllers. Reaction Manager lets you add and delete masters and slaves, define states for reactions, use a graph to view and modify reactions with curves, and more.
 Reaction Manager. If you use Reaction Manager often, it's recommended that you assign a keyboard shortcut to the command.
Example: To use the Reaction Manager dialog:
The purpose of this procedure is to show you different ways to use Reaction Manager. Before trying it, we suggest that you first follow the introductory procedure in the Reaction Controllers topic: Example: To make the position of a sphere react to the position of a box:.
The viewport should resemble the following illustration:
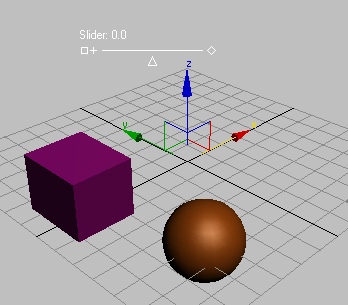
You'll use the slider to control two slaves separately: Negative values for the box X position, and positive values for the sphere's Hemisphere parameter.
 Create panel Parameters rollout, set Minimum to 100.0.
 (Add Master), and then click the Slider manipulator in the Perspective viewport.
value.
(Add Master), and then click the Slider manipulator in the Perspective viewport.
value.
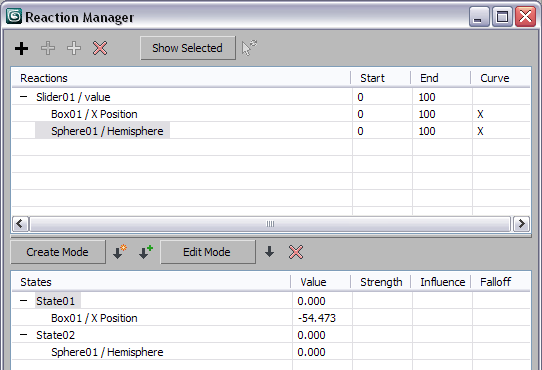
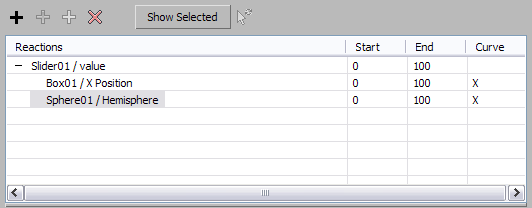
In the Reactions list, the master entry Slider01 / value appears.
 (Add Slave), and then click the box in the Perspective viewport.
Position X Position.
(Add Slave), and then click the box in the Perspective viewport.
Position X Position.
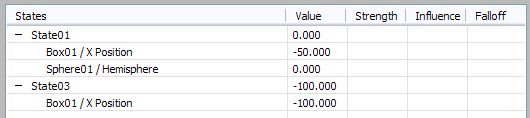
In the Reactions list, the slave entry Box01 / X Position appears under the master entry. Also, a new state appears in the States list for the newly added slave track. This simply says that, when the slider value is 0, the box's X position should be what it is currently. However, a reaction needs at least two states to be meaningful. You'll learn how to accomplish this shortly.
 select the sphere.
 (Add Selected).
Hemisphere.
(Add Selected).
Hemisphere.
The sphere's Hemisphere track is added as a slave of the slider, and a new state for the two is added to the States list.
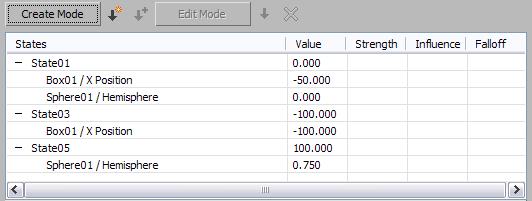
You now have two states in the States list, but in both cases the state value (that is, the slider value) is the same, so you really need only one. You can resolve this by adding the Hemisphere slave track to the first state and then eliminating the second state.
 (Append Selected).
 (Delete State).
Currently, the box is where you created it, but you might want it to start out at a different location. However, because the box is a slave of the slider, you can't move it freely on the X axis. You'll use the Reaction Manager to set the X position of the box to a specific value.
Value entry. 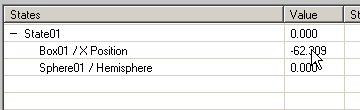
You might find it difficult to set an exact value by dragging, which changes only the tenths (and higher) value. You can use the keyboard to specify a more exact value.
The value highlights and becomes a keyboard-editable field.
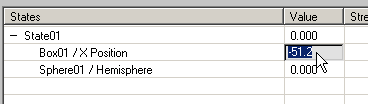
The value now displays as –50.000.
You can use the same mouse and keyboard methods to change state (master) values as well.
Next, you'll learn how to use Create Mode to create new states freely.
First, you'll set a new state to move the box leftward for negative slider values.
When Create Mode is on, you can change master and slave properties and use the current properties to create new states.
 (Select And Manipulate), and then drag the slider pointer all the way to the left, so the slider value reads –100.0.
Highlighting the slave entry lets you manipulate the slaved value interactively in the viewport while Create Mode is on. Then, when you click Create State, a new state is created for that slave only. If you highlight the master instead, you can manipulate all slaves freely, but then clicking Create State creates a new state for all slaves. Reaction Manager is a complex tool, so in general it's best to keep the data as simple as possible.
 (Create State).
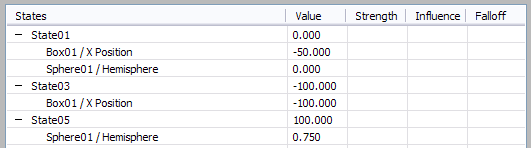
The Reaction Manager adds a new state, State02, with the state (slider) value at –100.0, and the box at its new X position.
Next, you'll set a new state so the right half of the slider range affects the sphere's Hemisphere value.
 Modify panel.
The Hemisphere parameter is unavailable, because it's slaved to the slider value.
Modify panel, set Hemisphere to 0.75.
(Create State).
The Reaction Manager adds a new state with the state (slider) value at 100.0, and the Sphere01 / Hemisphere value at 0.750.
Also, if you click Slide01 / Value in the Reactions list, you can see in the graph showing the slider value on the horizontal axis and the two reactions on the vertical axis. The scale between the two differs greatly, so the Hemisphere reaction on the right side of the graph looks like a straight line, but if you click the Sphere01 / Hemisphere slave entry in the Reactions list, the graph shows a steady rise from 0.0 to 0.75.
Over the left half of the slider range, the box moves along the X axis. Over the right half of the range, the sphere's Hemisphere value changes.
To finish the procedure, you'll experiment with using the graph to change a reaction.
 (Zoom Extents) below the graph.
 (Add Point), and then click the middle of the graph curve (it's the red, diagonal line).
This adds a new point to the curve and a new state in the States list.
 (Move), and then drag the new point upward so it's above the right-hand endpoint.
As the slider moves from 0 to 100, the Hemisphere value increases so much that the sphere disappears, and then decreases so you can see the upper fourth of the sphere.
This has been a brief tour of some of the capabilities of the Reaction Manager dialog. For further information, consult the “Interface” section, below.
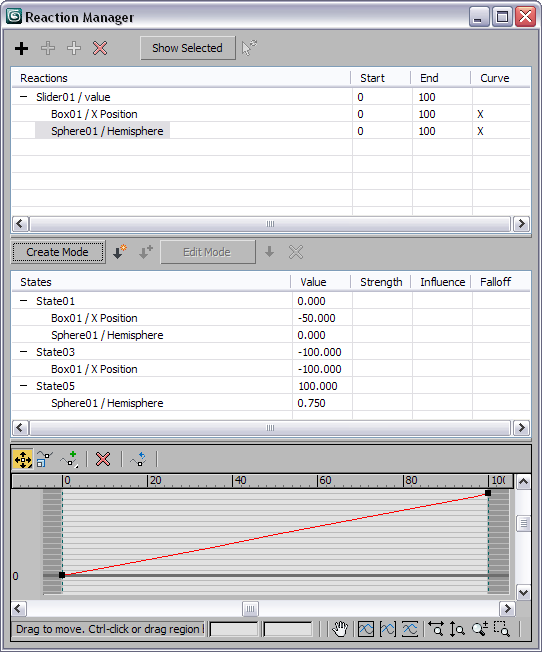
The Reaction Manager dialog interface consists of three parts: the Reactions list, the States list, and the graph. Each has its own toolbar or toolbars. Each list contains rows and columns; the column headings employ standard Windows functionality. To resize a column, drag the divider to the right of its heading, or auto-size a column to fit its widest entry by double-clicking the right-side heading divider. To change the vertical size of a list section, drag the horizontal divider at the bottom of the list, and to scale all three sections proportionally, drag the bottom of the dialog. You can also resize the dialog by dragging a corner or a side.
You can use standard methods to highlight list items for further actions. Highlight a single item by clicking it. Highlight multiple consecutive items by clicking the first item and then Shift+clicking the last. Use Ctrl+click to highlight non-contiguous items and to toggle highlighting of a single item.
In most cases, if a cell in the Reactions list or the States list contains a single numeric value, you can change the value by dragging vertically on the cell. Click and hold on the number in the cell, and then move the mouse upward to increase the value or downward to decrease it. The exception to this are the Start and End values for master objects; you can change these values only by modifying a slave's Start or End value. You can also modify a one-value field by double-clicking it and then editing it with the keyboard. If a field contains multiple numeric values, you must manipulate the object directly in the viewports or the appropriate dialog.
The dialog also has a right-click menu for managing reactions and states, available by right-clicking anywhere on the dialog except in the graph section.
The Reactions list displays a hierarchical view of the master-slave relationships of objects with Reaction controllers in the scene. You can use its controls to add and delete masters and slaves, change start and end frames, and toggle usage of the graph curve. These controls are available both on the toolbar above the list and in the list itself.
Add MasterPlaces you in Add Master mode. Click an object in a viewport, and then use the pop-up menu to choose an animation track to
use as master. Alternatively, choose a track in Track View or from the Motion panel Assign Controller rollout list.
Using the pop-up menu, you can choose only a track at the end of the menu hierarchy; for example, Transform Position X Position. If you choose the object name from the top of the menu, Reaction Manager lists it as World Space Position, so
that you can use its three-dimensional position in the World coordinate system to control its slaves.
To use a Position or Rotation track for the master, click Add Master and then click the track in Track View or the Motion
panel Assign Controller rollout list. In the latter case, the object must already be selected in the viewports before clicking
Add Master in order for it to show up on the Assign Controller rollout list. If using Track View, you can open the Track View
dialog before or after clicking Add Master.
Add SlavePlaces you in Add Slave mode, letting you assign a slave track to the currently highlighted master in the Reactions list.
Highlight a master and then click Add Slave. Click an object in a viewport, and then use the pop-up menu to choose an animation
track to use as slave. Alternatively, choose a track in Track View or from the Motion panel Assign Controller rollout list. Available only when a master is highlighted in the Reactions list.
To add multiple slaves, click Add Slave and then press H to open the Pick Object dialog. Highlight the objects to add, and then click Pick. The pop-up menu then appears, prompting you to choose an animation track to use as slave. The same track is used from each object. Alternatively, select the objects and then use Add Selected (see following).
If multiple masters are highlighted when you add a slave or slaves, the slave is added to the first master in the list.
If any states are highlighted in the States list, the new slave or slaves are added to the highlighted states. If no states are highlighted in the States list, Reaction Manager creates a new state with the added slave or slaves.
Add SelectedLets you add slave tracks to the current master for any selected objects in the viewports. Opens a pop-up menu from which you can choose a track. If multiple objects are selected, this track is added as a slave for each selected object. Available only when a master is highlighted in the Reactions list and at least one object is selected in the viewports.
If multiple masters are highlighted, the slaves are added to the first master in the list.
If any states are highlighted in the States list, the new slave or slaves are added to the highlighted states. If no states are highlighted in the States list, Reaction Manager creates a new state with the added slave or slaves.
Delete SelectedWhen on, displays data in the Reactions list only for objects selected in the viewports. This lets you restrict display reaction setups to objects of immediate interest, without having to scroll through long lists of parameters.
When off, shows all objects and states, regardless of viewport selection status.
If the master is selected in the viewport, Show Selected shows all slaves in the Reaction list whether or not they're selected.
 Update Selection
These columns show the first and last animation frames for which the master-slave relationship is in effect. These default to the active time segment. Use standard methods to change these values.
If multiple slaves assigned to the same master have different Start or End values, the master's Start and End fields are blank.
This column shows an X when the graph curve is used to modify Strength, Influence, and Falloff. To specify these numerically in the States list, click the field to toggle the X. Available for slaves only.
A state describes interaction between a master and its slaves. In each state, you specify a value or values for the master track, and corresponding values for each slave. Then, as a master-track value changes in the scene, the slaved values follow along according to the states' specifications.
The States list shows all states for the highlighted reaction in the Reactions list. Any member of a reaction (master and/or slaves) can be highlighted in the Reactions list for its states to appear in the States list. If members of multiple reactions are highlighted, the States list reflects values for the first highlighted reaction only.
You can use tools in the States list to add and modify states and their names. To change a state name, click the text twice, slowly (don't double-click). Or, if the state name already highlighted, just click it once. The text highlights and a box appears around it to show that you can now edit it. You can rename only state names, not the indented slave tracks.
You can change values for single-numeric-value slaves in this list by dragging vertically on the value.
The following reference describes changing values interactively in the viewports using the States list controls. Other controls are described in the introduction to this topic.
Use primarily to create new states interactively. To use it, turn on Create Mode, adjust values for the current reaction (master and slaves) in the viewports, and then click Create State. You can repeat this to create any number of new states quickly and efficiently.
The difference between creating a state in or out of Create mode is that, in Create mode you can manipulate the reaction tracks for all objects, whereas with it off you can manipulate the reaction track only for the master.
Create StateAdds a new state to the States list for the current reaction, using the current values for the master and slave parameters.
When you create a state, 3ds Max gives it a default name (State##) and lists its slave tracks, indented, under the state name.
The contents of the new state depend on what's highlighted in the Reactions list. If the master is highlighted, a new state specifies values for the state (i.e., master track) and all of its slaves. If one or more slaves are highlighted in the Reactions list, the new state specifies values for the master and only the highlighted slaves.
Append SelectedWhen on, you can change slave values interactively in the current state by manipulating slave objects in the viewports or by editing their values on a rollout. Available only when at least one item in the States list is highlighted.
If you highlight a slave name, you can edit its value for the current state. If you highlight a state name and then click Edit Mode, you can edit any of its slave tracks. To exit this mode and test the new values, click Edit Mode again.
As you manipulate the object, the value is updated immediately and the new value is displayed in the States list. If slaves in multiple states are highlighted, values are updated for those in the first state only.
 Set State
Updates the highlighted state (master track) to its current value. To use this option, highlight the master track in the Reactions list and the state in the States list. Manipulate the master object in the viewports, and then click Set State to update the state value. Available only when a state is highlighted in the States list.
Delete StateThe following three parameters, which appear as columns in the States list, apply to slaves and are normally controlled via the graph curve. They're available only if the slave has Curve turned off in the Reactions list.
These parameters are based on the fact that states can influence one another, so that you get a blending between them.
Reaction Manager's graph displays curves that graph the master values on the horizontal axis and slave values on the vertical axis. It shows data of all states for items highlighted in the Reactions list. If a master is highlighted, the graph shows states curves for all its slaves. If one or more slaves are highlighted, but the master isn't, the graph shows data for those slaves only. You can edit data using the graph by dragging points.
The graph controls are similar to those found in other graphs in 3ds Max, such as the Material Editor Output rollout. The toolbar above the graph offers functions for moving and scaling points on the graph, as well as inserting new ones (that is, new states). The same functions are available by right-clicking the graph, and if you right-click a graph point, you can set it to Corner and two different Bezier types. If you select a Bezier point, you can reshape the curve by moving its handles. You can drag a region to select multiple points, and then edit them together. Use the toolbar under the graph for panning and zooming the graph.
Reaction Manager's right-click menu provides quick access to a number of commonly used functions. It also contains the Replace Master function, which is unavailable elsewhere in the dialog interface. To open the right-click menu, right-click anywhere on the Reaction Manager dialog except in the graph section.
Places you in Add Master mode. Click an object in a viewport, and then use the pop-up menu to choose an animation track to
use as master. Alternatively, choose a track in Track View or from the Motion panel Assign Controller rollout list.
For more information, see Add Master.
Lets you replace the current master. Use the standard method to choose another master as described in Add Master.
Use this function to specify a master when you open Reaction Manager by assigning a Reaction controller to a slave.
Lets you add a slave to the current master. For details, see Add Slave.
Lets you add selected objects as slaves to the current master. For details, see Add Selected.
Deletes any items highlighted in the Reactions list. For details, see Delete Selected.
Lets you create states on the fly by manipulating objects in the viewports. For details, see Create Mode.
Adds a new state to the States list for the current reaction. For details, see Create State.
Updates the highlighted state (master track) to its current value. For details, see Set State.
Lets you change slaves' values in the current state. For details, see Edit Mode.


 Motion panel
  (Assign Controller).