The Reaction controller is a procedural controller that lets a parameter react to changes in any other parameter in 3ds Max. Typically, most of the setup involving Reaction controllers is done with the Reaction Manager dialog. You use the dialog to define a master, which is an object that controls other objects, and, for each master, any number of slaves, which are objects the master controls. Alternatively, you can assign a Reaction controller directly to a slave object using Track View or the Motion panel (as you would any other controller), and then use Reaction Manager to specify its master and other parameters.
Reaction controllers come in five different types: Position Reaction, Rotation Reaction, Point3 Reaction, Scale Reaction, and Float Reaction. You can assign a Reaction controller to any animatable track in the scene. Reaction is not based on time, but rather on other variables in your scene such as position or rotation.
You can use a Reaction controller to turn on a light as an object nears a given point. Muscles can bulge as an arm bone rotates. A ball can squash automatically as the ball's Z position nears the ground plane. Feet can rotate as their heels are lifted from the floor.
A particle system can be triggered by any given event. Morph target percentages can be controlled by events.
Example: To make the position of a sphere react to the position of a box:
This procedure shows an alternate way to use a Reaction controller. The recommended workflow is to do most of the setup in the Reaction Manager dialog: See Example: To use the Reaction Manager dialog:.
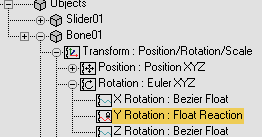
 Motion panel, and on the Assign Controller rollout, click the Position track to highlight it.
 (Assign Controller).
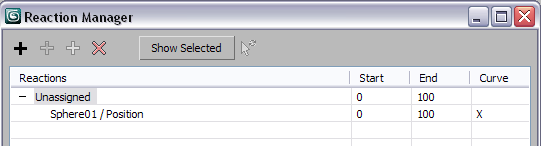
This opens the Reaction Manager dialog. The Reactions list shows that the sphere is assigned as a slave, but no master is assigned. A Reaction controller uses a master's motion to control any number of slaves.
This places you in a Pick mode where you can choose a motion track from any object in the scene to act as master.
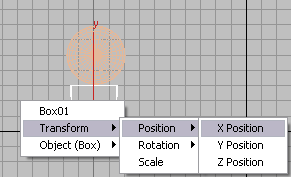
 Position X Position.
The “Unassigned” text is replaced by a master track labeled “Box01 / X Position”.
Also, a new state, State01, appears in the States list.
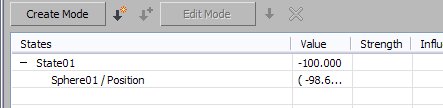
This is an example of the basis of the control mechanism used by the Reaction controller: For each master/slave combination, you can specify any number of states defined by values for the master and slave tracks. The first state, created automatically when you added the master, specifies that when the box is at –100 on the X axis, the sphere should be at (–100,0,50). In this case, you're controlling three parameters (the sphere position on all three axes) with one (the box position on the X axis). More typically you'd use one-to-one master/slave-parameter ratios.
Next you'll create a second state that tells the sphere how to move on multiple axes as the box moves on one.
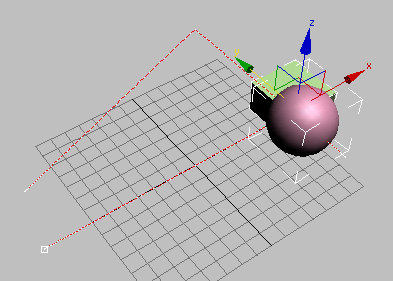
The box moves to the midpoint of its animated trajectory. The sphere remains where it is.
 (Create State).
This creates a new state (State02) using the current positions of the box and sphere.
You can't move the sphere because it's under the full control of its master, the box. Similarly, you can't change its position using the Coordinate Display fields on the status bar. However, you can change the sphere's position using the Reaction Manager's editing tools.
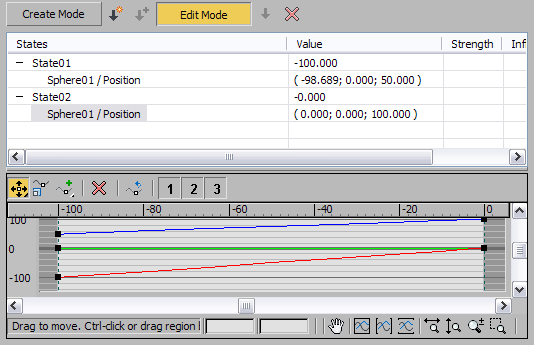
The position updates in the Sphere01 / Position line under State02. Also, the Reaction Manager graph shows the change in values of the slave's (sphere) X and Z position values as the master box's X position changes. On the graph, as in Track View, red=X, green=Y, and blue=Z.
As the box moves between frames 0 and 50, the sphere rises to the position specified in the second state.
For the third and final state, you'll have the slave move in a different direction over the second half of the master's motion.
Over the first 50 frames, the sphere moves between the first two states, and over the second half of the animation, the sphere moves between the second and third states.
To conclude the procedure, you'll demonstrate that the sphere is responding only to the box's X position, regardless of animation.
 Select the box, and then press and hold the Alt key and right-click the box.
This command deletes all animation keys for the current selection.
 move the box in all three dimensions.
Any change in the Y or Z position has no effect on the sphere. However, moving the box between –100 and 100 on the X axis, no matter what the Y or Z position, results in changing the sphere's position as specified in the Reaction controller.
This procedure gives you a hint of the Reaction controller's power. You can find another procedure showing additional aspects of the Reaction Manager in: Example: To use the Reaction Manager dialog:.
After assigning a Reaction controller, right-click the track and then choose Properties, or choose Animation Reaction Manager, to open the Reaction Manager dialog.
Use the Reaction Manager dialog for setting up and modifying Reaction controllers. Reaction Manager lets you add and delete masters and slaves, define states for reactions, use a graph to view and modify reactions with curves, and more.
The Position Reaction and Rotation Reaction controllers let you perform certain functions via manipulators in the viewports.


