 Command entry:Particle View
 Click Mapping in an event or add a Mapping operator to the particle system and then select it.
The Mapping operator lets you assign a constant UVW mapping to the entire surface of the particles. It works in conjunction with a map specified in a material operator in the current event. By animating the mapping coordinates, you can vary the location on the material map from which the particle color is taken, thus changing the particle color in a predictable way over time.
The Mapping operator was designed primarily to be used with gradient maps, although you can use it with any map you like. The procedure below describes a recommended method for using the Mapping operator.
Example: To animate particle coloring using the Mapping operator:
 Material Editor, and create a material that uses Gradient Ramp as the Diffuse map.
 (Auto Key).
U=1.0.
(Auto Key).
U=1.0.
 (Auto Key), and click
  (Play Animation).
As each particle is born and falls, its U mapping coordinate gradually changes from 0.0 to 1.0, while its color changes to match the corresponding position across the Gradient Ramp map.
To vary the effect, try changing the Gradient Type setting, and animate the V and W values as well. Or, for more sophisticated
effects, assign animation controllers such as Noise Float to the Mapping coordinate values, or wire them to other changing
parameters in the scene (Animation menu Wire Parameters Parameter Wire Dialog).
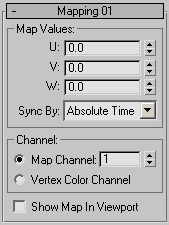
The user interface appears in the parameters panel, on the right side of the Particle View dialog.
Set the coordinates on the map from which the particle color is taken. One pixel from this location is used to color the entire particle.
In general, U and V represent the horizontal and vertical dimensions, respectively, beginning at the upper-left corner of the map, and W is useful only with three-dimensional maps, in which context it specifies depth.
Choose the time frame for applying animated parameters. For further information, see Animation Offset Keying group.


