Use these tools to paint objects onto the scene or specific objects freehand or along a selected edge loop. The objects you add to the scene by painting are known as paint objects.
This procedure covers the most important settings for painting objects onto the scene freehand.
 Selected Objects; otherwise, choose
  Scene to paint anywhere in the scene, or
  Grid to ignore existing objects while painting.
 (Paint) and then drag in a viewport to paint the paint objects into the scene. Use as many paint strokes as you need.
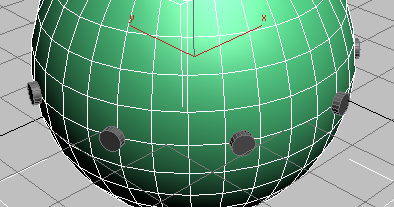
Teapots painted onto the scene
 (Commit) on the Brush Settings panel.
After you do so, you can no longer adjust the paint objects via the Paint Objects and Brush Settings parameters. However, they are standard objects, so you can edit them as with other objects in the scene. Also, each paint object is an instance of the original object, so you can affect each set of instances by editing any one’s creation parameters, modifiers, and so on.
Alternatively, to stop painting without saving your work, click  (Cancel) on the Brush Settings panel.
Example: To paint with an animated object:
You can paint with transform-animated objects so that each paint object’s transform plays back differently during the animation.
Selected Objects.

The painted-on cylinders all fall over at once, because the animation for each copy starts at the same time as the animation of the original cylinder.

This time the cylinders fall in sequence, starting with the first and proceeding to the last. The offset of 1 means that the playback of each cylinder’s transform animation is delayed one frame from the one before it.

To apply objects to an edge selection with Fill:


Fill works only with a single, unbroken edge loop. If the object contains multiple qualifying selections, the loop containing the lowest ID gets the fill (see Fill).
 (Fill).
The paint objects are applied to the edge selection.

Also, you can change other settings such as transforms applied to the paint objects with the Brush Settings panel.
Alternatively, to stop painting without saving your work, click (Cancel) on the Brush Settings panel.
 Paint
Paint
After specifying one or more paint objects and the surface to paint on, click this button and then drag in a viewport to paint the objects.
To stop painting, right-click in the viewport or click the Paint button again. To exit Paint mode without saving your work, use Cancel.
For details, see this procedure.
Fill
Places paint objects along selected edges in a continuous loop on an editable poly or Edit Poly object only. Available only at the Edge or Border sub-object level of an editable poly or Edit Poly object with at least one edge selected.
For details, see this procedure.
If edges on more than one loop are selected, Fill applies to the loop that contains the edge with the lowest ID.
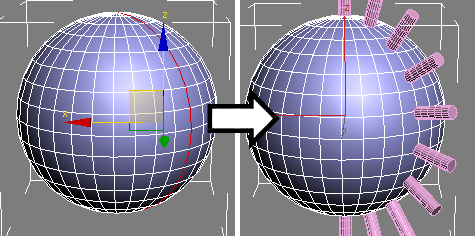
Single edge loop before Fill (left) and after Fill (right)
The object or objects to paint into the scene. By default, this field shows “No Object...” (when no paint object is designated) or the name of the object at the end of the object list (see following). Alternatively, you can choose either of the following:
 Edit Object List
Opens the Paint Objects dialog for managing the list of paint objects.
When the Use Object list (see preceding) is set to a single object, use Edit Object List to choose which object to paint. When the Use Object list is set to All, In Order, use Edit Object list to change the object order.
 Pick Object(s)
Designates a single paint object. Click Pick Object(s) and then select an object. To designate additional paint objects, repeat the process. Available only when Paint is off.
The last object you pick appears by default on the drop-down list (see preceding) and is thus the default paint object. To make a different object the default, highlight it in the Edit Object List (see preceding). To draw with multiple objects, choose an alternative option from the drop-down list: All, In Order; or All, Randomly.
The number of objects to be painted on the selected edges when you click Fill.
Choose the surface to receive paint objects:
GridPaints objects onto the active grid only, disregarding any objects in the scene. 
With Draw On set to Grid, some paint objects were painted under the raised part of the plane object.
Selected ObjectsPaints only on selected objects. 
If, when using Paint On Selected Objects, you move the brush off an object surface and then back on in a different place, using a single stroke (that is, without releasing the mouse button), the software automatically connects the two points with a line of paint objects.

The paint stroke moved off the object surface at point 1 and then back on at point 2.
ScenePaints objects on object surfaces under the mouse cursor, and on the grid when the mouse cursor is not over an object. 
See also: Paint on Painted Objects
If you paint with transform-animated objects, the resulting paint objects inherit that motion. Note that this applies only to animation of the entire object with the Move, Rotate, or Scale tool (or any combination of those tools). It does not apply to sub-object-level animation or animation of modifier parameters.
For more information, see this procedure.
Use these parameters to specify how the animation plays back. The desired settings must be in place before you paint; changing settings does not affect existing paint objects.
 ConsecutiveUpon animation playback, starts playing each successively painted object N frames later than the previous one, where N is
the By # Frames value (see following).
ConsecutiveUpon animation playback, starts playing each successively painted object N frames later than the previous one, where N is
the By # Frames value (see following).
 RandomUpon animation playback, starts playing each successively painted object a random number of frames later than the previous
one.
RandomUpon animation playback, starts playing each successively painted object a random number of frames later than the previous
one.
The Paint Objects dialog lets you manage the list of paint objects used when painting objects into the scene. You can keep this dialog open while painting to change the paint object on the fly.


