Command entry:
Create panel


(Geometry)
Choose Particle Systems from the drop-down list.
Object Type rollout
SuperSpray/Blizzard/Parray/PCloud
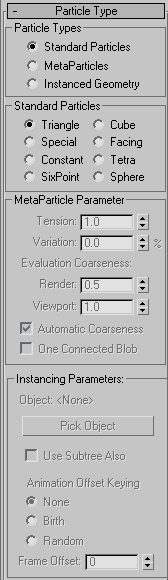
Particle Type rollout
Command entry:Select a SuperSpray/Blizzard/Parray/PCloud emitter.

Modify panel
Particle Type rollout
The controls on this rollout let you specify the type of particle used and the type of mapping performed on the particles.
Interface
Particle Types group
These options specify one of four categories of particle type. Depending on which option you choose, different controls become
available in the lower portion of the Particle Type rollout.
- Standard Particles
-
Uses one of several standard particle types, such as triangle, cube, tetra, and so on.
- MetaParticles
-
Uses Metaball particles. These are particle systems in which the individual particles blend together in blobs or streams.
- Object Fragments
-
Creates particles out of fragments of an object.
Object Fragments is available only with Particle Array. Choose it when you want to fracture the particle emitter object and
use the pieces as particles. This option is useful for animating explosions and shattering collisions.
The fragments are created at the Emit Start frame. The Use Rate, Use Total, Emit Stop, and Particle Size parameters are unavailable.
- Instanced Geometry
-
Generates particles that are instances of either an object, a linked hierarchy of objects, or a group. The object is selected
in the Instancing Parameters group on the Particle Type rollout.
Choose Instanced Geometry when you want particles to be identical instances of another object in your scene. Instanced geometry
particles are extremely effective for creating crowds, flocks, or flows of very detailed objects. Here are a few examples:
- Instance a red blood cell and use Super Spray to animate blood flowing in an artery.
- Instance a bird and use Particle Cloud to animate a flock of birds flying.
- Instance a rock and use Particle Cloud to animate an asteroid field.
NoteOnly one type of particle can be used for the particle system. However, you can have more than one particle array bound to
a single object, and each particle array can emit a different type of particle.
TipImage motion blur, described in
Object Properties Motion Blur group, is known not to work properly with instanced particles. Use object motion blur with instanced particles,
or use image motion blur with standard particles.
Standard Particles group
When you choose Standard Particles in the Particle Types group, the options in this group become available. Choose one of
the following options to specify the particle type:
- Triangle
-
Renders each particle as a triangle. Use Triangle particles with noise opacity for steam or smoke.
- Cube
-
Renders each particle as a cube.
- Special
-
Each particle consists of three intersecting 2D squares. These are effective when you use a face-map material, described in
Shader Basic Parameters Rollout, optionally along with an opacity map, to create the effect of a three-dimensional particle.
- Facing
-
Renders each particle as a square that always faces the view. Use with an appropriate opacity map for bubbles or snowflakes.
- Constant
-
Provides a particle that remains the same size, in pixels, specified in the Size spinner. This size never changes, regardless
of its distance from the camera.
ImportantYou must render either a camera or a perspective view for Constant particles to render correctly.
- Tetra
-
Renders each particle as a mapped tetrahedron. Use Tetra particles for raindrops or sparks.
The default alignment of the tetra particles depends on the particle system type and emitter setup. To specify an alignment,
use controls in the Rotation and Collision rollout.
- SixPoint
-
Renders each particle as a six-pointed, two-dimensional star.
- Sphere
-
Renders each particle as a sphere.
MetaParticle Parameters group
When you choose the MetaParticles option in the Particle Types group, the options in this group become available, and metaballs
are used as particles. Metaparticles take extra time to render but are very effective for spraying and flowing liquid effects.
- Tension
-
Determines the tightness of the particles, with regard to their tendency to blend with other particles. The higher the Tension,
the harder the blobs, and the harder it is for them to merge.
- Variation
-
Specifies the percent of variation of the Tension effect.
- Evaluation Coarseness
-
Specifies how accurately the metaparticle solution is calculated. The higher the coarseness values, the less calculation.
However, if the coarseness is too high, there may be little or no metaparticle effect at all. Conversely, if the coarseness
is set too low, the time for calculation can become extremely long.
- Render
-
Sets the coarseness for metaparticles in the rendered scene. This option is unavailable when Automatic Coarseness is on.
- Viewport
-
Sets the coarseness for the viewport display. This option is unavailable when Automatic Coarseness is on.
- Automatic Coarseness
-
A general rule is to set the Coarseness value between 1/4 and 1/2 the size of the particles. When this item is on, the rendering
coarseness is automatically set, based on the size of the particles, and the viewport coarseness is set to about twice that
of the rendering coarseness.
- One Connected Blob
-
When off (the default), all particles are calculated; when on, a shortcut algorithm is used that calculates and displays only
those particles that are adjoining or contiguous to each other.
NoteOne Connected Blob mode speeds particle calculations, but you should use it only when your metaparticles form one connected
blob, as the label indicates. That is, all particles' blobs must be touching. For example, if you were to use One Connected
Blob on a stream of particles containing a mass of 10 contiguous particles followed by a space, then 12 contiguous particles
followed by another space, and finally 20 contiguous particles, one of the particles will be chosen, and only the mass connected
to that particle will be displayed and rendered.
TipWhen in doubt, leave this option off. If you think all your particles are contiguous and want to save time, turn on One Connected
Blob, and then display various frames to see if everything appears.
Object Fragment Controls group
With a particle array, when you choose the Object Fragments particle type, the items in this group become available, and the
object-based emitter is exploded into fragments, rather than being used to distribute particles.
NoteTo see the fragments in the viewports, choose Mesh in the Viewport Display group near the bottom of the
Basic Parameters rollout.
The items in this group include a Thickness spinner, along with three option buttons that determine how the fragments are
formed.
TipThere is no automatic way to hide the distribution object that explodes into fragments. To create the illusion that an object
is exploding, you must either set the original object to be invisible at the start of the explosion, as described in
Add Visibility Track , or move or scale the original object so it doesn't remain in view.
- Thickness
-
Sets the thickness of the fragments. At 0, the fragments are single-sided with no thickness. When greater than 0, the fragments
are extruded, at fragmentation time, by the amount specified. The outer and inner surfaces of the fragment use identical smoothing,
which is picked up from the object-based emitter. The edges of the fragments are not smoothed.
The three options that follow specify how the object fragments.
- All Faces
-
Each face of the object becomes a particle. This results in triangular particles.
- Number of Chunks
-
The object breaks into irregular fragments. The Minimum spinner, below, specifies the minimum number of fragments that will
appear. The method of calculating the chunks may result in more fragments than specified.
- Minimum
-
Determines a number of "seed" faces in the geometry. Each seed face collects connecting faces surrounding it until all available
faces are exhausted. Any leftover faces become unique particles, thus increasing the minimum number of fragments.
- Smoothing Angle
-
The fragments are broken based on the angles between face normals, as specified in the Angle spinner. Generally, the higher
the Angle value, the fewer the number of fragments.
- Angle
-
Sets the amount of smoothing angle.
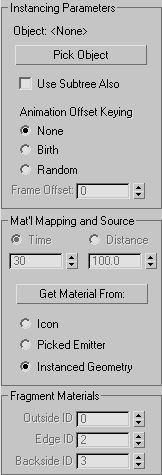
Instancing Parameters group
These options are used when you specify Instanced Geometry in the Particle Types group. They let you generate each particle
as an instance of either an object, a linked hierarchy of objects, or a group.
NoteInstanced objects can be animated, providing the animation incorporates one or more of the following types:
- Animation of object geometry parameters, such as a sphere's Radius setting.
- Animation of object-space modifiers, such as the Angle setting of a Bend modifier.
- Transform animation of a hierarchical object's children. Transform animation of the top-level parent and non-hierarchical
objects is not supported. For example, if you use the toolbar Select and Rotate function to animate a box rotating, and then use the box as instanced geometry with a particle system, the system will not use instanced
box's keyframed animation.
- Object
-
Displays the name of the picked object.
- Pick Object
-
Click this, and then select an object in the viewport to be used as a particle. If you select an object that's part of a hierarchy
and Use Subtree Also is on, then the picked object and its children become a particle.
If you pick a group, all objects in the group are used as a particle.
- Use Subtree Also
-
Turn this on when you want to include the linked children of the picked object in the particle. If the picked object is a
group, all children of the group are included. Note that you can turn this on or off at any time to alter the particles.
- Animation Offset Keying
-
Because the instanced objects can be animated, the options here let you specify the timing of the animations for the particles.
- None
-
Each particle duplicates the timing of the original object. As a result, the animation of all particles will be identically
timed.
- Birth
-
The firstborn particle is an instance of the current animation of the source object at the moment of that particle's birth.
Each subsequent particle then uses the same start time for the animation. For example, if the animation of the source object
is a bend from 0 to 180 degrees, and the first particle is born at frame 30, when the object is at 45 degrees, then that particle,
and all subsequent particles will be born starting at a bend of 45 degrees.
- Random
-
This option is the same as None when Frame Offset is set to 0. Otherwise, each particle is born using the same animation as
the source object at the time of birth, but with a random offset of frames, based on the value in the Frame Offset spinner.
- Frame Offset
-
Specifies an offset value from the current timing of the source object.
Mat'l Mapping and Source group
Specifies how a mapped material affects the particles, and lets you specify the source of the material assigned to the particles.
A detailed description of how materials affect particles is in the topic Using Mapped Materials with Particle Systems.
- Time
-
Specifies the number of frames from the birth of the particle that it takes to complete one mapping of the particle.
- Distance
-
Specifies the distance, in units, from the birth of the particle that it takes to complete one mapping of the particle.
NoteTetra particles are an exception. They always have their own local mapping from head to tail, as described in the following
section.
- Get Material From
-
Updates the material carried by the particle system, using the source specified by the option buttons below this button.
ImportantRemember to click Get Material From whenever you choose a different source option button, or whenever you assign a new material
to the specified source. Only a single material (or multi/sub-object material) is carried by the particle-system object at
any time. Thus, when you change sources, you actually overwrite the currently assigned material with an instance of the source
material.
- Icon
-
The particles use the material currently assigned to the particle system icon.
NoteThe Time and Distance options are available only when you choose this option.
- Picked Emitter
-
The particles use the material assigned to the distribution object.
- Instanced Geometry
-
The particles use the material assigned to the instanced geometry. This option is available only when you choose Instanced
Geometry in the Particle Types group.
ImportantWhen you turn on either Picked Emitter or Instanced Geometry, an instance of the material from the chosen source is copied
to the emitter icon, overwriting the material originally assigned to the icon. Thus, if you've assigned a material to the
particle emitter, and then switch to Picked Emitter, the material originally assigned to the icon is replaced by an instance
of the material carried by the picked object. If you then return to the Icon option, the particle system does not revert to
the material that was assigned the icon, but retains the material taken from the picked object.
Fragment Materials group
These spinners let you assign different material ID numbers to outside surfaces, the edges and the back sides of fragment
particles. You can then assign different materials to the front, edge and back of the fragments by using a multi/sub-object
material.
- Outside ID
-
Specifies which face ID number is assigned to the outside faces of the fragments. This spinner defaults to 0, which is not
a valid ID number, forcing the outside of the particle fragments to use whatever material is currently assigned to the associated
faces. Thus, if your distribution object already has several submaterials assigned to its outer faces, these materials are
retained by using ID 0. If you want a single, specific submaterial, you can assign it by changing the Outside ID number.
- Edge ID
-
Specifies which submaterial ID number is assigned to the edges of the fragments.
- Backside ID
-
Specifies which submaterial ID number is assigned to the back sides of the fragments.