


The PArray (Particle Array) particle system can distribute particles on a geometric object. You can also use it to create sophisticated object explosions.
When you use PArray to emit particles using a selected geometric object as the emitter template (or pattern) for the emission, the object is referred to as the distribution object.
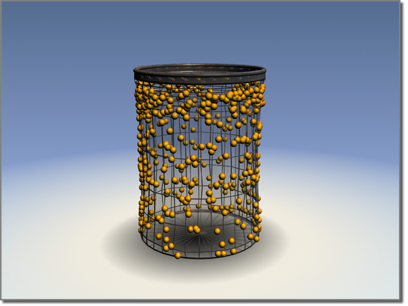
Basket used as a distribution object for random particles over its surface
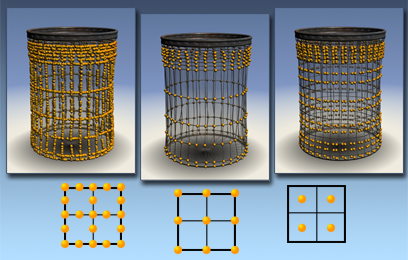
How particles can be distributed on an object:
Left: Edges
Center: Vertices
Right: Faces
 Create panel, make sure
  (Geometry) is active and Particle Systems is chosen in the object category list, then click PArray.
The distribution object can be any object containing renderable faces.
The particle-system object does not appear in the rendered scene. Its placement, orientation or size in the scene has no influence on the particle effect. To access the Particle Array parameters after creation, open the Modify panel and select the particle-system object (or click any visible particles in the viewport). To transform or otherwise modify the distribution object, select the distribution object itself.
Also, you can share a single distribution object among more than one particle-system object. The distribution object merely provides the template for the particles, which are actually generated by the particle system.
Example: To assign three different mapped materials to fragments:
 Select the PArray icon.
 Particle Types group, turn on Object Fragments.
The items on the Basic Parameters rollout let you create and adjust the size of the particle system, and pick the distribution object. In addition, they let you specify the initial distribution of the particles in relation to the geometry of the distribution object, and the initial velocity of the particles from the distribution object. From here, you can also specify how the particles appear in the viewport.
Items on this rollout control when and how quickly particles form, how particles move, and the size of the particles over time.
The controls on this rollout let you specify the type of particle used and the type of mapping performed on the particles.
Particles often move at high rates of speed. In such cases, you might want to add motion blur to the particles to enhance their motion. Also, real-world particles typically rotate as they move, and collide with each other.
Each particle's position and direction of movement are determined by the position and orientation of the emitter at the time the particle is created. If the emitter is moving through the scene, particles are scattered along the emitter's path.
Bubble motion provides the wobbling effect you see in bubbles rising underwater. Typically, it's used when the particles are set to rise in thin streams. Bubble motion is similar to a waveform, and the Bubble Motion parameters let you adjust the amplitude, period, and phase of the bubble "wave."
The options on the Particle Spawn rollout let you specify what happens to particles when they die, or when they collide with a particle deflector. Using the options on this rollout, you can have particles generate additional generations of particles upon collision or death.
These options let you store preset values that can be used in other, related particle systems. For example, after setting parameters for a PArray and saving it under a specific name, you can then select another PArray system, and load the preset values into the new system.
