Command entry:
Modify panel

Make a selection.
Modifier List
Vol. Select
Command entry:Make a selection.
Modifiers menu
Selection Modifiers
Volume Select
The Volume Select modifier lets you make a sub-object selection of vertices or faces for passing up the stack to another modifier
or modifiers. The sub-object selection is completely separate from the underlying parametric geometry of the object. Like
other selection methods, Volume Select works with single or multiple objects.
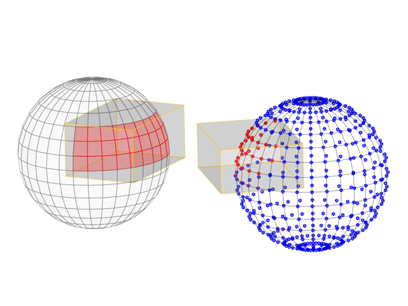
You use a box-, sphere-, or cylinder-shaped gizmo or an object in the scene to define a volume of space as the selection area,
to which you can then apply modifiers. You can move the selection over an object and animate it.
When applied, Volume Select begins with the current geometry in the object's stack, whether it's a whole object or a sub-object
selection (for example, from an Edit Mesh or another Volume Select modifier).
Patches
Patch objects coming up the modifier stack are not converted to a mesh by this modifier. A patch object input to the Volume
Select modifier retains its patch definition.
Scaling Compatibility
The Volume Select gizmo scales along with its object. Thus, if you apply a Volume Select modifier, and then change the scale
of your object (with the toolbar Scale function) the selection doesn't change. In other words, all three transforms affect the Volume Select gizmo and its object identically.
Volume Select Center
The Volume Select modifier has a center as well as a gizmo. This lets you alter the center for non-animated transforms. However,
if you animate a rotation about the offset center, you achieve animation of both rotation and translation.
Procedures
To apply and use volume selection:
- Select an object and apply the Vol. Select modifier.
The Parameters rollout appears.
- In the Stack Selection Level group, choose Object, Vertex, or Face to specify the kind of geometry you want to work with.
- In the Select By group, choose one of the four volume types: Box, Sphere, Cylinder, or Mesh Object.
If you choose Mesh Object, you should then click the None button and select an object to use as the selection volume.
- Choose a selection method and type (defined in the following Interface section). You can change these choices as you work,
depending on the particular selection you're trying to make.
- Once the selection is complete, you can do the following:
- Apply modifiers to the selection.
- Transform the Volume Select gizmo at the sub-object level, changing the selection in the process.
- Combine these options. See the following example.
Example: To animate a volume selection:
- Apply Volume Select to an object.
- Make a sub-object selection of the object's geometry at Face or Vertex level, and apply a geometric modifier, such as Bend, to the selection.
- Move to a nonzero frame and begin animation. Adjust parameters on the geometric modifier, then move to another frame.
- In the stack, return to the Volume Select modifier. Choose the Volume Select gizmo sub-object. Move the gizmo and its geometry
selection to another part of the object.
- Repeat this process on other frames. Optionally, you can return to the geometric modifier and change its parameters at any
frame.
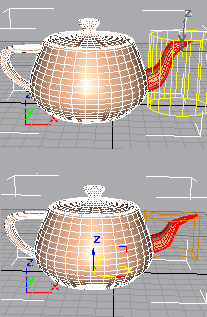
During playback, you see the effect of an animated geometric modifier moving over the object.
Interface
Modifier Stack
- Gizmo sub-object
-
You can transform and animate the gizmo to change the selection. Translating the gizmo translates its center an equal distance.
Rotating and scaling the gizmo takes place with respect to its center.
- Center sub-object
-
You can translate and animate the center, which affects rotation or scaling of the Volume Select modifier's gizmo.
For more information on the Stack Display, see Modifier Stack.
Parameters rollout
Stack Selection Level group
- Object/Vertex/Face
-
Volume Select provides three selection levels. Vertex and Face levels put the modifier stack in sub-object selection. You
can make one sub-object selection for each Volume Select modifier. You can then toggle the one selection between Face and
Vertex level to send either up the stack. Object (top) level lets you modify the whole object while retaining any sub-object
selection.
Selection Method group
- Replace
-
Clears any selection passed up the stack to the Volume Select modifier, and then selects geometry within the volume.
- Add
-
Selects all geometry within the volume, adding to any previous selection.
- Subtract
-
Deselects all geometry within the volume.
- Invert
-
Reverses the entire selection set. Geometry that was unselected becomes selected, and vice versa.
Selection Type group
Lets you determine whether selected faces are wholly or partially within the defined volume when you set Stack Selection Level
to Face.
- Window
-
Selects only faces with all three vertices within the selection volume.
- Crossing
-
Selects faces with only one vertex within the selection volume.
Select By group
These controls let you define the selection with a primitive, a mesh object, or by surface characteristics.
- Volume: Box/Sphere/Cylinder
-
To define the selection space using a standard primitive-shaped gizmo, choose one of these. You can then scale, rotate, or
move the gizmo anywhere around the object.
- Volume: Mesh Object
-
Choose this option to use another object to define the selection space. After choosing Mesh Object, click the button below
it (labeled "None" by default), and then select an object to use as the volume.
Besides mesh objects, you can use patch objects and NURBS objects. In addition, if you turn on Soft Selection rollout Use Soft Selection, you can use spline objects and particle systems to define the selection. This latter option is quite
powerful because the selection changes as the particles move.
- Mesh object button
-
Click this button, then select an object to define the selection space. You don't need to choose Mesh Object first, but you
do need to choose Mesh Object to use the object as a volume. After you select an object, its name appears on the button.
This button is labeled "None" if no object has been chosen.
NoteThe selection depends on a volume intersecting the object. If a gizmo or object is scaled down and moved inside an object,
no selection occurs because no geometry is within the volume of the gizmo.
- Surface Features
-
Defines the selection by surface characteristics instead of a geometric volume. While this doesn't have much to do with volume,
it was added because Volume Select is a procedural modifier, whereas Mesh Select is explicit. Now, even if your topology changes, Volume Select will consistently select the faces or vertices using a particular
material or smoothing group.
Indicate which type of surface characteristic to base selection on by choosing one of the following:
- Material ID
-
Specifies a material ID. All faces or vertices using the ID indicated by the spinner value are selected.
- Sm Group
-
Specifies a smoothing group. All faces or vertices using the ID indicated by the spinner value are selected.
- Texture Map
-
Specifies a texture map from the scene. Click the map button (labeled "None" by default) to choose a texture map to use for
selection. All faces or vertices using that texture map will be selected. When using the Texture Map option, you can also
specify a mapping channel or the vertex color channel using the Map/Vertex Color radio buttons and spinner.
NoteYou must apply mapping to the object below Vol. Select in its stack for the Texture Map selection to work. That is, the Vol.
Select modifier must have mapping coordinates passed up the stack so it can use a texture map for selection.
NoteIf you set Selection Type to Window, vertices will be selected if all the faces they touch use the specified material or smoothing
group. If you set Selection Type to Crossing, vertices will be selected if they touch any face using the specified material
or smoothing group.
Alignment group
These controls are generally used when the gizmo has been transformed out of its original orientation to the object.
- Fit
-
Resizes the gizmo to fit around the object or previous selection in the stack. Maintains any previous rotation.
- Center
-
Recenters the gizmo on the object or previous selection in the stack. Maintains any previous scale or rotation.
- Reset
-
Returns the gizmo to its default size and orientation. Cancels the effect of all previous transforms.
- Auto Fit
-
When on, automatically adjusts the gizmo size and shape to fit the object as you change the underlying topology (for example,
transforming vertices).
Soft Selection rollout
These controls, available only at the Vertex stack selection level, let you set a gradual falloff of influence between selected
and unselected vertices. See Soft Selection Rollout (Edit/Editable Mesh).
NoteSoft Selection does not apply to materials or smoothing groups. However, if there was already a weighted selection passed
up the stack, a Volume Select set to Material or Smoothing Group mode and not set to Replace will preserve the selection.