This command creates a character assembly.
To create a character assembly:
The character-assembly node is created at the bottom of the entire selection, as viewed in the Front viewport.
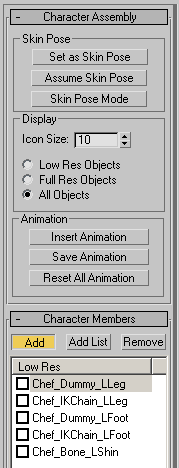
The character assembly is given the default name of Character01, which can be changed. All members of the assembly are listed in the Character Members rollout.
To work with the character assembly, select the character assembly node and work with the parameters on the Modify panel.
The Skin pose is the bone structure pose used by the Skin modifier for associating bones with the mesh. When the Skin modifier is first applied, the current bone structure pose is used as the Skin pose. The Skin pose can sometimes be accidentally altered by animating the bone structure on frame 0. If this occurs, you can use these options to fix the Skin pose.
You can use these options both before and after applying the Skin modifier. You can also invoke these options when any member of the character assembly is selected.
Causes the bone structure to take on the Skin pose. This feature can be useful during the animation phase. For example, if you have animated the character on various keyframes and want the character to animate back to its Skin pose at frame 50, you can turn on Auto Key at frame 50 and click Assume Skin Pose.
When a high resolution character model is animated, redraw time can slow the animation process. To speed up your work, a low resolution version of the model can be used for the animation process, then switched for the full resolution version at render time. Character assembly objects can be designated as Full Res or Low Res on the Character Members rollout.
Animation for the character assembly can be saved or reset in this group. Previously saved animation from another character can also be inserted to the current character assembly.
Displays the Merge Animation dialog, and prompts for a previously saved animation file.
Saves the character assembly animation in an ANM or XML file. Both file types contain the character assembly and its animation. An ANM file is a proprietary format that can be read and saved only by 3ds Max. An XML file formats the information as XML code, and can be edited with a text editor.
Animation saved as an ANM file loads and saves faster than an XML file. Saving and editing an XML animation file is recommended only for users who are familiar with the XML language, and who have a specific need for editing the file.
All members of the character assembly are displayed on this list. By default, all members are designated as Full Res objects. To designate a member as Low Res, check the object on the list. The Full Res and Low Res designations are used in conjunction with the Display group selection in the Character Assembly rollout.