Command entry:
Select objects.

Rendering menu
Render to Texture
Render to Texture dialog
Output rollout
Click Add.
Add Texture Elements dialog
Choose elements to render.
When you render to texture or “bake” a texture, you choose one or more elements to render. These elements save aspects of
the rendered scene: its geometry, lighting, shadows, and so on. Some texture elements can display in shaded viewports; others
require a DirectX viewport shader to view in 3ds Max.
When you add an element to render, it appears in a list in the Objects To Bake rollout. In the list, you can disable or enable rendering of that individual map, or select it to adjust which components
it will include.
NoteAutomatically generated reflections and refractions do not work well with rendered textures, although they are included in
the Complete and Blend texture maps.
The available element maps are described in the sections that follow.
Limitations of Composite and Blend Materials
If the object has a Composite or Blend material applied to it, only certain elements render correctly. Which elements render
correctly depend on the renderer you are using.
The default scanline renderer renders only these elements of a Composite or Blend material correctly:
- Diffuse color
- Specular color
- Reflections
- Ambient color
- Self-illumination color
- Refractions
The mental ray renderer renders only these elements of a Composite or Blend material correctly:
Component Options (Unique Settings)
Many element maps let you choose to include or not include components of the rendered scene. When your element to render is
highlighted in the list, these options appear on the Selected Element Unique Settings group.
Complete Map
A complete map saves most surface properties of the rendered object; specifically:
- Lighting
- Diffuse color
- Specular color
- Reflections
- Shadows
- Ambient color
- Self-illumination color
- Refractions
Component Options (Selected Elements Unique Settings)
For a complete map, you can choose not to render shadows.
Specular Map
A specular map saves only the specular color of the object.
Component Options (Selected Elements Unique Settings)
For a specular map, you can choose not to render lighting or shadows.
Diffuse Map
A diffuse map saves only the diffuse color of the object.
Component Options (Selected Elements Unique Settings)
For a diffuse map, you can choose not to render lighting or shadows.
Shadows Map
A shadows map saves only the shadows cast onto the object.
Component Options (Selected Elements Unique Settings)
There are no unique settings for a shadows map.
Lighting Map
A lighting map saves only the lighting cast onto the object.
Component Options (Selected Elements Unique Settings)
For a lighting map, you can choose not to render shadows, direct light, or indirect light.
Normals Map
A normals map saves a color gradient that indicates the direction of normals on the surface of the object. With a normals
map, Direct3D rendering can make simple geometry appear more complex.
With DirectX 8, you can view a normals map in shaded viewports by using the Metal Bump Direct3D viewport shader.
With DirectX 9, you can view a normals map in any shaded viewport.
Component Options (Selected Elements Unique Settings)
There are two unique settings for a normals map:
- Output into Normal Bump
-
When on, assigns a Normal Bump map to the Target Map Slot, and places the rendered Normal Bump map in the Normal component
of the Normal Bump map. Default=off.
- Render Height Map into Alpha Channel
-
When on, renders a grayscale height map and assigns it to the alpha channel of the Normal map. If you are rendering to a file
type that doesn't have an alpha channel, this setting has no effect. Default=off.
Height Map
A height map is a grayscale map that stores the relative height of the source object when you render with normal projection.
(See Creating and Using Normal Bump Maps.) You can use the height map as a displacement map on the target object. This is a way to add detail to the edges of the
low-resolution object, because edges are not affected by the normal bump map itself.
NoteWhen using a height map as a displacement map with the mental ray renderer, be sure to use the
Height Map Displacement shader. Also, turn off Smoothing, either
globally or for the individual object on the Object Properties dialog
mental ray panel. In addition, when rendering with mental ray, if you're applying the height map to a standard material, apply the map as
a Displacement map on the
mental ray Connection rollout (unlock the map first), not on the Maps rollout.
TipUsing a paint program such as Adobe Photoshop on a height map is possible, but prone to error. The values in the height map
depend on the shapes of both the low-resolution and high-resolution models, and it's easy to damage the mathematical accuracy.
If you paint any changes onto the map, be careful to preserve the faceted look, and avoid the temptation to blur away the
facets. You might try painting in Additive or Subtractive mode, to add to or subtract from the displacement, because Normal
mode will set a fixed displacement, making it difficult for an artist to control the result.
Component Options (Selected Elements Unique Settings)
There are no unique settings for a height map.
Blend Map
A blend map is like a complete map, except that all its components, not just shadows, are optional.
Component Options (Selected Elements Unique Settings)
For a blend map, you can choose not to render any of the following components:
- Lighting
- Diffuse color
- Specular color
- Reflections
- Shadows
- Ambient color
- Self-illumination color
- Refractions
Alpha Map
An alpha map saves only the alpha channel of the rendered object.
Component Options (Selected Elements Unique Settings)
There are no unique settings for an alpha map.
Ambient Occlusion (MR) Map
Use an ambient occlusion map when you want the surface information to describe how much ambient light the surface can receive.
The ambient occlusion map considers the obstruction of the light by surface contours and surrounding objects. By using the
ambient occlusion map when rendering, you do not need to set up special lighting, replace materials on the objects, or use
with global overrides because the ambient occlusion map already accounts for these settings.
You can use ambient occlusion maps with or without a Projection modifier and for many different purposes. Use them to mask
layers in Adobe Photoshop, for items such as painted edits and texture maps. Also use them as dirt maps, or as masks for reflections
or specular light.
NoteBy default, the shader used by the Ambient Occlusion bake element excludes the low-resolution object from the ambient occlusion
calculations whenever performing projection-mapped texture baking. However, if the Projection Mapping option
Include Working Model is enabled, then the occlusion rays will include the working model. In this case, projection rays also include the working
model. No undesired blank areas appear on the map, because there are no cases where a projection ray passes though the lo-res
model to hit a point on the high-res model that is completely occluded by the low res.
NoteThis map is available only when the mental ray renderer is active.
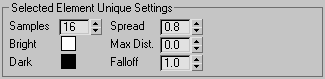
Component Options (Selected Elements Unique Settings)
For an ambient occlusion map, you can set the following unique settings:
- Samples
-
Sets the number of rays cast. More rays results in a smoother image. Default=16.
- Spread
-
Sets the spread of the ray, creating a cone shape. With a value of 0.0 a single point is sampled; with a value of 1.0 the
entire hemisphere is sampled. Range=0.0–1.0. Default=0.8.
NoteYou can set Spread to values greater than 1.0, but only values within the specified range are useful.
- Bright
-
Sets the color in the map where no occlusion occurs. The default color is white. Click the swatch to change the color.
- Max distance
-
Sets the range within which geometry is probed. A value of 0.0 samples the entire scene. For non-zero values, only objects
within this range are sampled. Default 0.0.
- Dark
-
Sets the color in the map where complete occlusion occurs. The default color is black. Click the swatch to change the color.
NoteColors between the Bright and Dark values are used to indicate partial occlusion.
- Falloff
-
Defines the amount of falloff of the ray. The greater the value, the greater the falloff. Default=1.0.