


This rollout has controls for the texture baking of individual objects. It lets you choose which map channel the texture will use, which elements will be rendered, and at what sizes. It also lets you control filename generation, and assign the format of rendered texture elements.
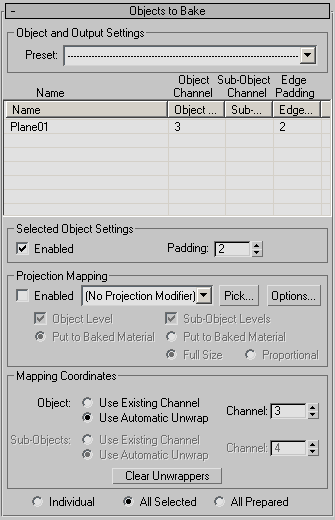
Object and Output Settings group
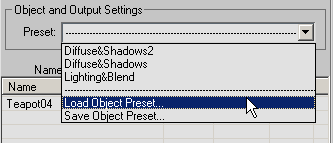
This drop-down list lets you save presets comprising all current Render To Texture settings, including map types and sizes,
from a single object and then load a preset onto any number of objects. Render To Texture presets use the RTP filename extension.
Presets contain all settings on the Objects to Bake and Output rollouts and the Projection Options dialog. The only exceptions are the Object Level and Sub-Object Levels radio buttons in the Objects To Bake rollout  Projection Mapping group and the Use Automatic Unwrap Channel numeric values in the Objects To Bake rollout Mapping Coordinates group.
Use the upper part of the drop-down list to choose an existing preset to load. The preset is applied to all objects in the objects list. The list contains up to the last 10 maps in the order that they were loaded or saved, with the most recent at the top.
After you choose a preset to load, a dialog appears showing you the path and name of the file containing the preset. Confirm or deny loading the preset by clicking Continue or Cancel, respectively.
In addition, if Projection Mapping is enabled, the dialog might contain related messages. For example, if the target object needs a Projection modifier, the dialog suggests that you use the Pick function to add one.
Shows all selected objects. Because the dialog is modeless, you can change the selection while it’s open, and the list updates dynamically.
This group contains the controls for generating a normal bump projection. See Creating and Using Normal Bump Maps
When on, normal bump projection is enabled using a Projection modifier. When off, the Projection modifier is not used. Default=off.
To generate a normal map rather than a normal bump map, leave Enabled turned off.
Click to designate the high-resolution object from which the Projection modifier will derive normals. This opens the Add Targets dialog, which works like the Select From Scene dialog to let let you select one or more objects on which to base the normal map.
Click to open the Projection Options dialog, which contains various normal bump projection settings. When Individual is chosen (at the bottom of the Objects To Bake rollout), the options affect the selected object; when All Selected or All Prepared is chosen, the options apply to all selected or prepared objects.
When on, uses the active sub-object selection, and makes the Mapping Coordinates group Sub-Objects controls available. Default=on.
The following options apply to sub-object rendering, when only a portion of the geometry is being rendered to the normal bump map:
For example, consider a plane that is 4 segments x 4 segments. Each "poly" in the plane is a separate sub-object, for a total of 16 sub-objects. If the output Map Size is 64, the object rendering output is 64 x 64 pixels. If Full Size is chosen, each sub-object rendering is also 64 x 64 pixels. If Proportional is chosen, each sub-object rendering is 16 x 16 pixels. If you change Proportional Multiplier to 2.0 in the Projection modifier, each sub-object rendering is now 32 x 32 pixels.
These controls are for basing the rendered texture on the object level of the source object.
When using this option, before rendering or unwrapping, set up the mapping parameters on the Automatic Mapping rollout.
These controls are for basing the rendered texture on a sub-object selection of the source object.
When using this option, before rendering or unwrapping, set up the mapping parameters on the Automatic Mapping rollout.
The radio buttons at the bottom of the rollout let you choose which objects to bake. See Render To Texture Dialog for procedures.
