


An IK solver creates an inverse kinematic solution to rotate and position links in a chain. It applies an IK Controller to govern the transforms of the children in a linkage. You can apply an IK solver to any hierarchy of objects. You apply an IK solver to a hierarchy or part of a hierarchy using commands on the Animation menu. Select an object in the hierarchy, choose an IK solver, and then click another object in the hierarchy to define the end of the IK chain.
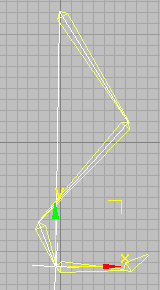
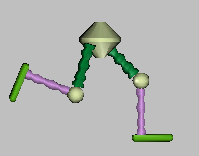
Bones system with HI IK solver applied
Each type of IK solver has its own behavior and workflow, as well as its own specialized controls and tools that display in the Hierarchy and Motion panels. IK solvers are plug-ins, so programmers can expand IK capabilities of 3ds Max by customizing or writing their own IK solvers.
3ds Max ships with four different IK solvers.
An IK solver generally operates in this way: an inverse kinematic chain is defined on part of the hierarchy, say from the hip to the heel, or the shoulder to the wrist of a character. At the end of the IK chain is a gizmo, called the goal. The goal can be repositioned or animated over time in a variety of ways, often using linkage, parameter wiring or constraints. No matter how the goal is moved, the IK solver attempts to move the pivot of the last joint in the chain (also called the end effector) to meet the goal. The IK solver rotates the parts of the chain to stretch out and reposition the end effector to coincide with the goal.
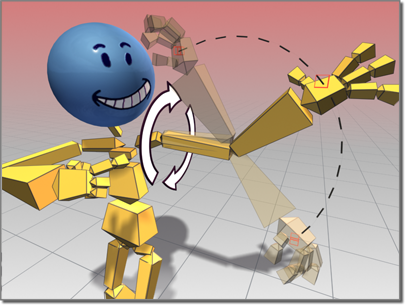
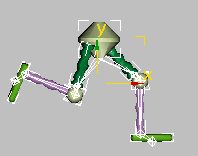
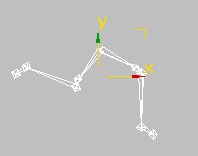
Using an IK solver to animate an arm
Frequently, the end effector is constrained to the ground plane. For example, you might "pin" the toes as the heels lift in a character walk cycle. Then the movement of the root of the chain poses the legs up from the toes.
Four plug-in IK solvers ship with 3ds Max:
The HI Solver is the preferred method for character animation, and for any IK animation in long sequences. With HI Solvers, you can set up multiple chains in a hierarchy. For example, a character's leg might have one chain from hip to ankle, and another from heel to toe.
Because this solver's algorithm is history-independent, it is fast to use regardless of how many frames of animation are involved. Its speed is the same on frame 2000 as it is on frame 10. It is stable and jitter-free in viewports. This solver creates a goal and an end effector (although the display of end effector is off by default). It uses a swivel angle to adjust the solver plane to position the elbow or the knee. You can display the swivel angle manipulator as a handle in the viewport, and adjust it. HI IK also uses a preferred angle to define a direction for rotation, so the elbow or knees bend correctly.
The HD Solver is a solver well-suited to use for animating machines, especially ones with sliding parts that require IK animation. It lets you set up joint limits and precedence. It has performance problems on long sequences, so ideally use it on short animation sequences. It is good for animating machines, especially ones with sliding parts.
Because this solver's algorithm is history dependent, it works best for short animation sequences. The later in the sequence it is solving, the longer it takes to calculate a solution. It allows you to bind the end effector to a follow object, and it uses a system of precedence and damping to define the joint parameters. It allows for sliding joint limits combined with IK animation, unlike the HI IK solver, which only allows for sliding joint limits when using FK movement.
The IK Limb solver operates on only two bones in a chain. It is an analytical solver that is fast in viewports, and can animate the arms and legs of a character.
The IK Limb solver can be used for export to game engines.
Because this solver's algorithm is history-independent, it is fast to use regardless of how many frames of animation are involved. Its speed is the same on frame 2000 as it is on frame 10. It is stable and jitter-free in viewports. This solver creates a goal and an end effector (although the display of end effector is off by default). It uses a swivel angle to adjust the solver plane to position the elbow or the knee. You can target the swivel angle to an another object to animate it. IK Limb Solver also uses a preferred angle to define a direction for rotation, so the elbow or knees bend correctly. It also allows you to switch between IK and FK by keyframing IK Enabling, and it has a special IK for FK pose function so you can use IK to set FK keys.
The Spline IK solver uses a spline to determine the curvature of a series of bones or other linked objects.
Vertices on a Spline IK spline are called nodes. Like vertices, the nodes can be moved and animated to change the curvature of the spline.
The number of spline nodes can be fewer than the number of bones. This provides the ease of posing or animating a long multiple-bone structure with just a few nodes, as opposed to animating each bone individually.
Spline IK provides a more flexible animation system than other IK solvers. Nodes can be moved anywhere in 3D space, so the linked structure can be intricately shaped.
A helper object is automatically placed at each node when Spline IK is assigned. Each node is linked to its corresponding helper, so a node can be moved by moving the helper. Unlike the HI Solver, the Spline IK system does not use a goal. The positions of nodes in 3D space is the only factor that determines the shape of the linked structure. Rotating or scaling nodes has no effect on the spline or structure.
While you can apply an IK solver to any hierarchy of objects, a system of Bones combined with an IK solver is a good way to animate a character.
A bones system is a jointed, hierarchical linkage of bone objects. Bones are used as an armature on to which objects are linked. If you use the skin modifier, you can "skin" an object to the bones, so the animation of the bones deforms the mesh that models a character. If you have a jointed character, you can use linkage or constraints so the bones animate the mesh.
Animating bones with skin causes the skin to stretch or shrink.
Animating bones with skin causes the skin to stretch or shrink.
Turning Other Objects into Bones
Any object can be turned into a bone object. Select the object, choose Animation  Bone Tools. On the Object Properties rollout, turn on Bone On. You can then choose Show Links Only to replace the display of the objects
with the bones. This can be useful if you have a geometrically intensive hierarchy to animate. The interactive viewport response
will be much quicker when the geometry is hidden and displayed only at links.
Bone Tools. On the Object Properties rollout, turn on Bone On. You can then choose Show Links Only to replace the display of the objects
with the bones. This can be useful if you have a geometrically intensive hierarchy to animate. The interactive viewport response
will be much quicker when the geometry is hidden and displayed only at links.
You can display any object as a bone object. Select the object, then choose Animation Bone Tools. This opens the Bone Tools floater. On the Object Properties rollout, turn on Bone On. Then go to the Display
panel, and on the Link Display rollout turn on Display Links and Link Replaces Object, which displays the bones instead of
the object. This can be useful if you have a geometrically intensive hierarchy to animate. The interactive viewport response
is faster when the geometry is hidden and displayed as links only.
Any object hierarchy can be displayed as bones.
Any object hierarchy can be displayed as bones.
Any object hierarchy can be displayed as bones.
Bones can scale, squash and stretch over time. See Using Objects as Bones.
You can use Display Links and Link Replaces Object to display the links instead of the object. These settings are found on the Link Display rollout on the Display panel. This can be useful if you have a geometrically intensive hierarchy to animate. The interactive viewport response is faster when the geometry is hidden and displayed only at links.
Advantages of Animating Bones with IK
It is possible to animate a character's motion through forward kinematics, rotating each limb into position from the shoulder to the fingers, and the hips to the toes. But it's a lot quicker and more realistic to use inverse kinematics to simulate the foot interacting with the ground. And it is a lot easier to control when you need to make changes to the animation. Rather than having keyframes on every bone in the chain, you have to make changes to only one node, to change the animation of the entire chain.
On the other hand, it is common for animators to use IK for the legs and FK for the torso and the arms. FK offers a bit more control for posing the upper body. It is not necessary to use IK for every character animation task. Using the HI IK solver allows you to jump back and forth easily between FK and IK.
You can apply an IK solver when you create a Bones system, or from the Animation menu:
When you create bones, turning on the Assign to Children option lets you apply an IK solver immediately. Default=Off.
IK Solver. You must select the node where you want the IK chain to start, then choose Animation menu IK Solvers and select the solver. Then click the node where you want the chain to end. The chain will be created between
the pivot points of the two nodes. If you are using an IK Limb Solver, the IK goal will be placed two bones down from the
highest node you've selected in the chain.
You adjust IK solver settings in the Motion and Hierarchy panels:
When the goal of an IK chain is selected, the motion panel displays the rollouts for the individual IK solver.
Motion panel parameters adjust the swivel angle of the solver plane, to point the knees and elbows. Also, the controls in the IK Solver rollout let you mix periods of IK with FK (forward kinematics) through the Enabled button and the IK button.
Motion panel parameters assign, remove, and edit the end effector for the currently selected joint. You can parent the end effector to another object, and return the skeleton to an initial pose. Changing IK controller parameters in the Motion panel affects the entire HD IK chain, even when you've selected only a single bone.
When a bone is selected, the IK panel displays controls to activate and limit the rotational joints, and set a preferred angle for the joints. The preferred-angle poses of all the joints help control the direction of rotation of the limbs. When a goal is selected, the IK panel is blank. If you select a bone before applying an IK Solver, a different set of sliding and rotational joint parameters will be displayed, but these will be replaced once an IK Solver is applied.
Select the spline of an Spline IK chain. In the Hierarchy panel, click IK. The controls that appear affect the Spline IK Solver. You will also find the tools to bind to follow objects, and set precedence and joint limits, damping and spring back. The controls in the IK panel are similar to the HD Solver.
To add an IK solver to a hierarchy or bones system:
 Select a bone or an object where you'd like the IK chain to start.
IK Solver, and then choose the IK solver:
Select a bone or an object where you'd like the IK chain to start.
IK Solver, and then choose the IK solver:If you are using the IK Limb Solver, you must apply the IK Solver to control only two bones.
To create a bones hierarchy that uses an IK solver:
 Create panel, click
  (Systems), and click Bones.
To display a hierarchy of objects as bones:
Select the hierarchy of objects in the viewport.
The HI (History-Independent) Solver does not rely on IK solutions calculated in previous keyframes in the timeline, so it is just as fast to use at frame 2000 as it is at frame 20.
Animating with the HD Solver lets you use sliding joints combined with inverse kinematics. It has controls for spring back, damping, and precedence not found in the HI Solver. It also has quick tools for viewing the initial state of the IK chain. Use it for animations of machines and other assemblies. Since this is history dependent, performance is slower at the end of long animations. For lengthy scenes, use HI Solvers, if possible.
The IK Limb solver is specifically meant for animating the limbs of human characters; for example, the hip to the ankle, or the shoulder to the wrist. Each IK Limb solver affects only two bones in a chain, but multiple solvers can be applied to different parts of the same chain. It is an analytical solver that is very fast and accurate in viewports.
The Spline IK solver uses a spline to determine the curvature of a series of bones or other linked objects.
