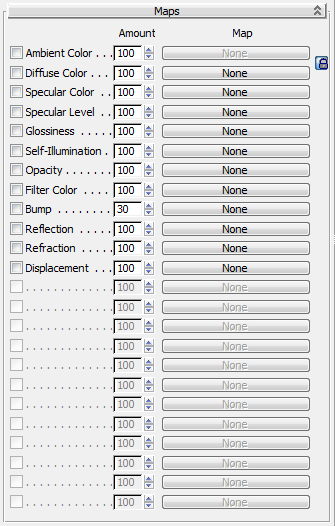
A material's Maps rollout lets you access and assign maps to various components of the material. It also lets you set an Amount value (relative strength) for each map.
You can choose from a large variety of map types. To find descriptions of these types, and how to set their parameters, see Map Types.
Assigning the Same Map to Different Parameters
Applying the same map to different parameters is useful in some cases. For example, using a pattern to map both self-illumination and opacity can make the pattern appear to glow and hover in space. One easy way to to this on the Maps rollout is to drag a map from one component to another, and then set the Method to Instance on the dialog that opens.
Blending Map Amounts for Opacity and Other Material Components
When you assign a map to a scalar component (such as Specular Level, Glossiness, Self-Illumination, and Opacity), the component's value in the Basic Parameters rollout is blended with its associated map Amount in the Maps rollout.
For example, when Opacity is set to 0, the map Amount setting controls Opacity completely. That is, reducing the Amount value increases the transparency of the entire surface. On the other hand, when Opacity is 100, reducing the map's Amount value increases the opacity of the entire surface. You can adjust a Checker Opacity map so that the opaque areas remain opaque, while the transparent areas become semi-transparent.
Other scalar components behave the same. Setting the map's Amount to 100 applies all of the map. Setting the Amount to 0 effectively turns the map off. Intermediate Amount values are blended with the value of the scalar component.
To assign a map, do one of the following:
3ds Max opens a modal Material/Map Browser, where you can double-click the map you want.
To use the same map for different parameters, do one of the following:
 Return to the material level, then drag the map button and drop it on the map button for another parameter. 3ds Max opens the Copy (Instance) Map dialog. Choose Copy or Instance, and then click OK. If you choose Copy, you’re assigning the same map type, but it can have different
settings. If you choose Instance, both copies always have the same settings. (If you choose Swap, the Material Editor swaps
the two button assignments.)
Return to the material level, then drag the map button and drop it on the map button for another parameter. 3ds Max opens the Copy (Instance) Map dialog. Choose Copy or Instance, and then click OK. If you choose Copy, you’re assigning the same map type, but it can have different
settings. If you choose Instance, both copies always have the same settings. (If you choose Swap, the Material Editor swaps
the two button assignments.)
To view the parent material's parameters:
(Go To Parent).
3ds Max displays the parameters for the map's parent material. Also, in the Compact Material Editor, the Show End Result and Go To Parent buttons become unavailable.
To view a map's parameters, do one of the following:
3ds Max displays the parameters for the map. Also, in the Compact Material Editor, the Show End Result and Go To Parent buttons become available.
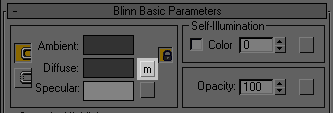
In the Basic Parameters rollout, if a map has been assigned to a color component or parameter, the corresponding button displays a letter M. In the Maps rollout, if a map has been assigned, the corresponding button displays the map name.
To use the Compact Material Editor to view a map's location:
 (Material/Map Navigator) to open the Material/Map Navigator.
The Navigator displays the hierarchy of the current material, which contains the map.
To go to a map using the Navigator:
The Navigator goes to the level of the map, and the Material Editor displays the controls for the map you clicked.
As the Navigator's map tree shows, maps for basic material components and parameters are one level below the material itself.
To preview a map in a sample slot:
 Turn off Show End Result.
In the Slate Material Editor, this button is located on the Preview Window for the map node. In the Compact Material Editor, it is located on the toolbar.
The preview window or sample slot shows the map instead of the material. If the map contains sub-maps, these are also visible.
By default, the preview window or sample slot displays a map with no three-dimensional shading. You can change this in the Material Editor Options dialog.
To view the map interactively:
 Select an object.
If the object type does not have a Generate Mapping Coordinates toggle, you can assign mapping coordinates by applying a UVW Map modifier.
 (Show Map In Viewport).
The map appears on objects assigned the material in all shaded viewports. Now when you adjust the map, the viewports update to display the adjustments.
Turning on Show Map In Viewport for one map automatically turns this button off for all other maps the material has.
Viewports can display 2D maps such as Checker and Bitmap.
Viewports can also display most kinds of 3D maps. The exceptions are Particle Age and Particle MBlur. Also, the appearance of the Falloff map in viewports give only a vague indication of how it will appear when rendered.
Show Map In Viewport is unavailable if the active map type cannot display in viewports.
Displaying mapped materials in a viewport can slow performance. If you don't need to view the texture, turn off its viewport display.
To turn off interactive texture display:
If you are at the material level, click the appropriate map button to go to the map level.
 (Show Map in Viewport).
The check box is to the left of the map's name.
When a map is off, a lowercase m appears on the corresponding map button.
The check box is to the left of the map's name.
When a map is on, an uppercase M appears on the corresponding map button.
To use the Compact Material Editor to move directly to an ancestor:
With this list, you can skip intermediate levels in the tree.
 The ancestor drop-down list shows only part of the tree. It does not show side branches and siblings. To view these, use
the Material/Map Navigator or the Go Forward To Sibling and Go To Parent buttons on the Compact Material Editor toolbar.
The ancestor drop-down list shows only part of the tree. It does not show side branches and siblings. To view these, use
the Material/Map Navigator or the Go Forward To Sibling and Go To Parent buttons on the Compact Material Editor toolbar.
To use the Compact Material Editor to change a map type:
a modal Material/Map Browser. If you were at a map, it lists only maps (if you were at a material when you clicked Type, the Browser lists only materials).
If you change a map type and the new map type can have component maps, a Replace Map dialog is displayed. This dialog gives you a choice between discarding the original map or using it as a component map.
If the new map type does not have components, it simply replaces the original map type.
To work with a standalone map or map tree, do one of the following:
 (Get Material). In the Material/Map Browser, double-click the name of the map type (not a material type) you want to use, or drag the map to a sample slot.
The sample slot now contains a standalone map not associated with material parameters. Use the Compact Material Editor to modify the map as you would any other map.
By default, the sample slot displays a map with no three-dimensional shading. You can change this in the Material Editor Options dialog.
This rollout lets you assign a map or shader to many of the Standard material parameters. You can also assign maps and shaders on the rollout where the parameter first appears: The principal value of this rollout is that it also lets you toggle a parameter's shader, using the check box, without removing the map.
The Amount spinner determines the amount that the map affects the material expressed as a percentage of full intensity. For example, a diffuse map at 100% is completely opaque and covers the base material. At 50%, it is semi-transparent and the base material (the diffuse, ambient, and other colors of the material without maps) shows through.


 Material Editor