The Extended Parameters rollout is the same for all shading types of Standard material, with the exception of the Strauss and Translucent shaders, as noted below. It has controls related to transparency and reflection, as well as options for Wire mode.
This topic contains tables of the Index of Refraction for some common physical materials. These can be used to create Standard materials with realistic transparency.
Additive Opacity and the Alpha Channel
By default, additive opacity does not generate an alpha value. In other words, the alpha value is zero, indicating no transparency. This gives correct results with backgrounds in renderings, but if you want to composite objects with additive opacity using video post or a different compositing program, you might want to have additive opacity render with transparency. To do so, add the following line to the [Renderer] section of the 3dsmax.ini file, and then restart 3ds Max:
AlphaOutOnAdditive=1
To revert to the default method of rendering additive opacity, in the 3dsmax.ini file, change the value of AlphaOutOnAdditive back to 0 (zero), and then restart 3ds Max.
Advanced Transparency group (most shaders)
For the Translucent shader, the Advanced Transparency group is blank.
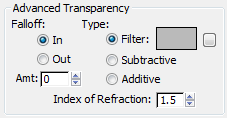
These controls affect the opacity falloff of a transparent material.
These controls choose how transparency is applied.
Click the map button to assign a Fjlter Color map. This button is a shortcut: You can also assign a Filter Color map on the Maps rollout.
You can use the filter color with volumetric lighting to create effects such as colored light through a stained-glass window. Ray-traced shadows cast by transparent objects are tinted with the filter color.
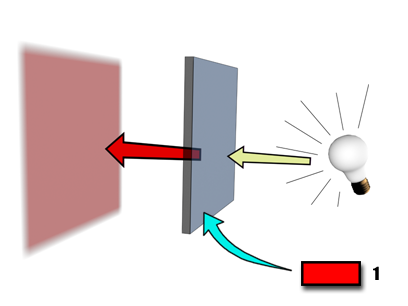
A shadow's color is changed with a red filter color.
Sets the index of refraction (IOR) used by refraction maps and raytracing. The IOR controls how severely the material refracts transmitted light. Left at 1.0, the IOR of air, the object behind the transparent object does not distort. At 1.5 the object behind distorts greatly, like a glass marble. At an IOR slightly less than 1.0, the object reflects along its edges, like a bubble seen from under water. Default=1.5.
Common IORs (assuming the camera is in air or a vacuum) are:
| Material | IOR Value |
|---|---|
| Vacuum | 1.0 (exactly) |
| Air | 1.0003 |
| Water | 1.333 |
| Glass | 1.5 (clear glass) to 1.7 |
| Diamond | 2.418 |
In the physical world, the IOR results from the relative speeds of light through the transparent material and the medium the eye or the camera is in. Typically this is related to the object's density; the higher the IOR, the denser the object.
You can also use a map to control the index of refraction. IOR maps always interpolate between 1.0 (the IOR of air) and the setting in the IOR parameter. For example, if the IOR is set to 3.55 and you use a black-and-white Noise map to control IOR, the IORs rendered on the object will be set to values between 1.0 and 3.55; the object will appear denser than air. If, on the other hand, your IOR is set to 0.5, then the same map values will render between 0.5 and 1.0, as if the camera were under water and the object was less dense than the water.
Here are some more IOR values for various materials:
| Material | IOR Value |
|---|---|
| Carbon Dioxide, Liquid | 1.200 |
| Ice | 1.309 |
| Acetone | 1.360 |
| Ethyl Alcohol | 1.360 |
| Sugar Solution 30% | 1.380 |
| Alcohol | 1.329 |
| Flourite | 1.434 |
| Quartz, Fused | 1.460 |
| Calspar2 | 1.486 |
| Sugar Solution 80% | 1.490 |
| Glass, Zinc Crown | 1.517 |
| Glass, Crown | 1.520 |
| Sodium Chloride | 1.530 |
| Sodium Chloride (Salt) 1 | 1.544 |
| Polystyrene | 1.550 |
| Quartz 2 | 1.553 |
| Emerald | 1.570 |
| Glass, Light Flint | 1.575 |
| Lapis Lazuli | 1.610 |
| Topaz | 1.610 |
| Carbon Bisulfide | 1.630 |
| Quartz 1 | 1.644 |
| Sodium Chloride (Salt) 2 | 1.644 |
| Glass, Heavy Flint | 1.650 |
| Methylene Iodide | 1.740 |
| Ruby | 1.770 |
| Sapphire | 1.770 |
| Glass, Heaviest Flint | 1.890 |
| Crystal | 2.000 |
| Chromium Oxide | 2.705 |
| Copper Oxide | 2.705 |
| Amorphous Selenium | 2.920 |
| Iodine Crystal | 3.340 |
Advanced Transparency group (Strauss shader)
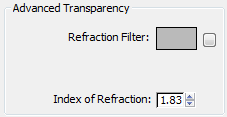
Click the color swatch to choose a Refraction Filter color. The filter, or transmissive color, is the color transmitted through transparent or semi-transparent materials such as glass.
Click the map button to assign a Fjlter Color map. This button is a shortcut: You can also assign a Filter Color map on the Maps rollout.
You can use the filter color with volumetric lighting to create effects such as colored light through a stained-glass window. Ray-traced shadows cast by transparent objects are tinted with the filter color.
Sets the index of refraction (IOR) used by refraction maps and raytracing. The IOR controls how severely the material refracts transmitted light. Left at 1.0, the IOR of air, the object behind the transparent object does not distort. At 1.5 the object behind distorts greatly, like a glass marble. At an IOR slightly less than 1.0, the object reflects along its edges, like a bubble seen from under water. Default=1.5.
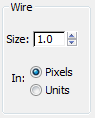
Sets the size of the wire in wireframe mode. You can set either pixels or current units.
For the Strauss shader, the Reflection Dimming group does not appear.

These controls dim reflection maps that are in shadow.
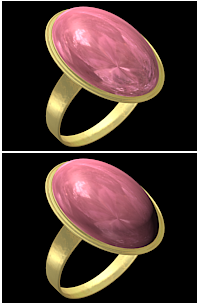
Reflection dimming
Above: None
Below: 0.0 (100% dimming)
Affects the intensity of the reflection that is not in shadow. The Reflection Level value multiplies the illumination level of the lit area of the reflection, to compensate for dimming. In most cases, the default value of 3.0 keeps the reflection in the lit area at about the same level it would appear if reflection dimming were not on.


 Material Editor