The modifier stack and its editing dialog are the keys to managing all aspects of modification. You use these tools to:
The modifier stack (or "stack" for short) is a list on the Modify panel. It contains the accumulated history of a selected object and any modifiers you have applied to it.
Internally, 3ds Max "evaluates" an object beginning at the bottom of the stack and applies changes to the object by moving sequentially to the top of the stack. You should therefore "read" the stack from bottom up to follow the sequence used by 3ds Max in displaying or rendering the final object.
Here is an example of stack entries for a capsule object (an extended primitive):
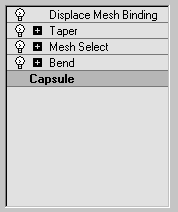
 Modifiers are preceded by a plus or minus icon if they have sub-object (or sub-modifier) levels. See Using the Stack at Sub-Object Level.
With the stack feature, no modification has to be permanent. By clicking an entry in the stack, you can go back to the point where you made that modification. You can then rework your decisions, temporarily turn off the modifier, or discard the modifier entirely by deleting it. You can also insert a new modifier in the stack at that point. The changes you make ripple upward through the stack, changing the current state of the object.
You can apply any number of modifiers to an object, including repeated applications of the same modifier. As you start applying object modifiers to an object, the modifiers "stack up" in the order they’re applied. The first modifier appears just above the object type at the bottom of the stack.
3ds Max applies modifiers in their stack order (beginning at the bottom and carrying the cumulative change upward), so a modifier's location in the stack can be critical.
The following figure shows the difference between the objects based entirely on a reversal in the stack order of two modifiers. On the left-hand tube, a Taper modifier is applied before a Bend modifier, and on the right-hand tube, the Bend is applied first.
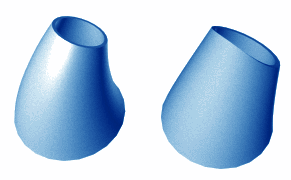
Results of reversing stack order of two modifiers
These buttons, found just below the modifier stack, help you manage the stack:
 Pin Stack
 Show End Result
 Make Unique
Makes an instanced object unique, or an instanced modifier unique to a selected object. See details in Editing the Stack. This option is also available from the Modifier Stack right-click menu.
 Remove Modifier
 Configure Modifier Sets


