The Raytrace Basic Parameters rollout for a Raytrace material controls the material's shading, color components, reflectivity or refractivity, and bumps.
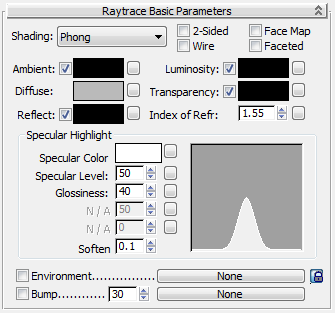
The basic parameters in this rollout are similar to the basic parameters for standard materials, but the color components of a Raytrace material behave differently.
As with standard materials, you can use maps for Raytrace color components and various other parameters. The small buttons to the right of the color swatches and parameters take you to the Material/Map Browser, where you select a map of corresponding type. These are shortcuts that also have corresponding buttons in the Maps rollout. If you have assigned a map to one of these colors, the button displays the letter M. An uppercase M means that the corresponding map is assigned and active. A lowercase m means that the map is assigned and inactive (turned off).
Chooses a shader. Depending on the shader you choose, the Specular Highlight can change to show the controls for that shader. The alternatives are:
Same as for standard materials. When on, shades and raytraces both sides of faces. By default, objects are one-sided in order to speed up rendering.
If you have a 2-sided, reflective and refractive object, and you use the raytrace map rather than the material, the raytracer runs until it hits the maximum recursion level. This can be time-consuming.
Same as for standard materials. When on, renders the material in wireframe mode. You can specify the wire size in the Extended Parameters rollout.
With pixels, wires maintains the same apparent thickness regardless of the scale of the geometry or how near or far the object is positioned. With units, the wires appear thinner at a distance and thicker at close range, as if they were modeled in the geometry.
Applies the material to the faces of the geometry. If the material is a mapped material, it requires no mapping coordinates. The map is automatically applied to each facet of the object.
Renders each face of a surface as if it were flat.
This is not the same as the ambient color for a Standard material. For a Raytrace material, this controls an ambient absorption factor: That is, how much the material absorbs ambient light. Setting Ambient to white is the same as locking the ambient and diffuse colors in a standard material. Default=black.
Click the map button to assign an Ambient Color map. This button is a shortcut: You can also assign an Ambient map on the Maps rollout.
Sets the diffuse color. This is the same as the standard diffuse color. It is the color that the object reflects, without specular reflection. Reflection and transparency effects are layered on top of the diffuse result. When Reflect is 100% (pure white), the diffuse color isn't visible. (This differs from the standard material.) Default=50% gray.
Click the map button to assign a Diffuse Color map. This button is a shortcut: You can also assign a Diffuse Color map on the Maps rollout.
Sets the specular reflection color. This is the color that the reflected environment (that is, the rest of the scene) is filtered through. The color's Value controls the amount of reflection. If your reflect color is saturated and the diffuse color is black, the effect is like colored chrome (for example, colored Christmas tree balls). Default=black (no reflection).
If raytracing is off (on the Raytracer Controls rollout), the object still reflects the environment, but ignores other objects in the scene. The environment can be the background color, the environment map, or the map in the Raytrace material's Environment component.
Click the map button to assign a Reflection map. This button is a shortcut: You can also assign a Reflection map on the Maps rollout.
Similar to the Standard material's self-illumination component, except that it does not depend on the diffuse color. You can have a blue diffuse object with red luminosity. Default=black.
Click the map button to assign a Self-Illumination map. This button is a shortcut: You can also assign a Self-Illumination map on the Maps rollout.
Similar to the standard material's filter color for transmitted light, combined with the standard material's opacity controls. This color filters scene elements that are behind the object with Raytrace material. Black is opaque, white is fully transparent, and any value in between filters objects behind the raytraced object. A fully saturated color in both the diffuse and transparency components gives the effect of tinted glass. If you want more of an opaque look, pick the color you want as a transparent color, copy it to the diffuse color, make the diffuse color fully saturated, and then adjust the transparency to get the effect you want. Default=black (no transparency).
If raytracing is turned off (in the Raytracer Controls rollout), the object still refracts the environment map, but ignores other objects in the scene.
Click the map button to assign a Filter Color map. This button is a shortcut: You can also assign a Filter Color (Transparency) map on the Maps rollout.
The index of refraction (IOR) controls how severely the material refracts transmitted light. At 1.0, the IOR of air, the object behind the transparent object does not distort. At 1.5, the object behind distorts greatly, like a glass marble. At an IOR slightly less than 1.0, the object reflects along its edges, like a bubble seen from under water. Default=1.55.
Click the map button to assign a Refraction map. This button is a shortcut: You can also assign a Refraction map on the Maps rollout.
Common IORs (assuming the camera is in air or a vacuum) are:
| Material | IOR Value |
|---|---|
| Vacuum | 1.0 (exactly) |
| Air | 1.0003 |
| Water | 1.333 |
| Glass | 1.5 to 1.7 |
| Diamond | 2.418 |
In the physical world, the IOR results from the relative speeds of light through the transparent material and the medium the eye or the camera is in. Typically this is related to the object's density, and the higher the IOR, the denser the object.
You can also use a map to control the IOR. IOR maps always interpolate between 1.0 (the IOR of air) and the setting in the IOR parameter. For example, if the IOR is set to 3.55 and you use a black-and-white Noise map to control IOR, the IORs rendered on the object will be set to values between 1.0 and 3.55. The object will appear denser than air. If, on the other hand, your IOR is set to 0.5, then the same map values will render between 0.5 and 1.0, as if the camera were under water and the object was less dense than the water.
Here are some more IOR values for various materials:
| Material | IOR Value |
|---|---|
| Carbon Dioxide, Liquid | 1.200 |
| Ice | 1.309 |
| Acetone | 1.360 |
| Ethyl Alcohol | 1.360 |
| Sugar Solution 30% | 1.380 |
| Alcohol | 1.329 |
| Flourite | 1.434 |
| Quartz, Fused | 1.460 |
| Calspar2 | 1.486 |
| Sugar Solution 80% | 1.490 |
| Glass | 1.500 |
| Glass, Zinc Crown | 1.517 |
| Glass, Crown | 1.520 |
| Sodium Chloride | 1.530 |
| Sodium Chloride (Salt) 1 | 1.544 |
| Polystyrene | 1.550 |
| Quartz 2 | 1.553 |
| Emerald | 1.570 |
| Glass, Light Flint | 1.575 |
| Lapis Lazuli | 1.610 |
| Topaz | 1.610 |
| Carbon Bisulfide | 1.630 |
| Quartz 1 | 1.644 |
| Sodium Chloride (Salt) 2 | 1.644 |
| Glass, Heavy Flint | 1.650 |
| Methylene Iodide | 1.740 |
| Ruby | 1.770 |
| Sapphire | 1.770 |
| Glass, Heaviest Flint | 1.890 |
| Crystal | 2.000 |
| Diamond | 2.418 |
| Chromium Oxide | 2.705 |
| Copper Oxide | 2.705 |
| Amorphous Selenium | 2.920 |
| Iodine Crystal | 3.340 |
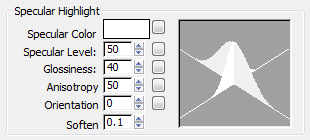
The controls in this group affect the appearance of specular highlights. Specular highlights simulate the surface of the raytraced object reflecting the lights in the scene. Changing the color or intensity of lights in the scene can change the appearance of specular highlights.
As in standard materials, as you adjust the values in this group the highlight curve at the right changes to give you an idea of the effect. The material preview in the sample slot also updates.
Sets the specular color, assuming there are white lights in the scene.
Click the color swatch to display the Color Selector and change the highlight color.
Click the map button to assign a Specular Color map. This button is a shortcut: You can also assign a Specular Color map on the Maps rollout.
The remaining controls in the Specular Highlight group depend on the active shader, as shown next to “Shading:” at the top of this rollout. These highlight controls are the same as for the Standard material shaders.
These are the highlight controls available to Raytrace materials:
Click the button to specify an Environment map that is local to t his Raytrace material. Both Reflect and Transparency use the scene-wide environment map unless you use this button to specify a different map. With this control, you can use different environment maps on a per-object basis, or provide an environment to specified objects when the scene as a whole has none.
This map overrides the scene-wide environment for both reflection and refraction. To override for refraction alone, see the Transparency Environment control in the Extended Parameters rollout.
Use the check box to turn this map on or off.
The  lock button to the right locks the Environment map to the Transparency Environment map (found on the Extended Parameters rollout). When on, the Transparency Environment map controls are disabled, and a map applied to the Raytrace Environment applies
to the Transparency Environment as well. When off, the Transparency Environment map controls are enabled, and the Transparency
Environment can have a different map assigned to it. Default=on.
lock button to the right locks the Environment map to the Transparency Environment map (found on the Extended Parameters rollout). When on, the Transparency Environment map controls are disabled, and a map applied to the Raytrace Environment applies
to the Transparency Environment as well. When off, the Transparency Environment map controls are enabled, and the Transparency
Environment can have a different map assigned to it. Default=on.
Changing this button’s setting here also changes it on the Extended Parameters rollout and the Maps rollout.
Click the button to assign a Bump map. This button is a shortcut: You can also assign a Bump map on the Maps rollout.
Use the spinner to change the bump Amount. Use the check box to toggle the map.


 Material Editor