After creating the default biped, you will often need to change the proportions of the skeleton to fit your model. Use Figure mode to change the biped structure in its rest pose.
Activating Figure mode returns the biped to its original location and orientation. With the biped in Figure mode, you can use the transform tools to change the proportions and positions of body parts. For instance, you might apply a non-uniform scale to shorten the legs or lengthen the arms.

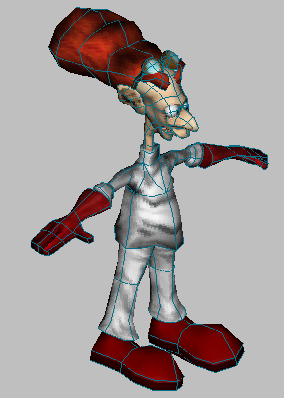
Biped proportioned to fit inside of Dr. X character geometry
You might rotate the spine objects to create the figure for a hunchback or a dinosaur. Use the move tool to change the position of the thumb or the arms. You can even apply modifiers to the biped skeleton pieces, such as using an FFD on the biped head to adjust its shape.
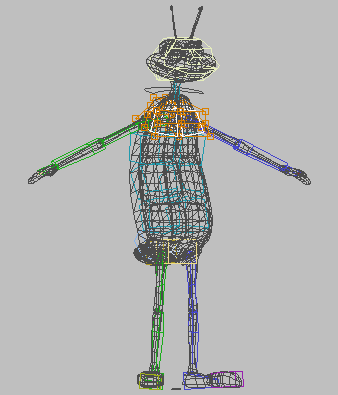
FFD Modifier used to shape spine and head
Once you have a default biped, you’ll need to match its proportions to the character’s geometry. It is quite typical to find the character’s geometry with the arms outstretched. The common workflow is to freeze the character and then in Figure mode, reposition the biped, so the center of mass is at the base of the torso. The spine objects, legs, and feet are scaled and rotated to fit within the confines of the mesh, then the arms and hands, neck and head. The tail and ponytail objects can be used for animating wings, fins, jaws, ears, horns, or hair.
Once your biped proportions are correct, you can save them in a FIG file. Because Biped saves the character in the FIG file and animation in the BIP file, you can change the character’s proportions without affecting the animation.
Bipeds don't have to appear human. You can change their elements and form to create other kinds of characters. Although you can change some initial aspects of the biped's structure in the Create panel, you use Figure mode to change all aspects of the biped's structure after its creation.
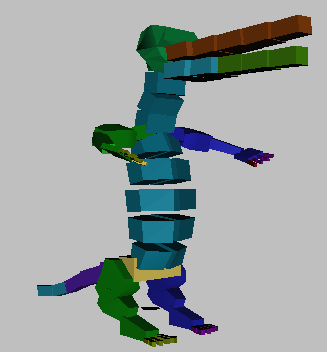
Bipeds don’t have to be human ...

or even walk on two legs.
Any number of bipeds can be in Figure mode at the same time, though you can only work on one biped at a time. When you select a biped, the Figure mode button indicates whether or not the biped is in Figure mode.
For more information on adjusting the biped’s proportions, see Scaling Links.
Working with Both Arms or Legs
As you pose your biped, there are two different methods for posing both arms or legs symmetrically.
The first method involves using Symmetrical on the Track Selection rollout to select both limbs simultaneously. With both limbs selected, you can rotate and scale the objects, and they will maintain a mirror-image relationship. You can also move the limbs, however they will not retain a symmetrical pose (with respect to the body) if you move them laterally.
The second method involves posing only one side of the biped, then copying the posture to the corresponding limbs on the other side.
 Select the biped you want to pose, and then go to the
  Motion panel.
The Motion panel doesn't show Biped controls unless the biped is selected.
 (Figure Mode).
The button turns blue to indicate a special edit mode:

The biped's pose and location change to the one last specified when the biped was in Figure mode. If the biped was just created and, therefore, was never in Figure mode before, it changes to the pose and location it had when you created it. When you turn off Figure mode, the biped returns to its animated pose and location in the scene.
To fit biped legs to the skin:
(Figure Mode).
 Scale Transform gizmo to scale the Z axis of the biped’s pelvis so the biped’s leg links are centered in each leg of the
skin.
scale the thigh links on the X axis so that they end at the knees of the skin.
scale the lower leg links on the X axis so that the biped’s ankles are level with the ankles of the skin.
scale the biped’s feet so their profile roughly matches the profile of the feet of the skin.
Scale toes or
Scale Transform gizmo to scale the Z axis of the biped’s pelvis so the biped’s leg links are centered in each leg of the
skin.
scale the thigh links on the X axis so that they end at the knees of the skin.
scale the lower leg links on the X axis so that the biped’s ankles are level with the ankles of the skin.
scale the biped’s feet so their profile roughly matches the profile of the feet of the skin.
Scale toes or  move them along their local X-axis so each toe is aligned with the corresponding toe in the skin.
The ends of the final toe links should go through the tips of the skin’s toes.
You might have to change the number of biped toes to match the number of skin toes. A biped must have at least one toe on each foot. If the skin has no toes or the character is wearing footgear, the position and number of biped toes doesn’t matter, but they should still extend beyond the skin.
To fit the spine to the skin torso:
(Figure Mode).
Select the lowest link of the spine (Bip001 Spine). Click  (Select And Move), constrain movement to the spine link’s local X-axis, and move the spine link vertically to the waist of
the skin, just below the navel.
Scale the other spine links in their local X-axis so they fit the upper part of the skin’s torso.
(Select And Move), constrain movement to the spine link’s local X-axis, and move the spine link vertically to the waist of
the skin, just below the navel.
Scale the other spine links in their local X-axis so they fit the upper part of the skin’s torso.
The neck link should begin where the skin’s neck begins.
If the torso of the skin curves, you should also rotate spine links about their local Z-axes, to align the spine with the longitudinal center of the torso.
Scale the biped’s neck along its local X-axis to match the length of the neck of the skin. The top of the last neck link
(also the base of the head link) should be where you want the head to pivot. This is usually just below the ears, centered
with the spine.
Leave the head in its default position relative to the spine and neck links.
To fit both arms using copy/paste:
(Figure Mode).
 Rotate one upper arm (R Arm1 or L Arm1) in its local Y-axis to center its link in the upper arm of the skin.
Scale the upper arm so its link ends at the elbow of the skin.
Scale the lower arm (R Arm2 or L Arm2) so its link ends at the wrist of the skin.
Rotate one upper arm (R Arm1 or L Arm1) in its local Y-axis to center its link in the upper arm of the skin.
Scale the upper arm so its link ends at the elbow of the skin.
Scale the lower arm (R Arm2 or L Arm2) so its link ends at the wrist of the skin.
If the skin’s arms are bent, rotate the lower arm to center its link as well.
Scale fingers, or move them along their local X-axis so each finger is aligned with the corresponding finger of the skin.
The ends of the final finger links should go through the tips of the skin’s fingers. You might have to change the number of biped fingers to match the number of skin fingers.
select all of it and on the Copy/Paste rollout, click  (Copy Posture).
 (Paste Posture Opposite) to pose the opposite arm.
To pose both arms simultaneously:
 Biped rollout, turn on (Figure Mode).
Select the biped's left or right hand.
Biped rollout, turn on (Figure Mode).
Select the biped's left or right hand.
 (Symmetrical).
Move, rotate, and scale the hands until you have the position and size you want. Use PAGE UP and PAGE DOWN to select different parts of the arm.
(Symmetrical).
Move, rotate, and scale the hands until you have the position and size you want. Use PAGE UP and PAGE DOWN to select different parts of the arm.
To create a symmetrical pose by copying one side of the biped to the other:
Biped rollout, turn on (Figure Mode).
Move, rotate, and scale the left arm and leg of the biped until you have the position and size you need.
Select all of the bones in the left arm and leg.
(Copy Posture).
(Paste Posture Opposite).
The right arm and leg assume the position and scale of their corresponding bones on the left.


