You can use a bitmap file or procedural map to control where specular highlights appear. A map assigned to the Glossiness material component determines which areas of the whole surface are more glossy and which areas are less glossy, depending on the intensity of colors in the map. Black pixels in the map produce full glossiness. White pixels remove glossiness completely, and intermediate values reduce the size of the highlight.
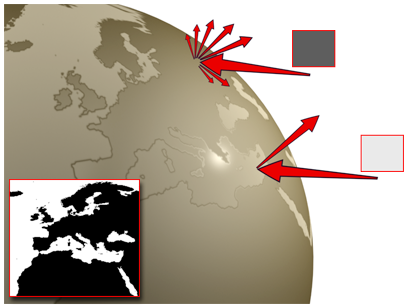
An object with a Glossiness map. The sea appears more reflective than the land.
The glossiness component is different from specular color in that glossiness affects the location of highlights, while the specular map affects the color of highlights.
The Glossiness map is usually most effective when you assign the same map to both Glossiness and Specular Level. (On the Maps rollout for a Standard or Raytrace material, you can do this by dragging from one map button to the other; in the Slate Material Editor, you can wire a single map node to both components.)
3ds Max opens the Material/Map Browser.
(If you choose Bitmap as the map type, 3ds Max opens a file dialog that lets you choose the image file.)
Alternatively, you can use the  Slate Material Editor to wire a map node to the Glossiness component.


 Material Editor