The LookAt constraint controls an object’s orientation so that it’s always looking at another object. It locks an object’s rotation so that one of its axes points toward the target object. The LookAt axis points toward the target, while the Upnode axis defines which axis points upward. If the two coincide, a flipping behavior may result. This is similar to pointing a target camera straight up.
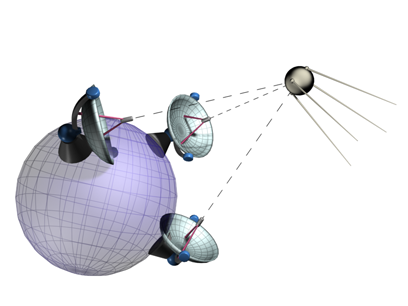
LookAt constraints enable the antenna dishes to track the satellite.
An example of a LookAt constraint’s use would be to constrain the eyeballs of a character to a point helper. The eyes will then always be aimed at the point helper. Animate the point helper, and the eyes follow. Even if you rotate the character’s head, the eyes maintain their lock on the point helper.
Multiple Targets and Weighting
A constrained object can be influenced by several target objects. When using multiple targets, each target has a weight value that defines the degree by which it influences the constrained object, relative to other targets.
Using Weight is meaningful (and available) only with multiple targets. A value of 0 means the target has no influence. Any value greater than 0 causes the target to influence the constrained object relative to other targets' Weight settings. For example, a target with a Weight value of 80 will have twice the influence of a target with a Weight value of 40.
To assign a LookAt constraint:
 Select the object you want to constrain. This is the object that will be always looking at its target.
 Constraints LookAt Constraint.
To access the LookAt constraint’s parameters through the Motion panel:
Select the LookAt Constrained object.
 Motion panel Rotation list, double-click LookAt Constraint.
The LookAt constraint parameters are located under the LookAt Constraint rollout.
Select the constrained object.
Motion panel Rotation list, double-click LookAt Constraint.
The LookAt constraint parameters are located under the LookAt Constraint rollout.
Select the constrained object.
Motion panel Rotation list, double-click LookAt Constraint.
The LookAt constraint parameters are located under the LookAt Constraint rollout.
 (Auto Key).
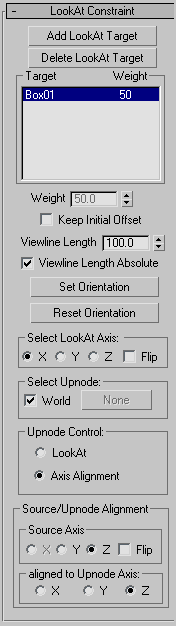
Once you assign a LookAt constraint, you can access its properties on the LookAt Constraint rollout on the Motion panel. On this rollout, you can add or delete targets, assign weighting, assign and animate target weight values, and adjust other related parameters.
Defines the length of the main viewline drawn from the pivot of the constrained object to the pivot of its target (or the average, in case of multiple targets). A negative value draws the line from the constrained object in the opposite direction of the target or targets.
With a single target, the length of the viewline is determined by the distance between the constrained object and the target, as well as the Viewline Length setting. However, if Viewline Length Absolute is on, the distance between the two has no effect on the length.
The color of the viewline is defined by the Target Line element in the Gizmos category of the Colors panel in the Customize Customize User Interface dialog.
The default Upnode is the World. Turn off World to manually select an object that defines the Upnode plane. This plane is drawn from the constrained object to the Upnode object. If the LookAt Axis and the Upnode axis coincide, the constrained object will flip. Animating the position of the upnode object will move the upnode plane.


