


An externally referenced scene, or XRef scene, appears in your current file, but is actually loaded temporarily from another MAX file. As a result, the source scene is protected from any modifications you might make to the XRef scene via the master scene. Updates or changes made to the source scenes are also updated in the master file once the changes are made and saved to the source file.
XRef scenes allow a team working on the same project to have access to each other’s work without the risk of changing the files. A designer can model a building, a second modeler might create the landscape; or one modeler might create a setting while another modeler creates a character. The animator can externally reference the setting as a scene and animate the cameras or characters in the setting without being able to make changes to the setting. If the setting file is changed, those changes will be reflected in the animator’s scene.
Objects loaded in the master file via XRef scenes cannot be selected nor modified, and do not appear in the Select From Scene dialog or Scene Explorer, the modifier stack, or the Track View. You can animate them in the current file only by using the Bind To Parent function in the XRef Scenes window.
You can snap to externally referenced scene entities. You can use Snap, AutoGrid, and Clone and Align to position local objects in context, as well as to pick objects as the target location for the clones. If you need to move, rotate or scale the referenced scene, you can bind it to a local object. Transforming the object the externally referenced scene was bound to transforms all objects in the externally referenced scene. You can also use externally referenced objects in the scene as the reference coordinate system. When you save changes to the externally referenced file (such as objects added, edited, or deleted), updating the XRef Scene inherits those changes locally.
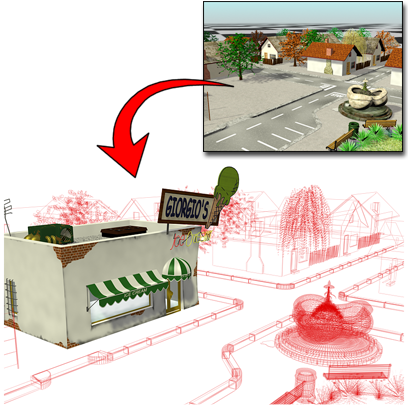
Importing the whole village model into the building model as an XRef
Radiosity solution data cannot be part of an XRef if objects have duplicate names. To solve this, change the duplicate names. Also, to reference radiosity data externally, the Save Scene Information In MAX File switch must be on in the Radiosity panel of the Preferences dialog. (It is on by default.)
Be aware that render effects are not carried into the master scene by XRef scenes. To use the render effects (such as glow or flare) from the XRef file, merge them in using the Merge buttons found in the Environment And Effects dialog.
Choosing XRef Scene displays the XRef Scenes dialog.
Overlays allow multiple scene references without the risk of creating circular dependencies. The scene XRef marked as overlay is loaded only into the master scene that references it, and is not visible in other scenes that might XRef the master file that uses the overlay. Consider two scenes that reference each other:
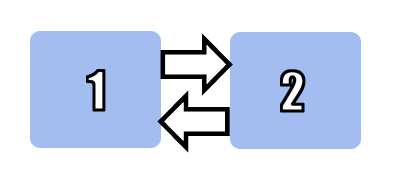
Ordinarily, 3ds Max would recognize this as a circular dependency, and disallow it. However, you can set up such a combination of XRefs by following these steps:
Scene 2 is externally referenced into scene 1, without pulling scene 1 in as a nested external reference.
The previous example is not particularly practical. But suppose you want to mask off part of your scene so other artists who XRef the scene will not see it. For example, you are working on a building and have XRefed a CAD file that lays out the plumbing of the building, as well as a scene of ground terrain that contains some XRefs to some trees. The XRef scene graph might look like this:
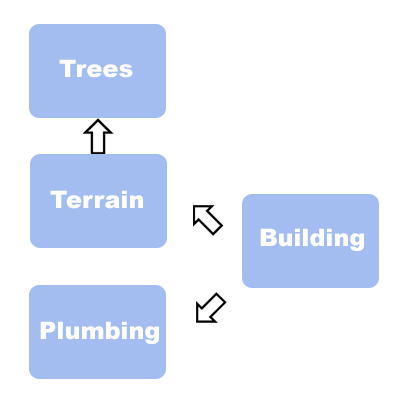
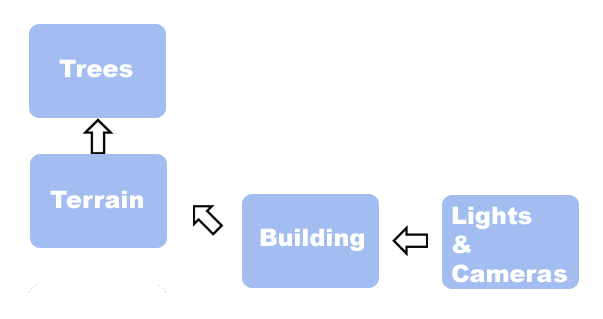
The building scene XRefs the terrain and the plumbing data. The terrain scene XRefs the trees. You decide you are the only one who needs to see the CAD plumbing data. The CAD plumbing data is needed only to line up where the sinks need to be in the building, so you set up the CAD plumbing data XRef to be an overlay. Other scenes that include the building scene won’t see the plumbing. For example, another artist who is responsible for the lighting and cameras sets up an XRef to the building scene. Now the XRef graph looks like this:
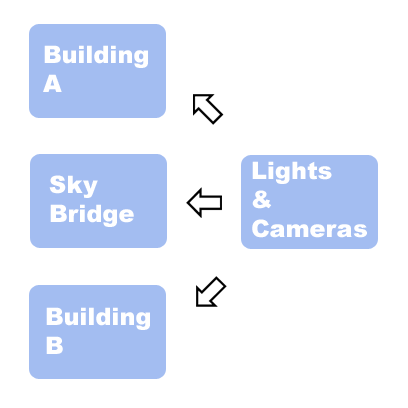
In this case, an overlay is used to simply hide data information from other master scenes. Another use of overlays is to avoid circular XRefs. For example, picture four artists working on a scene of a city block. Two of them are working on individual buildings, one is working on a sky bridge that connects the two buildings, and the fourth artist is setting up the cameras and the lights. The graph of externally referenced scenes might look like this:
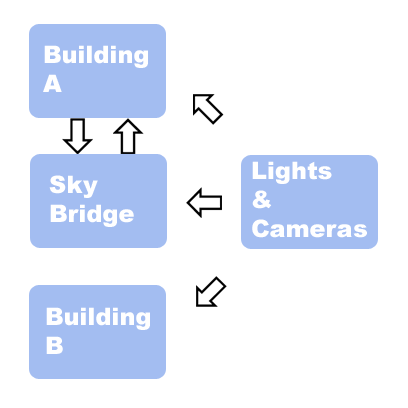
But the artists working on Building A and the artist working on the sky bridge need to see each other’s work to make sure everything lines up. The obvious solution would be to externally reference each other’s scene file:
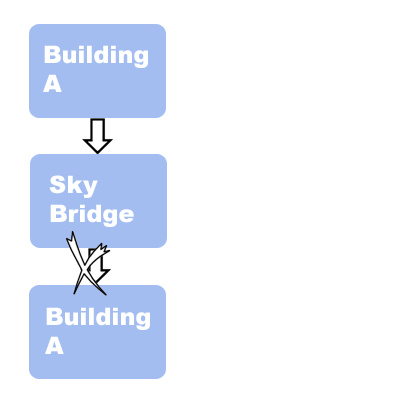
However, 3ds Max detects a circular external reference and won’t allow this, unless both the Building A scene and the Sky Bridge scene flag their external reference as an Overlay.
 Import XRef Scene.
You can add as many files as you like; each one appears in the XRef Files window.
You can affect the display of the XRef scene, making it visible or not, or making objects in the referenced scene appear as bounding boxes. You can ignore the file's lights, cameras, shapes, helpers, or animation. You can control when the file updates, either automatically or on demand. You can have the file enabled or disabled, or you can merge it, severing the XRef relationship and inserting the scene into your current file. You can bind the scene to a Parent object to reposition or animate the XRef scene.
To scale, rotate, or reposition an XRef scene:
This works best if both the parent object and the XRef scene have their pivot points positioned near the scene's origin (0,0,0).
If the XRef scene was created a large distance from the origin, you can run into a problem. As you scale the parent object, the XRef scene will move away from the center. To counteract this problem, you can create a second parent object centered over the XRef scene. Then select and link the original parent object to the centered parent object. You can then scale the centered parent object and the XRef will not move toward or away from the origin and use the original parent object to move the externally referenced scene.
An alternative method for scale problems is to use the Rescale World Units Utility on the original file.
The XRef Scenes dialog lets you add and remove XRef scenes. It also gives you tools to control the display of the XRef scene, options to ignore various components of the scene, and the ability to bind to a parent object so you can scale, rotate, or move the XRef scene.


