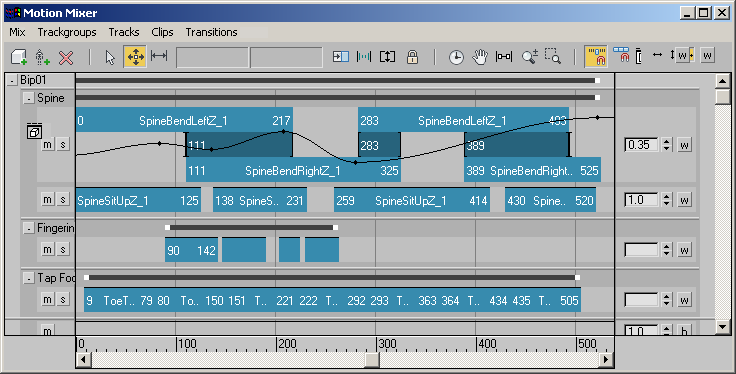
The Motion Mixer is used to mix motion clips that are assigned to bipeds and non-biped objects. The concept of the Motion Mixer is based on audio mixing done in the music and sound industries. Like an audio mixer, Motion Mixer lets you add a series of tracks for each object in a scene. To each track you add clips in the form of BIP or XAF files. You can also add transitions to smoothly link clips together. Clips and transitions can be filtered so their motion affects only specified biped parts.
The entirety of the clips, transitions and other clip settings for a single object in the Motion Mixer is called a mix. As each object has its own mix, there can be several mixes in the Motion Mixer at any given time. You can save a mix as a MIX file.
For more information and procedures describing how to use the Motion Mixer, see Using the Motion Mixer and the topics that follow it.

The Motion Mixer is normally opened as a floating window. It can also be opened in a viewport, like the Asset Browser and MAXScript Listener.
The Motion Mixer interface contains five menus located at the top of Motion Mixer window.
The topics in this section describe support dialogs for the Motion Mixer.
Like an audio mixer where you add music tracks and use fades and blends to transition between tracks, the Motion Mixer allows you to mix motion clips. The Motion Mixer toolbar offers commands that you use to add and delete biped and non-biped objects to and from the mixer, modify clips, and change the way tracks in the mixer are displayed.
By default, the Motion Mixer expects that a mix you create will affect the entire biped. If you like, you can filter a trackgroup so clips in the mix affect only selected body parts. This functionality makes it easy for you to assign one set of BIP files to control the motion of a biped's upper body, while another set controls the lower body.
By default, the Motion Mixer expects that a mix you create will affect the entire non-biped object. If you like, you can Filtering Mixer Tracks a trackgroup so clips in the mix affect only selected body parts. This functionality makes it easy for you to assign one set of XAF files to control the motion of an object's upper body, while another set controls the lower body.
The Motion Mixer window contains an editor where you manage everything that is added to the mix: bipeds, trackgroups, tracks, clips, and transitions.
The Motion Mixer Reservoir is similar to the Motion Flow Graph, in that it acts as a holding area where clips can be listed, giving you a palette of motions to choose from. As you add clips to objects in the Motion Mixer window, you see them appear on a track and they are automatically added to the Reservoir. If you add new clips directly to the Reservoir, they are available and held for future use.
The Motion Mixer Preferences dialog lets you make changes to display settings for clips, transitions and frames. It is similar to the way you can Hide By Category on the Display panel. You can also specify mixdown options from this dialog.
On this rollout, you can load and save Motion Mixer (MIX) files. A saved MIX file can be loaded onto any biped in the scene, and motions in the mix will be automatically adapted to the biped's size.