Command entry:
Rendering menu

Effects
Environment and Effects dialog
Effects panel
Add
Add Effect dialog
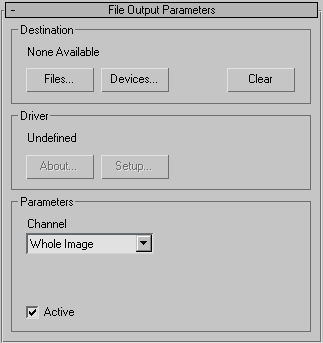
File Output
File Output allows you to take a “snapshot” of a rendering before some or all of the other Render Effects are applied, depending
on the placement of File Output in the Render Effects stack. You can save different channels such as Luminance, Depth, or
Alpha to a separate file while rendering an animation.
You can also use File Output to convert an RGB image into a different channel and send that image channel back into the Render
Effects stack. The rest of the effects can then be applied to that channel.
Interface
Destination group
- Files
-
- Devices
-
Opens a dialog so you can send the rendered output to a device such as a video recorder.
- Clear
-
Clears any file or device selected in the Destination group box.
Driver group
These buttons are available only when you choose a device as the image source.
- About
-
Provides information on the source of the image-handler software used to bring the image into 3ds Max.
- Setup
-
Displays a setup dialog specific to the plug-in. Some plug-ins may not use this button.
Parameters group
- Channel
-
Lets you choose which channel you wish to save or send back in to the Render Effects stack. Choose Whole Image, Luminance,
Depth, or Alpha to display more options in the Parameters group box.
- Affect Source Bitmap
-
When activated, this will take in an image with any effects previously applied, convert it to the channel selected, and send
it back into the stack for the rest of the effects to be applied. Your rendered image will be saved in the channel selected.
This parameter is not available to the Whole Image channel.
- Active
-
Turns the File Output feature on and off. Unlike the Active check box available in the Render Effects rollout, this check
box is animatable allowing you to save only desired portions of a rendered scene.
Depth Parameters
When Depth is selected as a channel, new parameters are available for determining what parts of the scene should be rendered
into the Depth channel image.
- Copy
-
After choosing a camera with the None button, click Copy to use the camera’s clipping planes to determine which part of the
scene should be rendered into the Depth channel image file.
- None
-
Enables you to select a camera to use for copying clipping planes. Click the none button to activate it. The None button will
turn green until a camera has been selected in the viewport. The camera’s name will then be displayed on the button instead
of None.
- Near Z
-
Specifies the beginning distance from the camera that should be used in determining where to start rendering the scene’s geometry
in the depth channel image file.
- Far Z
-
Specifies the ending distance from the camera that should be used in determining where to stop rendering the scene’s geometry
in the depth channel image file.
- Fit Entire Scene
-
Makes all other Depth parameters unavailable and will render the entire viewport’s scene geometry in the Depth channel image
file, automatically calculating the near and far Z required.