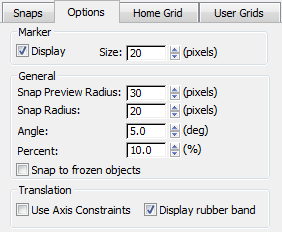
The Options panel of the Grid And Snap Settings dialog lets you set options related to snapping.
 Grids And Snaps Grid And Snap Settings.
The Snap Preview Radius setting lets you preview a snap before it actually happens. The Snap Radius setting determines when actual snapping occurs, providing the same functionality as Snap Strength in previous versions.
This procedure also demonstrates how to cycle through available snap/preview points with the keyboard shortcut.
To maximize the Perspective viewport, make sure it's active (yellow border), and then press Alt+W.
 Zoom in a bit so the grid squares are relatively large.
Snap and Snap Preview measure in pixels, so if the grid points are relatively far apart, it's easy to see the difference between Snap Preview and Snap.
 (Snaps Toggle) to turn on snapping, and then right-click the button to open the Grid And Snap Settings dialog to the Snaps
panel.
(Snaps Toggle) to turn on snapping, and then right-click the button to open the Grid And Snap Settings dialog to the Snaps
panel.
The default Snaps setting is Grid Points only; if this is not the case, make it so. A grid point is the intersection of two grid lines.
In the General group, Snap Preview Radius is set to 30 pixels and Snap Radius is set to 20 pixels. You can leave this dialog open while you use snaps.
 Create panel, click
  (Shapes), and then click Object Type rollout Line.
As you do so, a rubber-band line connects the mouse cursor to the start point.
This shows the snap preview; you'll see its purpose in the next step.
The second line vertex is created not where you clicked but at the grid point indicated by the snap preview. Snap preview lets you see where a snap will occur before it actually happens.
At the Snap Preview Radius distance (30 pixels), the snap cursor appears at the grid point.
After you move it 10 pixels closer (the difference between Snap Preview Radius and Snap Radius), the line endpoint jumps from the mouse cursor to the grid point. This is the legacy snap functionality.
zoom out so the grid points are closer together. Start another line, and then position the mouse cursor in the center of
a grid square, so the preview snap point appears at one of the grid points.
By default, 3ds Max uses the closest snap point as the preview location. This keyboard shortcut lets you choose other qualifying snap points.
Snap functionality includes several features that enhance ease of use. When using Snap, if the cursor comes within distance of a potential snap point that's less than the Snap Preview Radius distance but greater than the Snap Radius distance, the snap cursor jumps to that point as a preview of where the snap will occur, but no actual snapping occurs.
To use the preview point as the snap point, click or release the mouse button, depending on the context. If, instead, you then continue to move the cursor toward the potential snap point so that it comes within a distance equal to or less than the Snap Radius value, the snap takes place.
When the cursor is a distance from a potential snap-to point between the Snap Preview Radius value and the Snap Radius value, the snap marker jumps to the closest potential snap-to point, but no snap occurs. Default=30.
When a snap-to preview point is highlighted, release or click the mouse button (depending on the context) to snap the current selection to that location. Alternatively, before using the displayed snap point, you can cycle though any other available preview and snap points by pressing and holding Alt+Shift and then press S repeatedly.
Sets the size of the area around the cursor, in pixels, within which snapping occurs automatically. Default=20.
 Snap to Frozen Objects
When on, snapping to frozen objects is enabled. Default=off. This option is also available from the Snaps shortcut menu, accessed when you hold Shift and right-click in any viewport, as well as from the Snaps toolbar. Keyboard shortcut=Alt+F2.
 Use Axis Constraints
Constrains the selected object to move only along the axes specified on the Axis Constraints toolbar. When off (the default), the constraints are ignored, and snapped objects can be translated in any dimension (assuming 3D snapping is used).
Buttons on the Axis Constraints toolbar update interactively, depending on which portion of the gizmo or geometry you use to move the object.
This option is also available from the Snaps shortcut menu, accessed when you hold Shift and right-click in any viewport, as well as from the Snaps toolbar and the Tools menu Grids And Snaps submenu. Keyboard shortcut=Alt+F3 or Alt+D.


