On the Animation panel of the Preference Settings dialog, you set options relating to animation. Options include displaying animated objects in wireframe viewports, the assignment of sound plug-ins, and controller defaults.
To change the default transform center:
 Preferences Preference Settings dialog Animation tab.
This changes the default and activates all the transform center buttons. You can now move about the selection, coordinate center, or local pivot.
To set the key bracket display:
Preferences Preference Settings dialog Animation tab.
To specify default controller settings:
Preferences Preference Settings dialog Animation tab.
The Set Controller Defaults dialog appears.
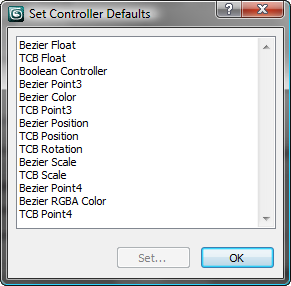
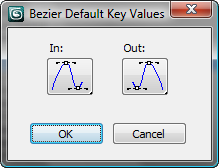
A dialog containing the default settings supported by the selected controller type appears in, for example, the In and Out tangents for a Bezier controller.
Once you click OK in the Set Controller Defaults dialog, the controller defaults are changed.
Changes to the controller default settings are written to your 3dsmax.ini file and become the defaults for all newly assigned controllers and all new scenes.
If you decide that you want to revert to the original 3ds Max defaults for all controllers, you can click Restore To Factory Settings.

When you move to a frame, 3ds Max displays white brackets around objects that have transform keys at that frame, including cameras and lights.
Displays brackets only on those frames containing keys for the active transform tool (Move, Rotate, or Scale).
If no transform tool is active, brackets appear in frames containing any of the three transforms.
To define which types of transform display brackets, turn off Use Current Transform and use the Position/Rotation/Scale switches (see following) .
Locks the center method to local. Turn off if you want to animate around a non-local center such as world or selection.
MIDI Time Slider Control group
Enables use of a MIDI device to control the time slider. Choose On to use the MIDI device specified in the MIDI Time Slider Control Setup dialog, which is displayed with the Setup button.
Sets the default values for animation controllers capable of supporting default settings. For example, set the default values for tension, continuity and bias in the TCB float controller.
When on, new parametric controllers are active throughout the timeline, independent of their animation range. Otherwise, they respect it and are only active within their range. Refer to Ignore Animation Range and Respect Animation Range for more details. Default=on.
When Auto Key Default Frame is on, this setting specifies the start frame at which 3ds Max sets a key when you use Auto Key to set a key at a frame other than the start of the animation.
The available settings are 0 and 1. When you set the default frame to 1, 3ds Max uses the equivalent in the current time display system, set via the Time Display setting on the Time Configuration dialog. For instance, if Time Display is set to MM:SS:TICKS, the equivalent to frame 1 is 0:0:160.
With the MIDI Time Slider Control Setup dialog you can specify and set up a MIDI device to control animation playback.


