Cloth is an advanced cloth-simulation engine that lets you create realistic garments for your characters and other creations. Cloth is designed to work in concert with the modeling tools in 3ds Max and can turn just about any 3D object into clothing; it also allows you to build garments from scratch.
Before you begin working with Cloth, we recommend that you read this overview. It provides background information on cloth-simulation technology, so you can begin to grasp exactly the way Cloth works. It will give you a better overall understanding of how to set up Cloth scenes, the way the cloth behaves, and the array of advanced controls you will have at your disposal.
As an artist and creator, you can use this knowledge to tailor (no pun intended) how Cloth will affect and interact with your scenes, and how you can best take advantage of this software.
Cloth simulation is the process of replicating the movement and deformation of a piece of fabric or clothing to mimic how cloth would react in the real world. To make cloth simulation work, first you need a cloth object, such as a tablecloth or a pair of pants. Next, you need something for the fabric to interact with. This can be a collision object such as a table top or character’s leg, or a force such as wind or gravity.
While Cloth is designed to help you create clothing for your models, you should be aware that, by its very nature, cloth simulation is only an approximation of how real fabric would react under certain circumstances; this system does have some limitations.
One of the most important aspects of working with Cloth is the amount of time it can take to create a simulation. If you're looking to create a fully physically correct simulation, you might run into problems. Even with a fast computer, cloth dynamics at that level of accuracy (and geometric detail) could take virtually forever. So you must learn to scale your simulations back to a reasonable level. This doesn't mean you can't get believable clothing; it simply means that there are tradeoffs you should be willing to make.
In order to create a believable simulation, you need to balance time against quality and accuracy. The more time you have, the more accuracy and quality your simulation can have. There's no reason to make a model with 10,000 polygons if you can define the form equally well with 3,000. The same rule applies to cloth simulations.
When simulating cloth, different forces come into play. Some internal forces like bend, stretch, and shear allow the fabric to deform in a realistic manner. External forces such as gravity, wind, and collisions make the cloth interact with its environment. To obtain a good-looking simulation, most or all of these things need to come into play. Without these forces, a piece of cloth will remain a flat, lifeless plane.
When putting a shirt or pair of pants on a character, you don't want any part of the body to protrude through the fabric. The desired result is to have the garment deform around the mesh (rather than through it) so there are no intersections. This is done with collision detection; with Cloth, you tell the simulation system which objects will act as cloth, and which ones will act as collision objects.
Basically, virtual feelers are sent out from the vertices of the cloth objects to see if there are any other objects that they might collide with. When one of the feelers hits something, the simulation knows that it must deform the fabric. It is important to remember that a cloth mesh with more vertices has more feelers and can do a better job of collision detection. This is critical, because if you are working with a high-poly character (collision object), you will need to increase the density of your cloth, or the high-poly mesh will protrude through the lower-poly cloth object. The reason is that there aren't enough feelers to detect all of the detail in the collision object.
The alternative to this is to add one or more low-polygon proxy meshes for the character so there doesn't need to be such high density cloth objects that will slow down simulation. We'll cover the mesh density a bit more in the next section.
Lastly, if you are simulating with fast-moving cloth objects, you might need to increase the Density value to give you the benefit of more feelers. You also might adjust the Step size to check more often for collision objects in the way.
Clothing and Pattern Design Overview
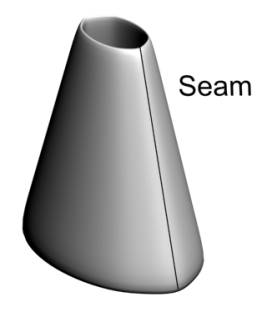
Traditionally, sewing patterns are cut from flat pieces of cloth and stitched together. The place where one piece of cloth is sewn to another is called a seam. Patterns are generally symmetrical, where the left side of the garment matches the right.
The simplest is a skirt pattern with two pieces, with a similar shape for the front and back. The back shape is a little larger than the front to account for the hips and buttocks.

The shapes are sewn together at the sides to form a simple skirt.
The bottom edge of a garment is called a hem. In the skirt pattern, the waistline and hem are slightly curved. When a person puts on the skirt, the curve sits flat on the waist, while the skirt falls in folds to the hem. Because both the waistline and hem are curved, the skirt falls to the same length all the way around.
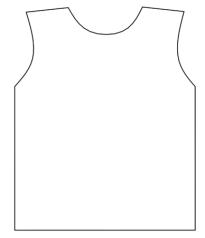
A shirt pattern is slightly more complicated. A simple T-shirt pattern is made of two pieces, one for the front and another for the back. The collar on the back piece is higher than the collar on the front. You sew seams up the sides and at the shoulders, leaving the arm hole open.
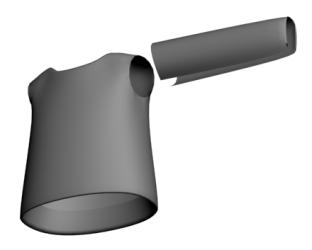
You can also add sleeves to the shirt. A sleeve pattern is bell-shaped.
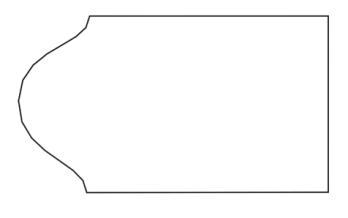
It might not be immediately obvious how this pattern turns into a sleeve. The large hump of the bell fits over the shoulder, to give room for it to move.
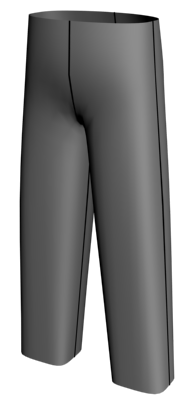
A pants pattern has a curved shape at the top to accommodate the hips. The longer straight edge is the outside seam, while the shorter edge is the inseam. The curve near the top fits around the belly or buttocks, and under the crotch area.
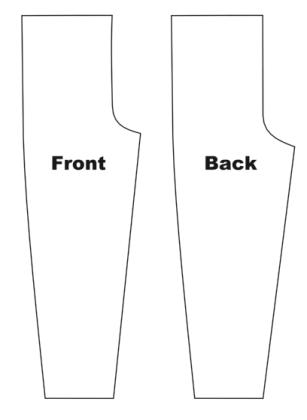
Each piece is cut twice. The two front pieces are sewn together along the crotch, and the two back pieces are sewn together in the same way. Then the front is attached to the back at the outside seams and inseams.
Darts are diamond-shaped holes inside a panel or V-shaped cutouts at an edge of a garment panel (see figure below), which when closed up cause the garment to assume a curved shape.
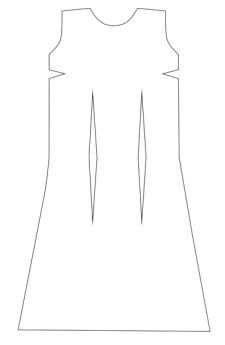
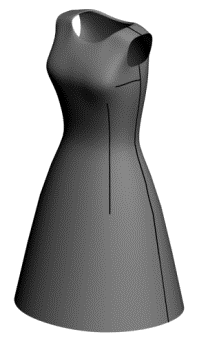
Darts used to be a common part of women's everyday clothing, especially in blouses and dresses. However, darts are not needed with loose garments or stretchy clothing. Today, they are used mostly in formal wear and tailored garments.
Clothing Design and Techniques
One way to create clothing is to lay out a pattern and put it together with Garment Maker. Garment Maker is a modifier that is used to make seams, lay out cloth panels and define fabric densities. You can use Garment Maker to create seams for the pattern either in a traditional, flat layout or in a visual, easy-to-use 3D layout.
In the real world, clothes are made by cutting out shapes from pieces of cloth and sewing them together along seams with thread. Garment Maker emulates this approach. First you must create a pattern that will define the shapes of the panels. Clothing patterns typically use shapes that we don't encounter in everyday life. Those of us who aren't an experienced clothing designers might have a hard time creating these shapes from scratch. It's often best to start out with a pattern made by somebody else. Cloth includes a variety of patterns for shirts, pants, jackets and so forth. You can also buy software that will generate these patterns in DXF format.
One program that does this is PatternMaker, available from http://www.patternmaker.com. When you want to move beyond editing the patterns included with Cloth, it's often helpful to use such applications to help create patterns and familiarize yourself with the process .

Shirt pattern and shirt sewn together with Garment Maker
Garment Maker is a useful tool for putting together patterns and adjusting seams, but you can also achieve good results by modeling with the standard 3ds Max tools and using Cloth on top of these meshes. You can create clothing with polygons, patches, or NURBS.
When designing clothing, Garment Maker is usually the best way to go. It lets you define seams, seam strength, pleats, and other clothing parameters that cannot be defined with clothing modeled via other methods. Either methods lets you define separate portions of your clothing with different fabrics, but Garment Maker gives you greater control over this. The advantage to using modeled clothing is that it can sometimes be a faster setup with familiar methods and it’s a great way to repurpose older clothing models you have made in the past. Using polygon-modeled clothing can result in overly regular creases and folds. Garment Maker uses a Delaunay mesh, which tends to avoid this problem. However, the irregular triangulation can result in rendering artifacts for low-resolution clothes, so it is advisable to apply the HSDS modifier after Cloth on garments created with Garment Maker and subdivide all the triangles once.
Cloth exists within 3ds Max as a pair of modifiers: Garment Maker and Cloth. Between these two, you can turn just about any 3D object into a cloth object, or you can create clothing in a more traditional method from 2D patterns, and then sew the panels together. However, before getting into the specifics of the two modifiers, it's useful to discuss how to preplan for using Cloth. This includes how geometry affects Cloth behavior as well as the density of the meshes you use as fabric.
Ideally, the way you model your cloth should not affect how it behaves. However, in practice, the nature of the cloth geometry impacts the simulation. First of all, the density of the mesh defines how fine the folds are that can develop. If you create a plane with only nine vertices, when you drape it over a sphere, you are obviously not going to get much detailed folding.
In addition to this aspect, there is the nature of the edges in the mesh. Folding can occur only at edges between triangles, so the regularity or irregularity of the mesh also dictates the resulting deformation. For example, a plane all of whose triangle hypotenuse edges are aligned will result in a cloth with folds aligned along those edges. Garment Maker creates meshes with an irregular layout (but with fairly equal-sized and close-to-equilateral triangles) that avoids this folding bias. However, this can also result in rendering artifacts with low-resolution cloths, so it is advisable to apply the HSDS modifier after Cloth on garments created with Garment Maker and subdivide all the triangles once.
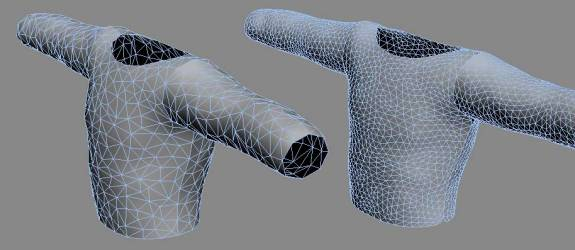
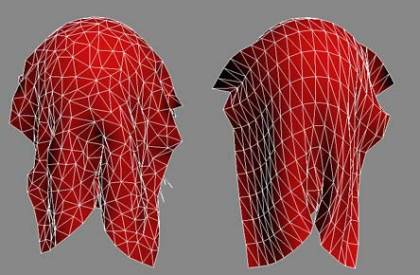
Left: A low-density shirt.
Right: The same shirt with HSDS applied, above Cloth in the modifier stack
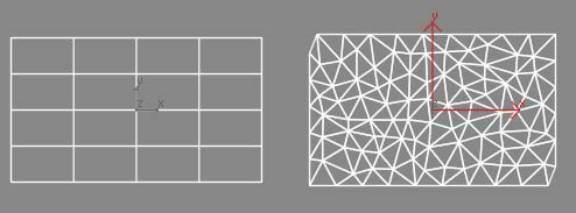
The type of geometry you work with can have a great impact on how the cloth will react. You're probably accustomed to using triangular and quadrilateral polygons for modeling. Garment Maker uses a Delaunay mesh subdivision that promotes non-uniform deformation. When using quad polygons for cloth simulation be careful of getting uniform or symmetrical results.
It is important to think about how dense your mesh has to be to achieve the result you want. Making the mesh too dense will slow down the system, while having your mesh at too low resolution might not give you the folds or detail you want to see.
For example, if you applied a Bend modifier to a cylinder with only a few height segments, the result would be angular and unsmooth. On the other hand, if you created the cylinder with 1,000 height segments, you'd be wasting resources. The same is true for Cloth. You must find a balance between level of detail and performance that is appropriate for your scene.

Low, medium, and high-density meshes and the way they deform
Using the HSDS modifier to add detail to your model can be an effective solution that lets you simulate with a lower resolution mesh, and still get high-quality results. However, if you choose to use the HSDS modifier on top of your Cloth garments, you may want to apply an Edit Mesh modifier below it to weld the vertices together along the seams. This prevents the mesh from coming apart at the seams as it is subdivided.
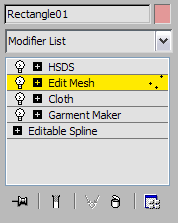
Shown above is how the modifier stack should look when using HSDS. The intermediate Edit Mesh modifier is used to weld the panel edge vertices together. If you want to preserve the seam creases, you should apply further Mesh Select and Smooth modifiers to reselect the panels and apply different smoothing groups across the garment.
Below is a list of traditional pattern-making software that you can use to create patterns for import into 3ds Max and use with Cloth. After ensuring that your Internet connection is active, click the software names to display the makers' Web sites.