


 Command entry:Particle View
 Click Speed By Icon in an event or add a Speed By Icon operator to the particle system and then select it.
The Speed By Icon operator lets you use a special, non-rendering icon to control particle speed and direction.
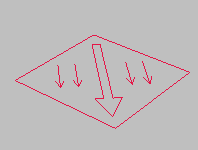
Speed By Icon operator icon
When you add a Speed By Icon operator to the particle system in Particle View, the Speed By Icon operator icon icon, or helper, appears in the scene at the world origin (0,0,0). When animated, the operator icon's motion is imparted to the particles. If you delete the icon, Particle Flow also deletes the operator.
To use the Speed By Icon operator:
The Speed By Icon operator icon appears at the world origin (0,0,0).
The particles' motion is now under the influence of the animated icon.
In general, the default Icon Animation Sync By setting, Event Duration, works best. It causes the icon animation to be applied to the particles within the time
frame of the event containing the Speed By Icon operator.
Example: To send particles along a path:
 Create panel, click
  Shapes. Choose Splines, then on the Object Type rollout, click Helix. In the Perspective viewport, at the center of the grid,
create a helix shape. Then, on the Parameters rollout, set the following:
Shapes. Choose Splines, then on the Object Type rollout, click Helix. In the Perspective viewport, at the center of the grid,
create a helix shape. Then, on the Parameters rollout, set the following:  Move and
  rotate the Particle Flow source icon so that it's at the start of the helical path, and aimed along the path, as shown. Get
the base of the arrow as close as possible to the start of the path.
rotate the Particle Flow source icon so that it's at the start of the helical path, and aimed along the path, as shown. Get
the base of the arrow as close as possible to the start of the path. 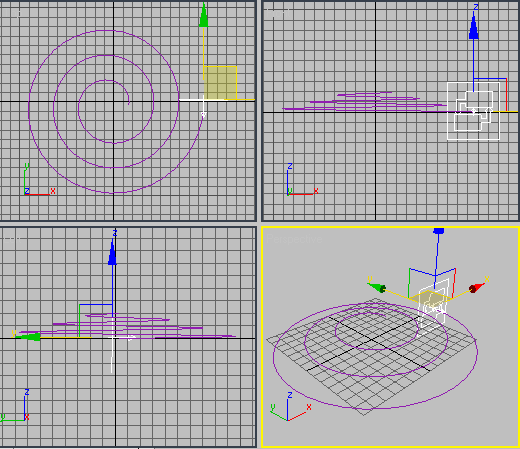 Path Constraint.
When you move the mouse cursor into the viewport, a rubber-band line joins the cursor to the icon.
The command panel switches to the  Motion tab, and the controls indicate that 3ds Max has applied a Position List controller to the icon, with the listed controllers being a Position XYZ and a Path Constraint.
You can delete the former if you like, but it doesn't make any difference for the purposes of this procedure.
Motion tab, and the controls indicate that 3ds Max has applied a Position List controller to the icon, with the listed controllers being a Position XYZ and a Path Constraint.
You can delete the former if you like, but it doesn't make any difference for the purposes of this procedure.
The particles follow the path fairly closely, but diverge noticeably at the end of the path, where the turns are tightest. Correcting divergence in tight turns typically requires an increase in the acceleration limit.
The particle stream diverges from the path at its endpoint.
This will let you see the results of changing the Speed By Icon parameters as you make the changes.
 Modify panel. If necessary, select the Speed By Icon operator icon.
The operator parameters appear on the Modify panel. This is the case with any action that uses a unique icon, and lets you adjust the parameters without using Particle View.
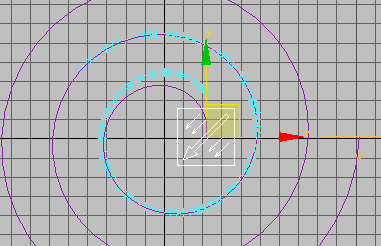
As you approach a value of 150, the end of the particle path comes closer and closer to the Helix. You shouldn't see much change above 150.
The endpoints now coincide.
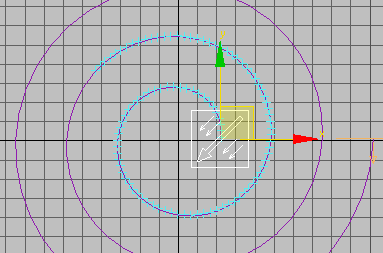
The particle path remains similar to that of the Helix for the entire duration of the animation. With other setups, you might need to use different values for Influence %, and for paths with tight twists and turns, you might need to increase Accel Limit as well.
You might be wondering why you didn't simply replace the default Speed operator with the Speed By Icon operator. To see why not, try this:
The entire particle path is offset from the Helix, so it's difficult to tell how closely it follows the latter's curves.
It's not easy. You get more reliable results using the Speed operator to set the initial speed, and then Speed By Icon to set the particle path.
To use the Use Icon Orientation option:
The Use Icon Orientation option applies arc-like motion to the particles based on rotation animation of the icon. To best understand how it works, it's necessary to isolate its influence by eliminating any potentially conflicting factors.
The Speed By Icon operator icon appears at the world origin.
 , and rotate the icon 180 degrees about the X axis.
 .
.
The particles aren't affected by the icon animation.
Because the Speed By Icon operator icon is selected, the operator's parameters appear on the Modify panel.
Modify panel, turn on Use Icon Orientation. Drag the time slider again.
This time, the particles move in unison with the icon rotation, as if they were glued to an infinite plane coincident with the icon.
moving and rotating the two icons, playing the animation each time you make a change. Also set Emit Stop back to 30.
As you can see, the possibilities with just this simple setup are myriad. In combination with the many other variables and options in Particle Flow, they're endless.
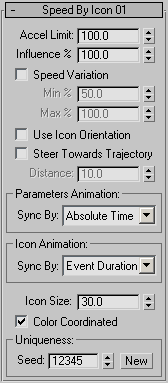
The user interface appears in the parameters panel, on the right side of the Particle View dialog. When the icon is selected, the parameters also appear on the Modify panel.
Determines the mix of the previous speed with the speed of the operator icon. Default=100.0. Range=0.0 to 100.0.
At the default value of 100, the speed is controlled only by that of the icon. At 0, the icon speed doesn't affect particle speed at all. At in-between values, the mix proportion is determined by the Influence % value.
Enables random variation of the particles' speed, so they don't all move at exactly the same rate as the icon. Turn this on, and then set the minimum and maximum percentages of variation. Default=off.
Using Speed Variation can help keep the particles from bunching up as they travel along the animation path. Note, however, that each individual particle's speed doesn't vary; it travels at a constant speed.
Applies animation of the icon's orientation to the particles.
By default, Speed By Icon controls particle motion only by animation of the icon's position. If you turn on Use Icon Orientation, Particle Flow also applies rotation of the icon to the particle motion. In essence, this motion is circular, and its extent depends on the distance between each particle and the icon. Default=off.
The best way to understand how this works is by using it. To try out Use Icon Orientation, see this procedure.
If you animate the operator settings, Particle Flow can begin applying this animation to all particles as of the start frame of the animation or the first frame of the current event, or to each particle based on its age. For instance, if you set Sync By to Particle Age, and set Speed Variation keys at frames 0 and 30, then Particle Flow will animate the speed variation for each particle born while the event is active between its birth and its 30th frame of existence. Alternatively, if you set Sync By to Absolute Time, the speed variation is animated from frame 0 to frame 30 of the animation, even if no particles are in the event at that time. Or, if you set Sync By to Event Duration, the speed variation animation is applied to each particle as of the time that it enters the event. For further information, see Animation Offset Keying group.
Choose the time frame for applying animated parameters:
Particle Flow can begin applying animation of the Speed By Icon operator icon to all particles as of the start frame of the animation or the first frame of the current event, or to each particle based on its age. For an explanation, see Animation Offset Keying group.
Choose the time frame for applying animation of the icon to the particles:
 (Helpers)