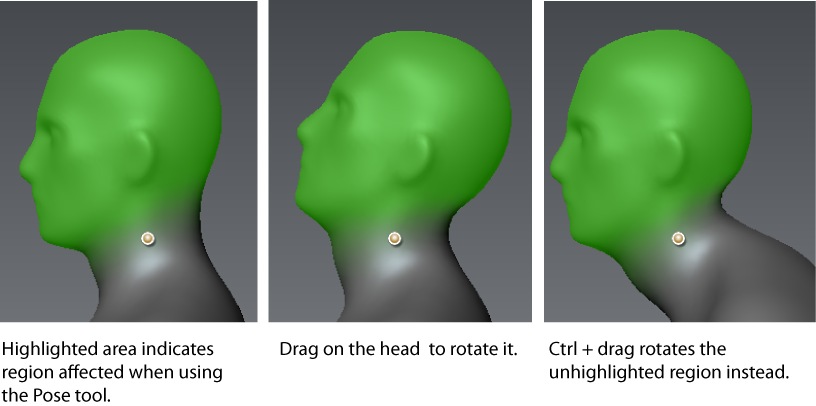
The tool rotates, translates, or scales the regions of a model associated with a joint. Any region that displays weight color
when the joint is selected will be affected. The saturation of the green color weighted region indicates how much it is affected
by joint. You can modify the region of influence for a joint using the tool (see Adjust a joints region of influence).
- Using the camera navigation tools, adjust the view of the model so the component you want to pose or deform initially appears
planar to the pivot translations you plan to make. The pose transformations use the camera view as a plane of reference.
NoteYou can use the tool from any camera angle within the Keep in mind that by default deformations occur either planar or perpendicular to the view in relation to the joint. You can
set the to an orthographic camera view (front, side, top, and so on) when posing if you prefer. Joints remain visible regardless
of the camera view while any of the pose tools are selected.
- In the tray, select the tool.
- If the model has multiple joints, click to select the joint you want to pose.
- Click-drag on the model component or the joint, keeping in mind that the stylus/mouse button controls the deformation that
occurs in relation to the joint as follows:
| To:
|
Action/Results
|
| Rotate the model components associated with a joint
|
Click-drag the weighted region to rotate the component about a rotational axis that is normal to the current camera view. Click-drag left and right on the joint to rotate the component about a rotational axis that runs vertically through the joint
and is planar to the current camera view.
Click-drag up and down on the joint to rotate the model component about an axis that runs horizontally through the joint and
planar to the current camera view.
|
| Move the model components associated with a joint
|
Middle-drag the weighted region to move the model component in a direction that is planar to the camera view.
|
| Scale the model components associated with a joint
|
Middle-drag the joint to scale the model component relative to the joint. The component is scaled non-uniformly depending
on the direction you drag.
To scale the model component uniformly, press Shift and middle-drag.
|
| To transform model components not within the weighted region selection.
|
Press Ctrl and click-drag with any button to perform any of the above transformation operations on un-highlighted components
of the model after the joint is selected.
|
- To immediately undo a deformation, select (Hotkey: Ctrl + Z)
NoteIf a component doesn’t deform as you expect, adjust the joint’s region of influence using the tool, adjust the pivot location, or touch up the model using the sculpt tools as required. When you use the tool immediately after a joint transformation, the vertex positions update based on the weight changes. This makes it easy
to assign the correct weights if you don’t get the expected deformation.
Pose multiple objects
You can pose multiple objects at the same time using the tool. To do this, you must ensure the multiple objects are associated with the same joint by painting weight color on them.
For example, if you want to pose a sphere held in a character’s hand, and ensure the sphere is transformed along with the
arm as part of the pose, you must ensure the sphere has weighting color applied to it similar to the arm.
- Create a joint for the item to be posed.
For the above example, create a joint for the elbow. The lower arm and hand will have full weighting applied to them.
- With the joint still selected, select the tool and apply weight color to the sphere, ensuring the color covers all vertices on it. This will ensure no stray vertices
remain behind when the arm is posed.
- Select the tool and click the arm joint to pose it.
The weighting color appears on the arm and the sphere.
- After adjusting the camera to the desired position, click on the joint, or weighted component (in this example, the lower
arm, hand, or sphere) to pose the items in unison.
The sphere moves in combination with the other components as the arm is posed.
Committed and uncommitted poses
When you first pose a component, the pose state is referred to as uncommitted. This means you can continue to adjust the pose,
or switch to the tool to adjust the weighting, and the model still updates to reflect those changes.
When you select the tool, or any sculpt or paint tool, Mudbox assumes you are finished with the pose, and the pose state is referred to as committed.
At this point, further updates using the tool will not be updated in real time until you select the tool and joint again.
 Except where otherwise noted, this work is licensed under a Creative Commons Attribution-NonCommercial-ShareAlike 3.0 Unported License