This menu item lets you bind geometry to any transform node or hierarchy of nodes such as an empty group node or a locator. For example, you can create a deformation effect by binding a polygonal mesh to locator nodes that are connected to the CVs of a spline curve.
Using the Smooth Bind Options, you can limit the number of joints that influence nearby skin points and limit the range of influence for joints.
See also Bind smooth skin.

Opens the Smooth Bind Options, letting you set the following options.
Specifies that the selected deformable geometry is bound to the entire hierarchy of the selected joint or non-joint transform node, from the top node down through the entire node hierarchy. If there are any joints in the node hierarchy, they are also included in the bind. With this option, you can bind entire pieces of geometry to nodes like groups or locators.
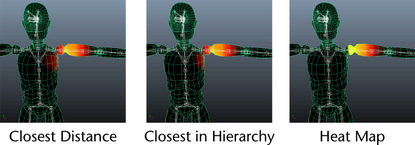
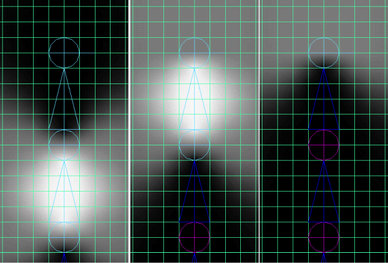
Specifies how joints influence nearby skin points during initial skinning. See also Bind methods for smooth skinning. Select from the following options:
Uses a heat diffusion technique to distribute influence weights. Initial weights are set based on each influence object inside the mesh acting as a heat source, emitting weight values onto the surrounding mesh. Higher (hotter) weight values occur closest to the joint, and dissipate to lower (cooler) values as you move away from the object.
The following image compares the default weights assigned for a character's left arm joint using the three different bind methods.
Specify which skinning method you want to use for the selected deformable object. See also Smooth skinning methods for more information.
Sets the object to use classic linear skinning. Use this mode if you want basic smooth skin deformation effects, the same as in previous versions of Maya. This mode allows some volume shrinking and collapse deformation effects to occur.
When a mesh is set to linear skinning, it can lose volume in areas where it is influenced by a joint that is twisting on its axis.
Sets the object to use a blend of classic linear and dual quaternion skinning, based on a per-vertex weight map that you paint. See Blend smooth skinning methods.
When on, Maya normalizes skin weight values as you add or remove influences, and as you paint skin weights. (This is the default.)
As you work, Maya adds or removes weights from other influences in order to make the total weights on all influences add up to 1.0. You can view the exact weights used for deformation on the skinCluster node weightList attribute.
For example, if you change a weight from 1.0 to 0.5, Maya distributes the remaining 0.5 amongst neighboring influences. This mode replicates the normalization process in previous versions of Maya.
Use the Weight Distribution setting to determine how Maya creates new weights during normalization, if necessary.
When on, Maya calculates normalized skin weight values as you deform the mesh, preventing any odd or incorrect deformation. No normalized weight values are stored on the mesh, which lets you continue painting weights or adjusting interactive bind manipulators without having the normalization process change your previous skin weighting work.
Selecting this mode lets you paint or change weights without affecting the weights for other influences, and still have the skin normalization occur when you deform the mesh.
Since Maya calculates the normalized weight values dynamically at deformation time, you cannot view the normalized values on the skinCluster node weightList attribute. Your mesh will deform with normalized values, but the actual weight values on your skinCluster node may add up to more or less than 1.
If you use interactive skin binding, this mode is automatically selected for you. (See Interactive bind for smooth skinning.) As a result, for interactive binding, weights are not normalized until you deform the mesh.
For more information on skin weight normalization, see Smooth skin weight normalization and Set normalization mode and normalize weights.
Available only when Normalize Weights mode is set to Interactive.
When you paint weights with Interactive normalization mode, Maya re-normalizes weight values after each stroke, scaling the available weights (those that already have some value and are not locked), so that the vertex weights still add up to 1.0. When possible, weights are scaled based on their existing value.
In situations where all other unlocked, available weights are zero, this setting lets you determine how Maya creates new weights during normalization.
Lets you set whether you want to allow multiple bind poses per skeleton. This option can be useful if you are binding multiple pieces of geometry to the same skeleton.
When on, you can bind the separate pieces using different bind poses for each. When off, you must bind all pieces of geometry with the skeleton in the same bind pose.
When on, your smooth skinned geometry cannot have, at any time, a number of influences greater than that specified by Max Influences.
For example, if Max Influences is set to 3, and you paint or set weights for a fourth joint, one of the weights of the other three joints is set to 0 to maintain the total number of weighted influences specified by Max Influences.
This limits the redistribution of weights to a specific number of influences, and ensures that the primary joints are the ones that receive the weights.
The influence each joint has on a particular point varies with the distance between the skin point and the joint.
This option lets you specify how rapidly the influence of each joint on skin points decreases with the distance from the joint (and the joint’s bone). The greater the Dropoff Rate, the more rapid the decrease in influence. The lower the Dropoff Rate, the further the influence of each joint. Use the slider to specify values between 0.1 and 10. You can enter values up to 100, but values between 0.1 and 10 are ideal for most situations. The default is 4, which provides good deformation effects for most characters.
After binding skin, you can use the Paint Skin Weights Tool to edit the influence of joints in an intuitive manner. For more information, see Painting smooth skin point weights.
When on, weighted influences that would receive a zero weighting are not included in the bind. This option is useful when you want to reduce the number of calculations for your scene to increase playback speed.
When on, bound skeletons and their skin vertices are colorized so that vertices appear the same color as the joints and bones that influence them.
You can change the colors of individual joints and bones from the Display > Wireframe Color window.
Controls the dropoff of weights around the selected joints when you select the Heatmap method of smooth skinning. This can help to reduce the amount of small weights spread across the mesh during heat map binding.
By default, Heatmap falloff is set to 0.68, which provides a better overall weighting. A value closer to 0 produces smooth results but can let small weights spread far across the mesh surface. A value closer to 1 produces a sharper falloff, which keeps weights closer to the influence object, limiting the spread of small weights.
 Except where otherwise noted, this work is licensed under a Creative Commons Attribution-NonCommercial-ShareAlike 3.0 Unported License


